


- Introduction
- The problem: Prop Drilling
- The Solution: An introduction to the Context API
- What is the React Context API?
- Getting Started: How to use React Context API
- Use Cases: When should you use React context?
- React Context Caveats
- Redux vs. React Context API: Is the React Context API deprecated?
- Conclusion
Introduction
More often than not, building React applications involves consuming data of different forms for our use. Primarily, data management in React applications is via props; and sometimes, that’s just all we need.
However, as our application grows larger and larger and the amount of data to consume or collect in our application grows, things get a little more complex, and there is a need to look for more efficient methods of consuming data within our app.
React provides a solution to this data management problem. The React Context Hook.
This article explains the drawbacks of managing data via props alone, React Context and how it addresses these drawbacks, the useContext() hook and its uses, as well as its caveats.
The article requires that you are familiar at least with;
- Functional React, i.e. React v16.8+,
- basic knowledge of React hooks, and
- data management with props.
The problem: Prop Drilling
As a developer, you might be familiar with the term prop drilling. Or not.
State, by convention, should be held by the top-level component in the stack that requires access to the state. This phenomenon is referred to as “Lifting state up“.
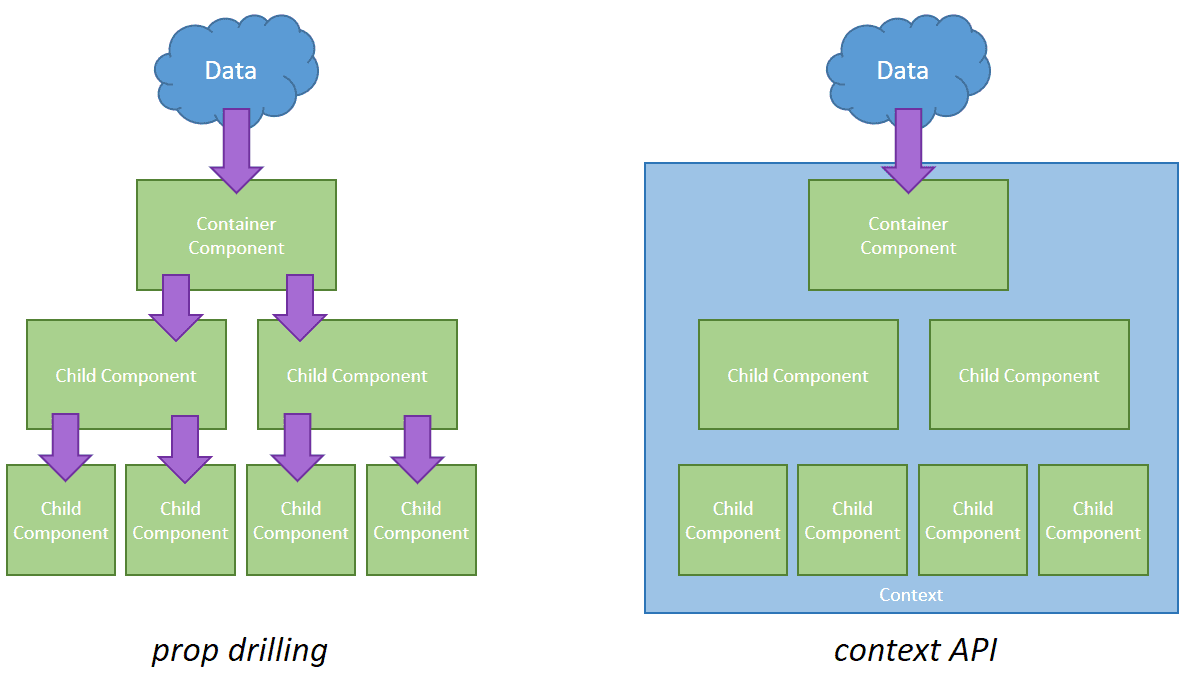
Before the advent of the React Context API, state management was mainly by props. Props were used to transmit data from the top-level component on our component tree to children and even grandchildren components. However, a problem arises when our application becomes larger and more complex, and our component tree starts to grow in size and depth. State management via props soon becomes inefficient, and we shall soon see why. A great place to start might be by defining the term prop drilling.
What is Prop Drilling?
Prop drilling is a technique of delivering data to a deeply nested component by passing it through a number of nested children components. In simpler terms, prop drilling is a technique of passing data through multiple layers on our component tree via props to a deeply nested component in need of that data.
Component Interaction via Props
Our application may initially only have one component, but as it becomes more complex and extensive, we must continually componentize your code, i.e. divide it up into smaller components.
Further componentization allows us to create a separation of concerns by isolating specific portions of a bigger program such that, if anything in our program breaks, fault isolation makes it simple to pinpoint the problem area.
Components, however, are also designed to be reused. Avoiding redundant reasoning and excessive abstraction are goals we must strive to achieve. The advantages of incorporating the DRY principle in our code include the ability to reuse components since most components provide data or functionality that other nested or sibling components require, for example, to maintain synchronization between components.
To enable communication between our components in React at a base level, however, we use props. However, props become inefficient at certain complexity, hence a need to seek other state management solutions.

Consider a Card with a theme-switching button;
We’ll begin by setting up our React project. I’ll be using CodeSandbox for a quicker setup but for a production-ready setup in no time, check out CopyCat!
We’ll also be making use of the useState and useLocalStorage hooks for reasons which we’ll explain in a bit.
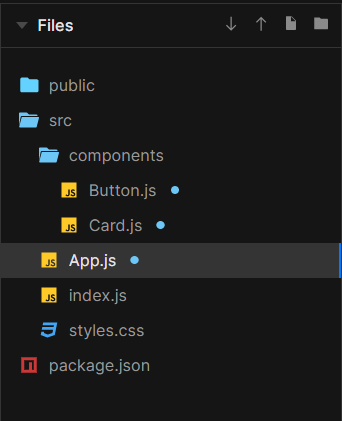
Below is what our basic folder structure should look like.
We can go ahead to populate our App.js file as thus;
import "./styles.css";
import Card from "./components/Card.js";
import React, { useState } from "react";
import useLocalStorage from "use-local-storage";

export default function App() {
  const [title, setTitle] = useState("dark"); //title variable

//this below carries out a simple check of our browser theme preferences.
  const defaultDark = window.matchMedia("(prefers-color-scheme:dark)").matches;

  const [theme, setTheme] = useLocalStorage(
    "theme",
    defaultDark ? "dark" : "light"
  ); // this hook uses the local storage to store and persist our theme variable

 // function to switch our theme.
  const switchTheme = () => {
    const newTheme = theme === "light" ? "dark" : "light";
    setTheme(newTheme);
    const newTitle = title === "dark" ? "light" : "dark";
    setTitle(newTitle);
  };

  return (
    <div className="App" data-theme={theme}>
      <h1>My Theme-Switching Card!</h1>
      <Card switchTheme={switchTheme} title={title} theme={theme} />
    </div>
  );
}
Our Card.js file as thus;
import Button from "./Button";

export default function Card({ switchTheme, title, theme }) {
  return (
    <div className="card">
      <p>I am a {title} card</p>
      <Button switchTheme={switchTheme} theme={theme} />
    </div>
  );
}
And finally, our Button.js file;
export default function Button({ switchTheme, theme }) {
  return <button onClick={switchTheme}>{theme}!</button>;
}
The main idea of this setup and code is to get the theme variable from our App component, which happens to be our root level component, to our button component. The useLocalStorage Hook stores our theme variable in local storage, while the title state holds the name/title of our card.
To get our theme variable to the Button component, we have to pass it from App through the Card component, which has no need for it, before it finally reaches the Button component. This is a simple illustration of Prop Drilling.
In much bigger applications, drilling may be as many as 5 levels deep, but we’re keeping it simple in this case for sake of clarity.
Why is Prop Drilling a problem?
Prop drilling is a problem for several reasons, which include;
- Inability or hindrances to reusing components – As aforementioned, the component-driven approach of software development is to improve and encourage reusability. However, when components carry props needed in one part of our application and useless in other parts, it hinders reusability hence increasing verbosity via repetition of code.
- Error-prone software – Passing props down many levels on our component tree means anything that can go wrong will go wrong.
- Difficulty debugging – Prop drilling makes it harder to track errors by fault isolation; this often leads to a ton of time wasted by tracking errors on multiple interconnected layers of components on our component tree.
- Renaming props halfway through – Keeping track of prop names can be tasking, making debugging a difficult chore.
- Hindrances to reshaping our data or component structure, addition, removal, renaming or further componentization of components may also cause problems in our code.
All these and more make state management via props inefficient as regards large-scale application software.
The Solution: An introduction to the Context API
To solve all of these problems, the React team shipped the React Context API together with its version 16.3 to handle the loopholes of state management with props.
What is a Context in React?
According to the React docs;
Context provides a way to pass data through the component tree without having to pass props down manually at every level.
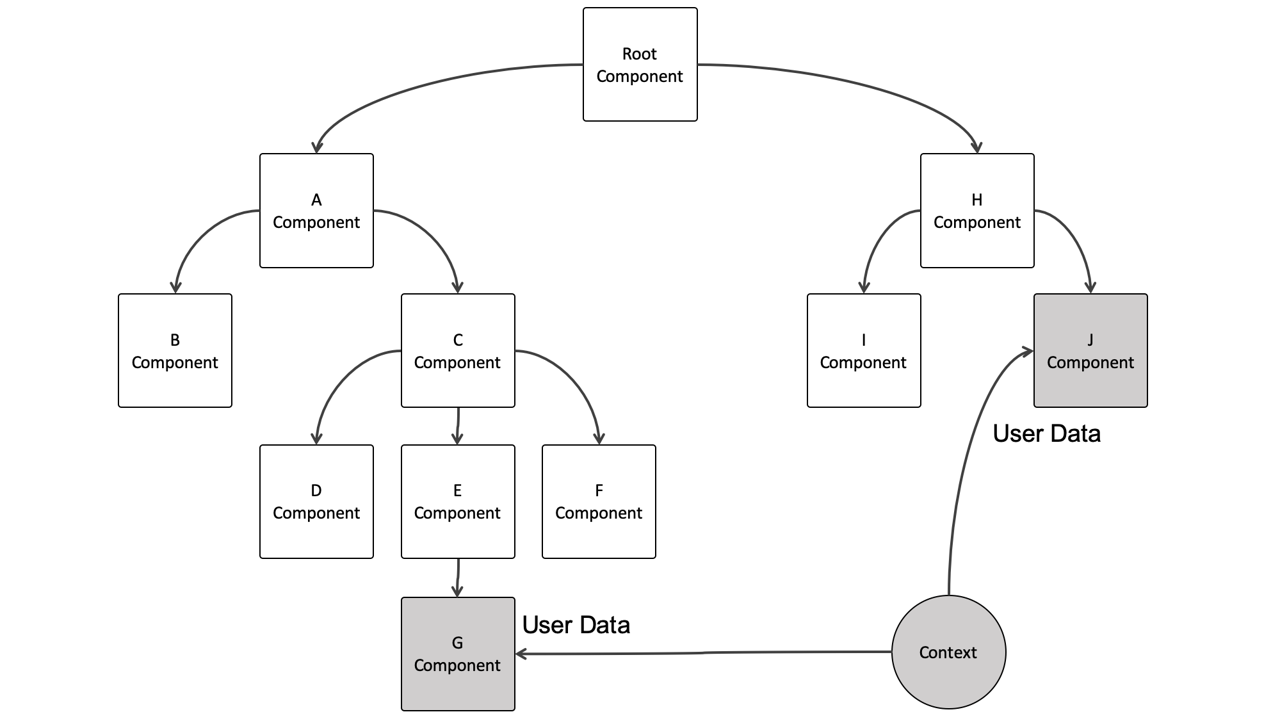
That’s as straightforward as it sounds. The React Context in any application acts like a central, top-level data or state store that any component, regardless of how deeply nested, can access. This way, every component in need of that state seeks the central store instead of subsequent parent or child components, therefore, solving the problem of prop drilling.
What is the React Context API?
According to the React docs;
Context is designed to share data that can be considered “global” for a tree of React components, such as the current authenticated user, theme, or preferred language.
The React Context API is React’s implementation of a Context in functional React components. It allows us an interface to access React Context and all of its functionalities.
What does React Context API do?
The React Context API, when called or initialized, instantiates a Context object. This object will now serve as our store and further return a Provider and a Consumer component.
Both components do what their names imply; one provides the context while the other consumes it. Let’s discuss this in detail with simple illustrations.
Getting Started: How to use React Context API
The React Context API is fairly easy to get started with. While where your context will be defined depends on you, it is best practice to make your context top-level since it will be a state store for your entire application.
Integrating React Context into your React Application
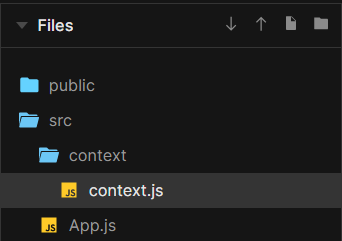
Conventionally, context is defined within a context.js file within a separate “Context” folder initialized within the src folder. This is to ensure separation of concerns and cleaner file structure.
We can implement this as such;
Now that this is done, we can look at how to use the React Context in our app, starting with the first step of using the API.
Creating the Context.
Creating the Context: createContext()
We can initialize or create a context instance by simply calling the out-of-the-box function from the React library, createcontext().
We can do this in just two steps. First, by import the function into our context file like below;
import { createContext } from 'react';
Then finally, instantiating our context object.
const MyContext = createContext();
The “Default value” in this case might be anything from a JSON object holding some data or a theme or even a state variable holding the results of an API call like in the example below.
import React, { useEffect, useState, createContext } from 'react';
const MyContext = createContext('Default Value');

   useEffect(() => {
	//API Call
   }, [dependencies])

   const [data, setData] = useState(//data obtained from API call)
   const myContext = createContext(data);
Now to the next step. Providing the Context.
Providing the Context: Context.Provider()
Now that we have created our context, we now have to make whatever data or state is available within it accessible to every component in our app.
We can do this via a Context Provider.
On initialization of our context object via createContext(), we automatically have access to a Context Provider component, <Context.Provider value={value} />.
The value prop is a default prop that comes with the provider component, it allows us to update or set our App component from above as thus;
import "./styles.css";
import Card from "./components/Card.js";
import { MyContext } from "./context/Context.js";
import React, { useState } from "react";
import useLocalStorage from "use-local-storage";

export default function App() {
  const [title, setTitle] = useState("dark");

  const defaultDark = window.matchMedia("(prefers-color-scheme:dark)").matches;
  const [theme, setTheme] = useLocalStorage(
    "theme",
    defaultDark ? "dark" : "light"
  );

  const switchTheme = () => {
    const newTheme = theme === "light" ? "dark" : "light";
    setTheme(newTheme);
    const newTitle = title === "light" ? "dark" : "light";
    setTitle(newTitle);
  };

// now to wrap our entire file structure with our provider. Note: we have made our theme variable the value of our "value prop".
  return (
    <MyContext.Provider value={theme}>
      <div className="App" data-theme={theme}>
        <h1>My Theme-Switching Card!</h1>
        <Card switchTheme={switchTheme} title={title} />
      </div>
    </MyContext.Provider>
  );
}
By convention, we wrap our entire app with the context provider if we’re working with global data. Otherwise, we just wrap whatever part of our application needs our context with it.
    <Context.Provider value={value}>
      <App />
    </Context.Provider>
After providing the context, the necessary components must now consume the context.
Consuming the Context
There are two ways of consuming the context: The Context.Consumer component method and the useContext Hook.
Context.Consumer
In this method, the Context.Consumer component wraps around the children of the render function like so;
function MyComponent() {
  return (
    <Context.Consumer>
      {value => <div>{value}</div>}
    </Context.Consumer>
  );
useContext Hook
The second and most preferred method is to use the useContext() hook. The hook gives back the context’s value: value = useContext(Context).
We first start by importing it into the file where the theme would be utilized.
import { useContext } from 'react';
Then, we can further assign a variable to the context that we can use as props or values, in our case, we can call our variable “theme”.
import { useContext } from "react";
import { MyContext } from "../context/Context.js";

export default function Button({ switchTheme }) {
  const theme = useContext(MyContext); // we assign our context to a variable.

//then call or use the variable where we need it, which is in our button.
  return <button onClick={switchTheme}>{theme}</button>;
}
When the context value changes, the hook also ensures that the component using that context is re-rendered, i.e, if we change the value of “theme”, the useContext hook ensures an update and a re-render of our Button component.
Finally, we are able to get the theme variable to the Button component without having to pass it through the Card component, thereby bypassing prop drilling! That is the power of React Context.
You can check out and play with the final code here.
Use Cases: When should you use React context?
Utilizing the context is primarily intended to provide your components access to a certain global state and to re-render when that global state is modified. When you have to pass along props from parents to kids, context solves the props drilling problem.
With the context, we can store:
- theme
- global state
- Configuring an application
- authenticated user profiles
- user preferences
- preferred language
On the other hand, you ought to give the decision to utilize context in your application significant thought.
React Context Caveats
Even though React Context solves prop drilling to a large extent, there are some caveats. Hence, the reason why you should give it some thought before implementing it in your application.
Some of these caveats include;
Complexity – Integrating the context firstly increases complexity. Complexity is increased by creating the context, encapsulating everything in the provider, and using useContext() in each consumer.
Unit Testing Difficulty – Second, introducing context makes unit testing the components more challenging. You would need to encase the consumer components in a context provider for unit testing. Including the elements that the context indirectly influences — i.e. the parents of context consumers.
Unintentional renders – Passing objects to the value prop can lead to unnecessary renders in our application. This is because objects are reference types(you can read more on this here). However, expensive renders can be memoized via the useMemo() hook. You can learn more about the useMemo hook with this article by CopyCat. CopyCat is a tool that cuts your development time by about 35% by converting your Figma file to up-and-running React projects. Check it out!
Redux vs. React Context API: Is the React Context API deprecated?
When it comes to state management, Redux is another household name.
You probably have questions like; Is it the same as the Context API? Is it better? Which should I use? etc.
A good place to start is to define Redux.
According to the Redux Documentation,
Redux is a predictable state container for JavaScript apps.
It helps you write applications that behave consistently, run in different environments (client, server, and native), and are easy to test. On top of that, it provides a great developer experience, such as live code editing combined with a time-traveling debugger.
You can use Redux together with React, or with any other view library. It is tiny (2kB, including dependencies), but has a large ecosystem of addons available.
Redux is an open-source library that offers a central store as well as actions to alter the store. It may be used with any JavaScript or TypeScript project, and most importantly, React.
Learn more about Redux in either of these videos:
Although it shares some similarities with the Context API, it also differs in a number of ways as highlighted in the table below.
Context API vs Redux (Table)
| Context API | Redux |
| Built-in tool that ships with React | Additional installation Required, driving up the final bundle size |
| Requires minimal Setup | Requires extensive setup to integrate it with a React Application |
| Specifically designed for static data, that is not often refreshed or updated | Works like a charm with both static and dynamic data |
| Adding new contexts requires creation from scratch | Easily extendible due to the ease of adding new data/actions after the initial setup |
| Debugging can be hard in highly nested React Component Structure even with Dev Tool | Incredibly powerful Redux Dev Tools to ease debugging |
| UI logic and State Management Logic are in the same component | Better code organization with separate UI logic and State Management Logic |
To go in-depth into the similarities and differences between Redux and the Context API, check out the following video.
Conclusion
Now that we know what prop drilling is, we know when and how to avoid it; we’ve also learned about the React context and how to use it to manage state in our applications.
To learn more about the React Context API, check out their docs here. For more insightful React articles, check out our blog. We’ve built a tool to cut down development time by about 35%; check it out here!
Related Articles
-
 React Best Practices
React SVG: How to use SVGs best in React
In this article, we’ll look at the SVG image format, how to import SaVG in react, how to convert SVG to react components and the benefits and drawbacks of using SVGs in react. What is an SVG? SVG is a…
April 1, 2022 -
React.js
React Markdown: A Thorough Guide With Markdown Examples
By default, React does not support Markdown syntax, it requires a Markdown library to convert the Markdown syntax into a React element. In this article, we’ll explore what Markdown and react-markdown are, why to use react-markdown, and how to use…
July 11, 2022