

- What Is Markdown?
- Markdown Syntax
- What Is
react-markdown? - Why You Should Use
react-markdown - Installing
react-markdown - How To Render Markdown In React Component Using
react-markdown - How To Use Plugins With
react-markdown - Examples Of
react-markdownComponents - How To Create Custom Components In react-markdown
- How To Render Markdown From an API With
react-markdown - Wrapping Up
- Where Do You Go Next?
By default, React does not support Markdown syntax, it requires a Markdown library to convert the Markdown syntax into a React element.
In this article, we’ll explore what Markdown and react-markdown are, why to use react-markdown, and how to use them in a React application.
What Is Markdown?
Markdown is a lightweight markup language for creating format text using a plain-text editor. It’s a common way of creating and formatting dynamic rich text content on a website, blog, or an e-commerce platform (Markdown formatting).
A Markdown file is saved with a .md or .markdown extension, and examples of Markdown usage include writing a readme.md file for a Github repository and adding new article content in a content management system (CMS).
Markdown Syntax
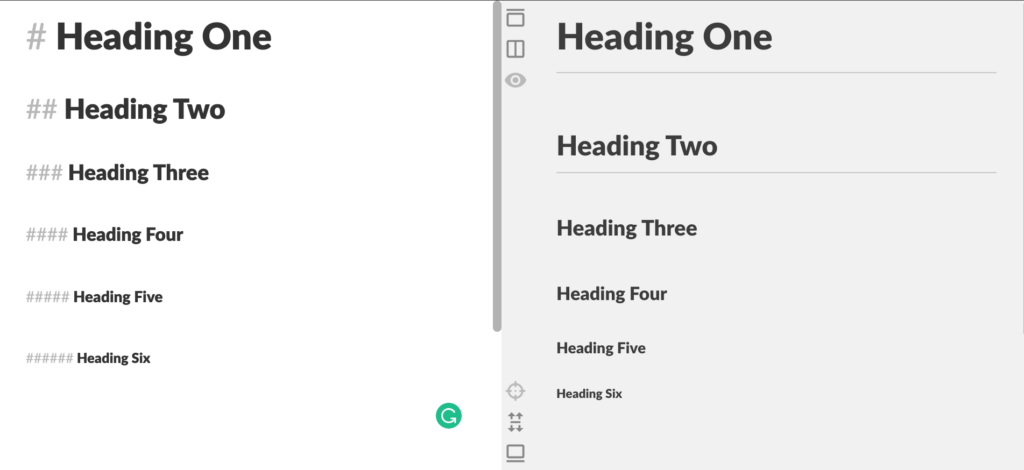
In Markdown, we define what a text should look like by adding a Markdown syntax to the text. For example, an H1 tag that is used as a heading text is denoted with one hash (#) in Markdown.
Using the StackEdit online Markdown editor. The Markdown heading syntax from H1 to H2 will look like this:
Click here to try it yourself.
Other text decorations such as bold, italics, strong, list, blockquote, and strikethrough can be represented in Markdown language syntax as shown below:

An HTML image tag (<img src=”” alt=”” />) is denoted with this  syntax in Markdown. Here’s how to display an image in Markdown:

A tasklist or a todo list can also be created with Markdown as shown below:
We can also create tables in Markdown by using three or more hyphens (—–) to create the table headers and use pipes (|) to create each of the columns. Here’s how:
You can see that, we can use Markdown to present text on the browser. In this section, you’ve learned the basic syntax of Markdown. Next, we’ll explore how we can write Markdowns or create a Markdown previewer in a React application.
You can also check out the Markdown crash course by TraversyMedia below to learn more:
What Is react-markdown?
The react-markdown library is a React component that converts a Markdown string into a React element. It also enables developers to use plugins to customize how the Markdowns are rendered as a React element.
Why You Should Use react-markdown
react-markdown is not the only library that transforms Markdowns into a React element. But it has an edge over others.
Below, we’ll discuss why you should consider using the react-markdown library:
- Security Issue With
dangerouslySetInnerHTML: Most React Markdown libraries rely on thedangerouslySetInnerHTMLproperty to programmatically render Markdown contents inside of an HTML element. The problem with this approach is not too far from its name, it is dangerous to use because it gives room for loopholes that can make your app vulnerable to attacks known as cross-site scripting (XSS) attacks. This attack can occur when you’re fetching or transferring data to a third-party API. Instead of usingdangerouslySetInnerHTMLto render the Markdown contents in an HTML element, react-markdown make use of a syntax tree to build the virtual dom to render the Markdown elements. - 100% CommonMark Markdown Specification: react-markdown syntax are 100% to CommonMark specification. CommonMark is a standard, interoperable and testable version of Markdown. It’s a formal specification for writing Markdowns. react-markdown converts your Markdowns into the standard specification.
- Plugins To Support Other Syntax Specifications: react-markdown provides plugins (e.g
remark-gfm) to support other syntax extensions such as strikethrough, tables, tasklists, and direct URLs that are not supported by default. - Custom Components (Syntax Highlight) Using plugins such as react-syntax-highlighter, a syntax highlighting component for React, we can customize how Markdowns (e.g codeblock) are been rendered in React.
Now that you know what react-markdown is, and some of the features it provides that makes it a before choice for building a Markdown previewer in a React application. In the next section, we’ll explore how to set up react-markdown in a React project.
Installing react-markdown
Working with react-markdown is simple, this section will give a step-by-step guide on how you can set up and start using the library in your React application.
First, create a new React app with the command below (in your terminal):
npx create-react-app my-markdown-previewer
Next, navigate inside the my-markdown-previewer:
cd my-markdown-previewer
Finally, install react-markdown with the command below:
npm i react-markdown
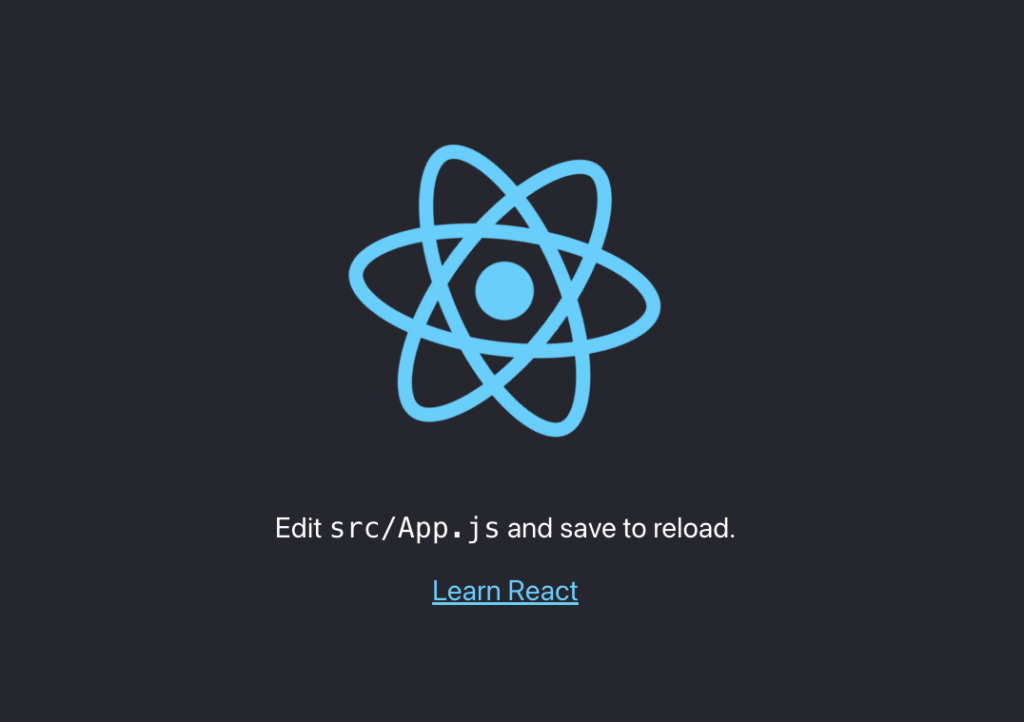
Now, you can start your React server using the command below:
npm run start
Your React app should look something like this:
How To Render Markdown In React Component Using react-markdown
Now that we have our server up and running, let’s take a look at how to render Markdowns in a React component. Open your project folder in any code editor (we love Vscode).
Import the ReactMarkdown component inside your App.js file:
import ReactMarkdown from "react-markdown";
Next, replace the lines of code in your App.js file with the line of code below:
<ReactMarkdown># Hello, *World*!</ReactMarkdown>
The Markdown snippet above is an h1 and the text “World” has an italic decoration. This will produce the following output on your browser:

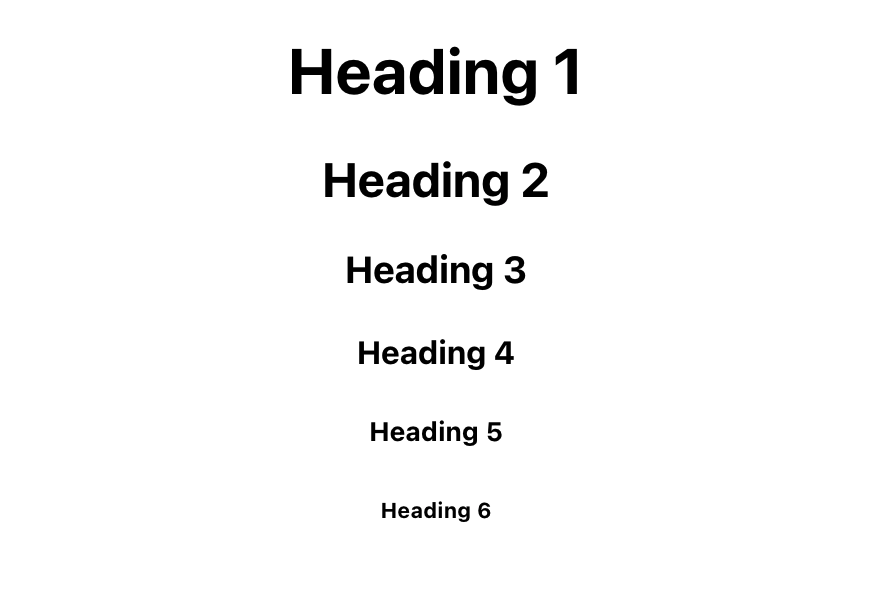
We can render multiple lines of Markdown by wrapping each lines in a ReactMarkdown component like this:
<ReactMarkdown># Heading 1</ReactMarkdown>
<ReactMarkdown>## Heading 2</ReactMarkdown>
<ReactMarkdown>### Heading 3</ReactMarkdown>
<ReactMarkdown>#### Heading 4</ReactMarkdown>
<ReactMarkdown>##### Heading 5</ReactMarkdown>
<ReactMarkdown>###### Heading 6</ReactMarkdown>
This will produce the following:
Let’s take a step further and render other Markdown text decoration such as bold text, italics, strong, list, and strikethrough, like this:
<ReactMarkdown>**A bold text**</ReactMarkdown>
<ReactMarkdown>*An italic text*</ReactMarkdown>
<ReactMarkdown>__A strong text__</ReactMarkdown>
<ReactMarkdown>1. An ordered list text</ReactMarkdown>
<ReactMarkdown>- An unordered list text</ReactMarkdown>
<ReactMarkdown> ~~A strikethrough text~~ </ReactMarkdown>
The output of the code above will be:
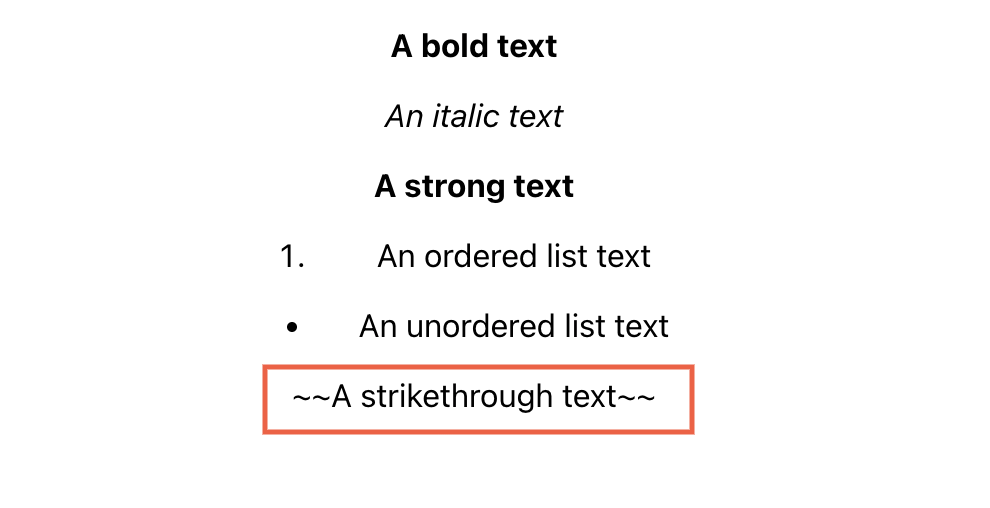
You can see from the above output that all other Markdown syntaxes are rendered properly apart from the strikethrough syntax. This is because, react-markdown does not support strikethrough, tables, tasklists, and URLs directly.
At this point, we’ve learned the basic syntax of react-markdown, and seen some of the Markdown syntaxes that are not supported by react-markdown by default. In the next section, we’ll see how we can add support for these syntaxes.
How To Use Plugins With react-markdown
As you’ve known that react-markdown does not support all Markdown syntax, but they made it such that we can make use of a plugin to add support for these syntaxes. We’ll use the remake-gfm plugin in this tutorial.
Remake-plugin adds support for footnotes, strikethrough, tables, tasklists, autolink literals, or URLs directly. It supports the same Markdown features that GitHub does in .md files in a repo, Gists, etc.
Install remark-gfm using the code below:
npm install remark-gfm
Import remark-gfm in your App.js:
import remarkGfm from "remark-gfm";
Examples Of react-markdown Components
Let’s explore how to build some Markdown components that we’ve created previously in the Markdown syntax in react.
Creating A Strikethrough Text In react-markdown
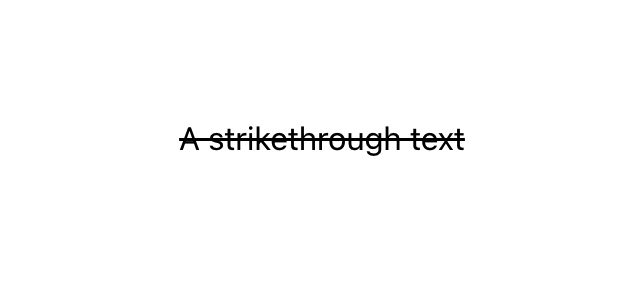
First, let’s render a strikethrough Markdown using remark-gfm:
<ReactMarkdown remarkPlugins={[remarkGfm]}>
	~~A strikethrough text~~
</ReactMarkdown>
From the above code, we pass the remarkGfm plugin as a prop to the ReactMarkdown this will intercept the unsupported Markdown and render them properly.
The output of the strikethrough Markdown above will be:
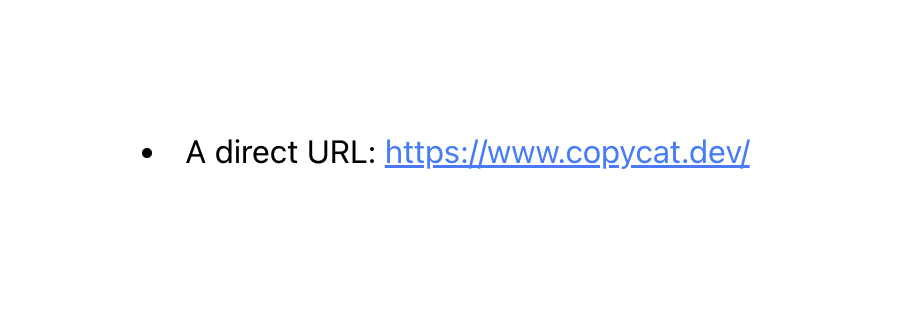
Creating A Direct URL Markdown In react-markdown
We can also pass the Markdown in the children prop of the ReactMakedown component like this:
<ReactMarkdown children={markdown} remarkPlugins={[remarkGfm]} />
Where markdown is:
const markdown = `- A direct URL: https://www.copycat.dev/`;
From the code above, we can use the remarkGfm plugin to render a direct URL without any Markdown as shown below:
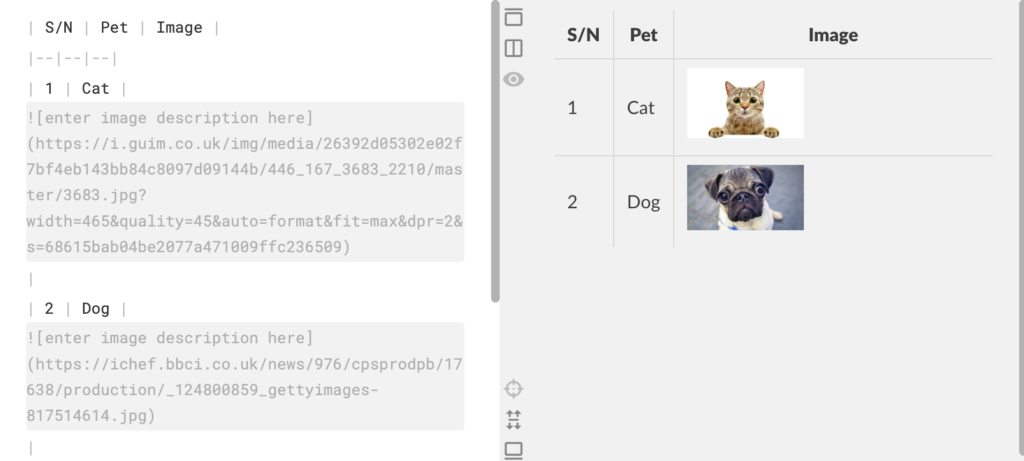
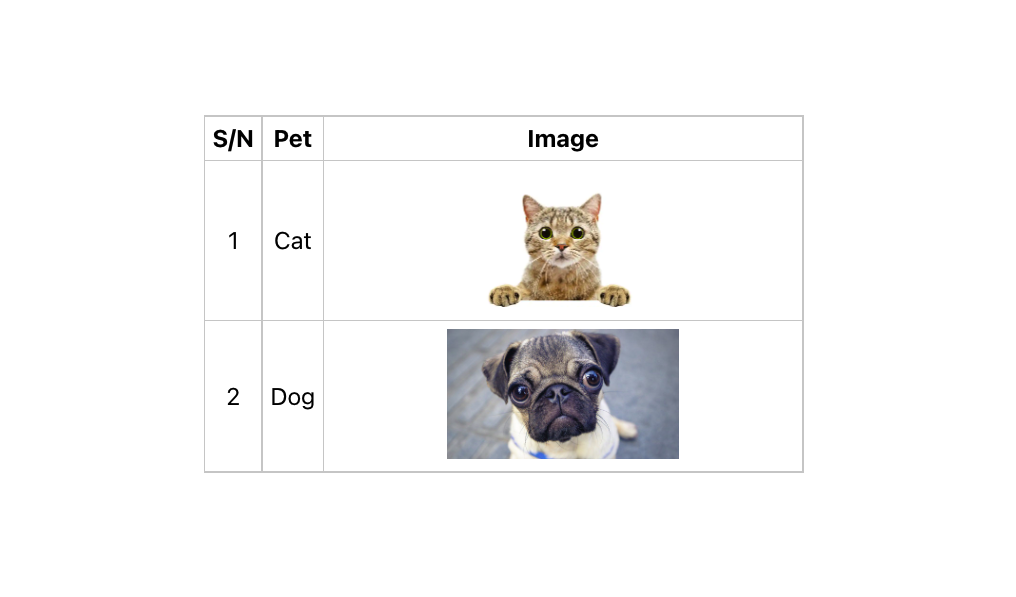
Creating A Markdown Table In react-markdown
We can write a Markdown table in a backtick as shown below:
const markdownTable = `
| S/N | Pet | Image |
|--|--|--|
| 1 | Cat | |
| 2 | Dog ||
`;
Then pass it as a children prop in the ReactMarkdown component like this:
<div className='table-container'>
	<ReactMarkdown children={markdownTable} remarkPlugins={[remarkGfm]} />
</div>
The output of the Markdown table above, will be:
To have the same output as above, add the following CSS to your App.css:
.table-container{
  height: 400px;
  width: 400px;
  margin: 0 auto;
}

img{
  width: 50%;
  height: 100%;
  object-fit: cover;
}
table{
  width: 100%;
  border-collapse: collapse;

}
th, td{
  border: 1px solid #ccc;
  padding: 5px;
}
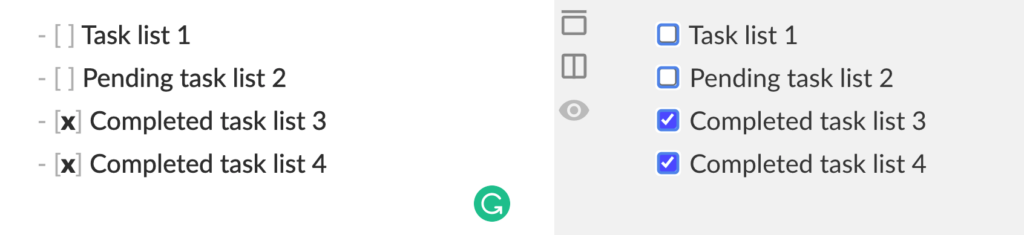
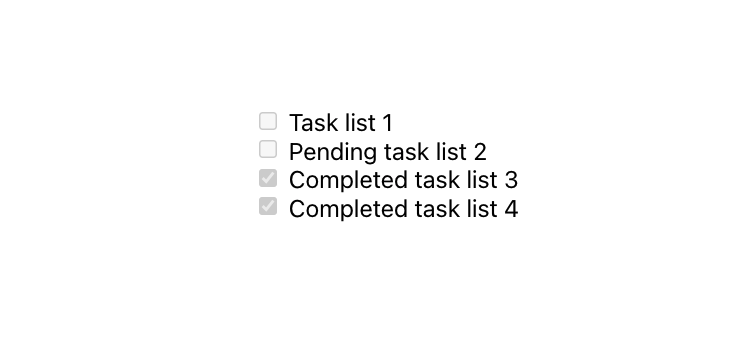
Creating A Tasklist Markdown In react-markdown
Tasklist or todo list is a checklist of things we want to do. Here’s how to create it with Markdown in React:
const markdownTaskList = `
  - [ ] Task list 1
  - [ ] Pending task list 2
  - [x] Completed task list 3
  - [x] Completed task list 4
`;
Then we pass the markdownTaskList to the children prop of ReactMarkdown component:
<ReactMarkdown children={markdownTaskList} remarkPlugins={[remarkGfm]} />
This will produce the following output:
To this point, we’ve learned how to add and use plugins along with react-markdown. We’ll learn how to create and use custom components with react-markdown in the next section.
How To Create Custom Components In react-markdown
Custom components in react-markdown enable us to overwrite the default appearance or to add a custom style to the Markdowns when they’re been rendered. This is called syntax highlighting.
We’ll use the [react-syntax-highlighter](<https://github.com/react-syntax-highlighter/react-syntax-highlighter>) in this tutorial and you can install it using the command below:
npm install react-syntax-highlighter --save
Next, import it in your App.js as shown below:
import { Prism as SyntaxHighlighter } from "react-syntax-highlighter";
A good example of syntax highlighting is a code snippet block on a technical blog post (that’s where you’ve been reading code sample). We can use the react-syntax-highlighter component to create this as well.
Let’s create a CSS code snippet block as an example:
const cssMarkdownCodeblock = `CSS code example:

~~~css
.container{
  max-width: 100%;
  margin: 0 auto;
  padding: 0;
}

.child-1{
  background-color: red;
}

.child-2{
  background-color: blue;
}

~~~
`;
Now, we can render the cssMarkdownCodeblock as children of the ReactMarkdown component like this:
<ReactMarkdown
  children={cssMarkdownCodeblock}
  components={{
    code({ node, inline, className, children, ...props }) {
      const match = /language-(\w+)/.exec(className || "");
      return !inline && match ? (
        <SyntaxHighlighter
          children={String(children).replace(/\n$/, "")}
          language={match[1]}
          {...props}
        />
      ) : (
        <code className={className} {...props}>
          {children}
        </code>
      );
    },
  }}
/>
With the code above, the SyntaxHighlighter component is passed as a component to the ReactMarkdown.
In order to render the corresponding syntax (colors), we’re checking if the specified language of the code blocks match any of the supported languages by SyntaxHighlighter. If the language matches, SyntaxHighlighter component will be used, else, the code blocks will be rendered in the native HTML code <code>...</code> tag.
The code above will produce the following result:
We can change the theme of the code block as well by importing the styles from prism:
import { dark } from "react-syntax-highlighter/dist/esm/styles/prism";
Using a JavaScript code block as an example for the dark theme:
const javaScriptMarkdownCodeblock = `JavaScript code example:

~~~javascript
// function that adds "2 numbers" together
const sumTwoNumbers = (num1, num2) => num1 + num2;

// call the function
console.log(sumTwoNumbers(1, 2)); // 3

// array of users
const users = [
  { name: "John", age: 30 },
  { name: "Jane", age: 28 },
  { name: "Bob", age: 25 },
];

// print out the users age
console.log(users.map(user => user.age)); // [30, 28, 25]
~~~
`;
We can then pass the dark theme as a style value to the SyntaxHighlighter component, as well as specify the parent tag of the code block using the PreTag prop:
<ReactMarkdown
  children={javaScriptMarkdownCodeblock}
  components={{
    code({ node, inline, className, children, ...props }) {
      const match = /language-(\w+)/.exec(className || "");
      return !inline && match ? (
        <SyntaxHighlighter
          children={String(children).replace(/\n$/, "")}
          style={dark} // theme
          language={match[1]}
          PreTag='section' // parent tag
          {...props}
        />
      ) : (
        <code className={className} {...props}>
          {children}
        </code>
      );
    },
  }}
/>
This will produce a fenced code block, as shown below:
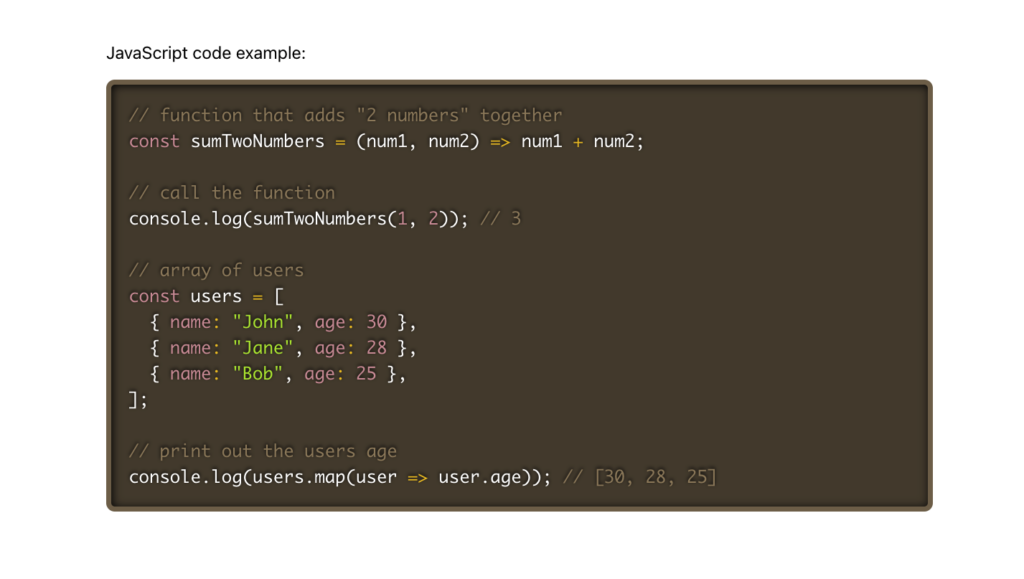
How To Render Markdown From an API With react-markdown
So far, we’ve been rendering hardcoded Markdowns from our React component, let’s take a look at how to render dynamic Markdowns from an Endpoint.
We’ll make use of the Markdown Guide API. It’s an API of the official Markdown document that can be embedded into any Markdown-based website for quick glance at the Markdown syntax or guidelines.
Firstly, we need to import the useEffect and useState hook from react:
import { useEffect, useState } from "react";
Then, update our App.js with the following line:
const [markdownCheatSheets, setMarkdownCheatSheets] = useState(null);

useEffect(() => {
  fetch("https://www.markdownguide.org/api/v1/cheat-sheet.json")
    .then((res) => res.json())
    .then(({ cheat_sheet }) => {
      setMarkdownCheatSheets([
        ...cheat_sheet[0]?.basic_syntax,
        ...cheat_sheet[1]?.extended_syntax,
      ]);
    })
    .catch((err) => {
      console.log(err);
    });
}, []);
The code above will fetch the Markdown cheat-sheet.json from the endpoint URL when the component mounts. There are two types of the Markdown syntax that’ll be returned in the cheat_sheet response data (the basic_syntax and the extended_syntax).
We’re then combining the two syntaxes into a single array and set them in our component’s markdownCheatSheets state.
When the data is available, we can then display it on the UI with the code below:
<div className='App'>
      {markdownCheatSheets && (
        <div>
          {markdownCheatSheets?.map(({ element, syntax }) => {
            return (
              <div key={element}>
                <h1>{element}</h1>
                <p>{syntax}</p>
                <div>
                  <h3>Examples</h3>
                  <ReactMarkdown
                    children={syntax}
                    remarkPlugins={[remarkGfm]}
                    components={{
                      code({ children, ...props }) {
                        return (
                          <SyntaxHighlighter
                            children={String(children).replace(/\n$/, "")}
                            style={dark}
                            PreTag='section'
                            {...props}
                          />
                        );
                      },
                    }}
                  />
                </div>
              </div>
            );
          })}
        </div>
      )}
    </div>
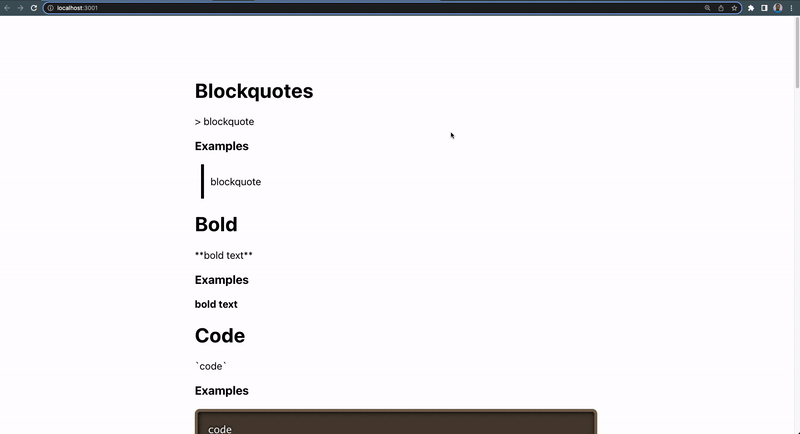
From the code above, we’re looping through the cheatsheet and rendering their details and examples on the UI.
Below is what the code above will produce on the browser:
You can explore the Markdown Guide API (Markdown documents) or yours to understand what is returned and how to render them in your own project.
Wrapping Up
In this tutorial, we explored what Markdown and react-markdown is and how to use it in rendering Markdown syntax in a React app.
Where Do You Go Next?
Now that you have an understanding of how Markdown works in React, you can learn how to build your own React Markdown previewer from this video:
You can also learn how to eliminate sprint delays in React development by using CopyCat, a Figma to React plugin tool that automatically converts design to code with the click of a button. Save time developing and on sprints while also spending more time coding the fun stuff.
Read More From Our Blog:
- Learn how to implement React Lazy Loading and Code Splitting
- Learn React Hook Form
- Why and How to Use React useState Hook
Related Articles
-
 React.js
How To Use React Styled Components in React Efficiently
Introduction As libraries evolve and software grows bigger and more complex, the need for a better styling approach grows. Especially for styled components react. The component-driven approach to building software applications majorly influenced by modern libraries and frameworks begs for…
July 12, 2022 -
React.js
Use Bootstrap Flex in Your React Projects for Great Web Design
Introduction A major aspect of modern web development in Bootstrap is responsive web design. Responsive web design implies that, depending on the screen size, platform, and orientation, design and development should adapt to the user's behavior and surrounding conditions. The…
November 29, 2022