

- Introduction
- Side Effects: React's interactions with the Outside World.
- Introduction to React.useEffect()
- Life before useEffect(): Lifecycle Methods
- The useEffect() Hook: React's new portal to the Outside World.
- The infinite loop pitfall of useEffect()
- React's useLayoutEffect hook: useEffect's not-so-distant cousin
- What is the difference between useEffect() and useLayoutEffect() in React?
- Conclusion
Introduction
React’s version 16.8+ is packed with several hooks with robust functionalities-including the React useEffect Hook.
These hooks, over time, have allowed developers to write even more expressive and readable code by providing a more straightforward API to handle React concepts like state, props, refs, context and lifecycle as opposed to the old (<v16.8) class-based approach of handling them.
However, quite a number of these hooks have proven to be challenging to get started with.
Case in point? The useEffect() hook.
This article introduces you to side effects, and their importance in building React applications, lifecycle methods and how they managed side effects in old class-based React and the beauty that is React’s useEffect() hook for managing side effects in functional React components and how to use it better in your code.
Understanding all of these concepts, however, starts with a simple question:
What are, in fact, side effects?
Side Effects: React’s interactions with the Outside World.
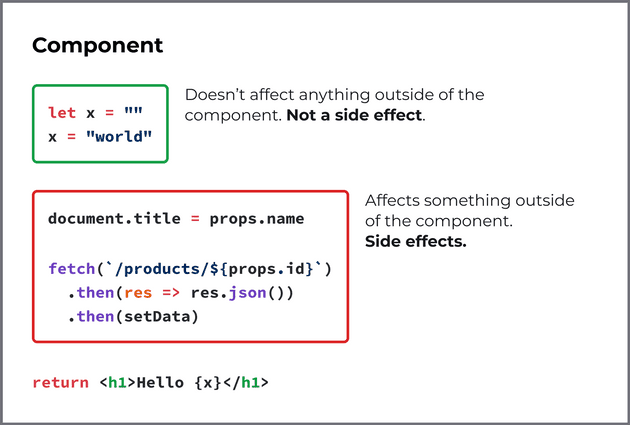
You see, React renders our UI via the workings of a virtual DOM, which is an ideal representation of the actual DOM that ensures the re-rendering of components only when either their props or state have changed.
The virtual DOM does this by syncing changes only where they have occurred, rather than re-rendering our entire app, thereby saving us performance costs.
What this means is that as long as there are no prop or state changes, the output of our component is unaltered. If props or state changes do occur, the output of our component changes and it triggers a re-render in our component to update it.
There are diverse operations we can carry out to cause a change in props or state and, consequentially, alteration in the output of our component.
There are certain actions or operations; however, that do not interfere with the workings and output of our component.
Some of them include,
- manipulating the DOM,
- making calls to an external API,
- making calls to authentication services etc.,
These operations are peculiar because React components interact while maintaining a one-way data flow between one another, i.e. parent-to-child communication via props or state, meaning that their lack of interference with this communication insinuates that they have somehow branched out of that flow.
It makes sense because any operation that breaks out of this pattern of component interaction to communicate with some external resource or service other than our components has no direct influence on the output of our components.
In React, any such action or operation that allows our components to interact with the outside world, i.e. resources outside our components, without causing a change to or altering the output of any component is referred to as a side effect.
Types and Examples of Side Effects
Solid examples of side effects in React include;
- Making asynchronous API calls for data fetching. Learn more about data fetching with this article by CopyCat! Copycat is a tool that cuts down development time by converting your Figma files to code!
- Measuring the width, height, or position of elements in the DOM
- Setting a subscription to an observable
- Setting or getting values in local storage
- Updating global variables from inside a function
- Manually updating the DOM element
- Logging messages to the console
- Working with timing functions like setInterval or setTimeout
Introduction to React.useEffect()
With the advent of the React hooks API, there came better ways to handle certain operations in React. Hooks provide us with a level of abstraction that allows us to perform complex operations efficiently.
Of all of these hooks, the React useEffect hook has proven to be the “Jack of all Trades” or the “Swiss Army knife”, as the case may be. Its versatility makes it useful when carrying out operations like setting intervals or timeouts, fetching data, logging outputs to the console, etc.
In fact, pretty much anything you would want to do other than return JSX (read: side effects) should be thrown into a useEffect hook. However, with this power comes a major drawback;
The concept of the useEffect hook can be hard to grasp, hence the need to understand its workings so as to use it efficiently in our application. In the following sections, we’ll discuss the mental model behind the use effect hook, React’s render cycle, and lifecycle methods.
Life before useEffect(): Lifecycle Methods
Understanding what was before what is might be helpful in understanding the workings of the useEffect hook. Feel free, however, to skip past this section if you’d rather not.
If you come from a background of writing class-based React, you might be familiar with lifecycle methods. If you’re not, stay with me here.
When trying to get the hang of the useEffect hook, one rather important question comes to mind;
“If side effects are out of the component flow and do not affect the output of our component, when, then, do they come in?”
To answer this question, we need a basic understanding of React’s render cycle or, better phrased, the Component Lifecycle.

React’s Render Cycle
Have you ever wondered how React determines or decides what component to render and what not to?
The answer to this lies in the concept of Lifecycle Methods.
You might have an idea of these methods if you’ve ever written class-based React, and if not, we recommend this short tutorial by w3schools to get you familiar with them.
To understand the workings of the use effect hook, it is important to be aware of how the React render cycle works, i.e., how React renders or re-renders components, because side effects run after every render. This is because, once again, for performance reasons, React prioritizes rendering our components and painting the DOM over every other operation(side effects).
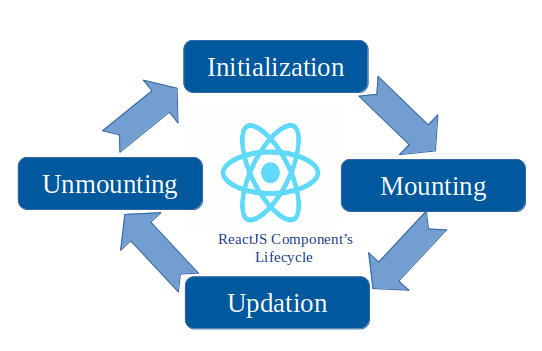
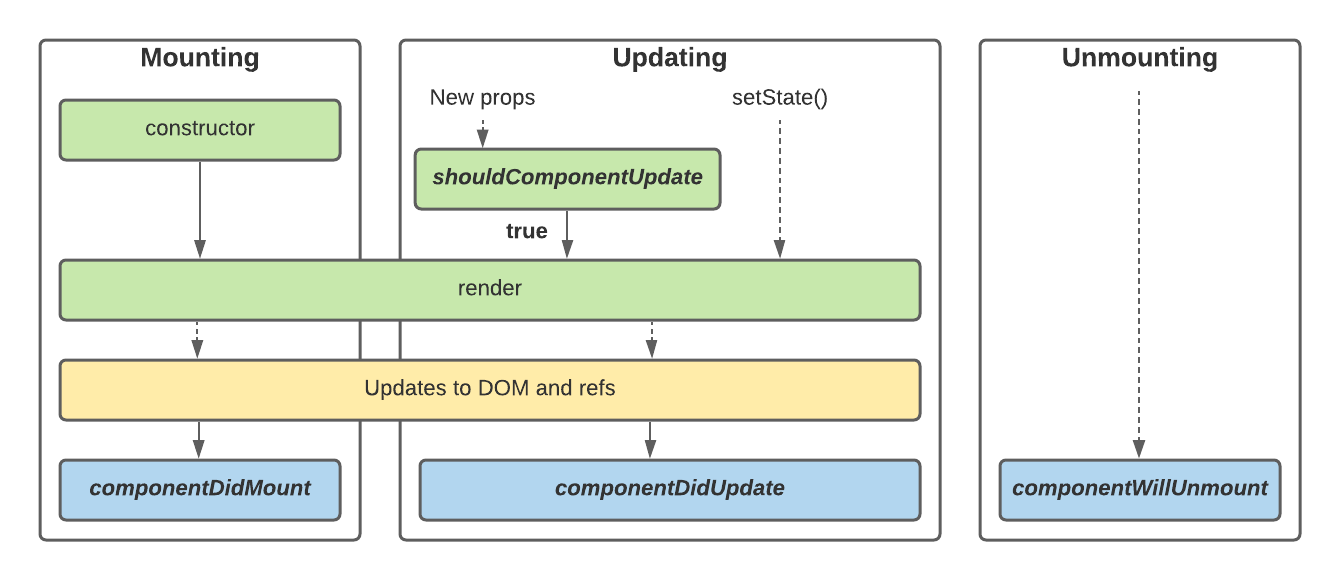
Going forward, the basic lifecycle of a React component in four phases;
- Initialization – this is the working out of state variables and props before a component renders or is mounted. This is done with the constructor() block.
- Mounting – adding the required nodes to the DOM tree
- Updating – updating the nodes on the DOM tree
- Unmounting – removing the nodes from the tree
The explanation for this is simply derivable from the terms.
Mounting
When rendering a component, React first “mounts” it, i.e. outputs its HTML to the browser for us to see; thereafter, based on prop or state changes, React then updates and re-renders our component; and finally, when we do not need that particular component any longer, React “unmounts” it by taking it off the DOM tree and consequently off our screen.
Component renders and side effects are independent of one other, so it makes sense to abstract them from each other.
Sometimes we only want to trigger our side effects once, or depending on props or a state variable, and putting them within a component defeats this purpose as on every re-render, our side effects will get triggered again.
In class components, React provides three lifecycle methods to handle side effects. In functional components, however, the useEffect() hook abstracts over these methods to provide a cleaner and even better way of handling side effects.
However, before we discuss the useEffect() hook, let’s take a look at these lifecycle methods, their drawbacks, and their impact on our efficiency in handling side effects.

componentDidMount()
componentDidMount() is called and executed after the component renders for the first time. This can be used to start an asynchronous operation as soon as the component is displayed on the browser.
Take a simple card component, for example;
class Card extends Component {
  constructor(props) {
    super(props);
    this.state = {color: "paleviolet"};
  }
  componentDidMount() {
 // You'd probably want to send an HTTP request or some side effects here,
 // but for brevity, we would log something simple to the console.
    console.log("There is a paleviolet card on the screen);
  }
  render() {
    return (
      <div id="card">
      	<h1>My Favorite Color is {this.state.color}</h1>
      </div>
    );
  }
}
componentDidUpdate()
componentDidUpdate() is called and executed after a component update and re-render.
For code we need to run when a component has updated, this method comes in handy as a place to write our side effect logic. It’s also useful for sending network requests when particular criteria are satisfied. For instance, using this lifecycle function, we can retrieve the data for a user’s new account if they changed handles or profile details.
Consider our Card component example;
class Card extends Component {
  constructor(props) {
    super(props);
    this.state = {color: "paleviolet"};
  }
  componentDidMount() {
    //let's replace our console.log with a timeout
    setTimeout(() => {
      this.setState({color: "steelblue"})
    }, 3000)
  }
  componentDidUpdate() {
    document.title =
    "The updated favorite is " + this.state.color;
  }
  render() {
    return (
      <div id="card">
      	<div>My Favorite Color is {this.state.color}</div>
      </div>
    );
  }
}

ReactDOM.render(<Card />, document.getElementById('root'));
When we run the code above, we see that our component mounts first as a pale violet card as its initial state value. After the initial render, our side effect within the componentDidMount block runs, kickstarting the timer.
Two seconds elapse.
Our state variable is updated, and our component renders again. At the completion of our component re-render, the componentDidUpdate() block runs another side effect, updating the document title. An important point to note is that while componentDidMount() runs our effect after the first render, componentDidUpdate() ensures a re-run of our side effects after every render due to subsequent state or prop updates.
componentWillUnmount
Lastly, when our component is no longer of use in our React application, the componentWillUnmount() is called before our component unmounts and its node is removed from the DOM tree.
In simpler terms, the componentWillUnmount() method handles the cleanup of our side effects before our component is unmounted. We’ll discuss cleanups later in this article.
Still, in our example above;
class Card extends Component {
   //other previous methods
   render() {
    return (
      <div id="card">
      	<div>My Favorite Color is {this.state.color}</div>
      </div>
    );
  }
   componentWillUnmount() {
	console.log("This component has been unmounted")
   }
}
From the code above, componentWillMount() logs the message to the console right before the Card component is unmounted. However, unlike a console.log message within the method, we would ideally be returning a function known as a cleanup function, responsible for operations like removing event listeners, aborting pending API calls, clearing timeouts etc.
clearTimeOut()
A good example of this is using the clearTimeOut() function to clean up a setTimeout() function.
class Card extends Component {
    //other methods

     componentDidMount() {
    	setTimeout(() => {
      		this.setState({color: "steelblue"})
    	}, 3000)
     }

   //other methods

   componentWillUnmount() {
	console.log("This component has been unmounted")
   }
}
Many developers like to think of the useEffect hook as a combination of all the lifecycle methods.
Even though they have managed to get the job done long before the arrival of the Effect Hook, it is more helpful to think of useEffect() as an even more efficient replacement for these methods.
The use Effect() function provides a better way to perform side effects, solving major lifecycle-method drawbacks like;
- verbosity – handling a side effect with lifecycle methods meant duplicate logic over and over within these methods.
- the danger of errors and memory leaks in React applications – lifecycle methods provide an inefficient way of handling cleanup in our code. This could lead to potential errors and memory leaks.
- proper abstraction of side effects from component rendering – running a side effect with lifecycle methods depends on the implementation details of how our component renders rather than based on a change in our data. useEffect abstracts the running of effects from component rendering.
These drawbacks and a few more are what useEffect() solves better in functional React components.
The useEffect() Hook: React’s new portal to the Outside World.
The skeleton of a basic useEffect() function is thus;
useEffect(() => {
  // code runs when component mounts or any of the values in the dependencies array change.
  return () => {
    // code runs just before dependencies change and component re-renders
  }
}, [dependencies])
Exploring the useEffect hook with simple examples.
Let’s elaborate on this using a simple example.
Let us refactor our custom Card component;
import React, {usestate, useeffect} from "react";

export const Card = () => {
   const [color, setColor] = useState("paleviolet")
   useEffect(() => {
     setTimeout(() => {
      	setColor("steelblue")
     }, 3000)
  return () => {
    clearTimeout()
  }
}) // dependencies argument omitted

   return (
     <div id="card">
      	<div>My Favorite Color is {color}</div>
     </div>
   );
}
Ignoring our lack of values in the dependencies array, let us examine the code within our useEffect() function.
In the absence of values within our dependencies array, our first argument, the callback function, runs our effect only once after every component render; and on every unmounting and “re-mounting” of our card component, for example, by refreshing our browser, our cleanup fires and cleans up our effect, i.e. on card remount or re-render, our Card is back to being paleviolet, and our effect can run once again after the specified time out.
Just like that, the useEffect() Hook allows us to successfully combine the functionalities of componentDidMount(), componentDidUpdate() and componentWillUnmount() into a single block of code.
This is the essence of the React Hooks API; abstraction over these methods so as to allow us to write cleaner, clearer and less verbose logic.
Now that we understand the workings of the first argument of our Effect function, let’s go into the details of the second argument, the dependencies array.

useEffect()’s second argument: The Dependencies Array
We could think of the dependencies array as the remote control of the useEffect() function.
Without it, our effect would run on every render and most times, that’s not what we want.
Instead of running on every render, we want to run our callback function only when certain conditions are met or certain variables change…. and that’s where it comes in!
The dependencies array takes in values, otherwise known as dependencies, which control when our callback function is invoked. Values within this array can be either props or state variables, and our side effect is run if and only if any of these values change.
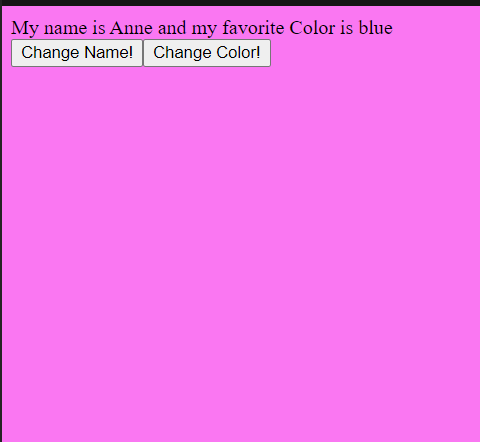
Let’s make a few changes to our custom Card component to explain it better;
import React, {useState, useEffect} from "react";

export const Card = () => {
  //cleanup declaration
  let isCleanedUp = false;
   const [colorName, setColorName] = useState("paleviolet")
   const [name, setName] = useState("Anne")

   //function for generating random colors
  function getRandomColor() {
      let value = Math.floor(Math.random() * 16777215).toString(16)
      let hexCode = '#' + value;
      document.body.style.backgroundColor = hexCode;
  	  setColorName(hexCode)
  }

   useEffect(() => {
     if(!isCleanedUp) {
      console.log("My color changed!")
      getRandomColor()
     }
	}, [name, isCleanedUp])

   return (
     <div id="card">
      	<div>My name is {name} and my favorite Color is {colorName}</div>
        <button onClick={() => setName(name === "Anne" ? "Joel" : "Anne")}> Change Name!</button>
        <button onClick={() => setColorName(colorName === "paleviolet" ? "red" : "blue")}> Change Color!</button>
     </div>
  );
}
Some Simple Changes
A lot more code, but we’ve made some simple changes here. We have introduced a new state variable, “name”, and made it a dependency. We’ve also declared our effect cleanup variable right at the top, set it to false and added it as a dependency. We’ve also created a function to generate random HEX codes for different colors, setting our “colorName” variable and the background color of our document to whatever HEX Code is generated.
Then within our useEffect function, we have replaced our setTimeout block with a console.log statement and called getRandomColor(). We have also introduced two button elements, both of which allow us to change the values of our state variables on click.
https://capture.dropbox.com/nnNwx5SVh5kOfAVp (link to the video)
And there we have it. Our Card component is refactored. You can check the project out here.
On running this code, we realize that our side effect doesn’t get triggered unless we click on the “Change Name” button. This is because the button’s onClick() function changes the value of “name”, which is one of our dependencies. This same is not true for the “Change Color” Button because it is not listed as a dependency.
Now, what about when we want to run our effect only once?
Easy, we can put in an empty array as our second argument!
So far, we have seen that calling our useEffect function without the dependencies array;
- will result in a trigger of our effect on every render;
- if we have an empty array of dependencies, our effect runs just once after the first render
- if our dependencies array contains values or dependencies, then our effect will run only when any of these dependencies change.

The infinite loop pitfall of useEffect()
Sometimes, all we want to do within our effect function is update some state. But what happens when you find yourself knee-deep in an infinite loop?
Let us create a simple counter to explain this;
function App() {
  const [count, setCount] = useState(0); //count state
  useEffect(() => {
    setCount((count) => count + 1); //incrementor
  }); //no dependency array.
  return (
    <div className="App">
      <p> value of count: {count} </p>
    </div>
  );
}
If we run this code (Warning: don’t run it, infinite loop ahead), we discover that it results in an infinite loop.
Why?
This is because, as we stated earlier, useEffect() runs on every render in the absence of a dependencies array. So on the first render, the useEffect() function fires and our count is updated. On updating, it fires again, and again, and again, and again….until we’re stuck in an infinite loop.
What then is the solution to this problem?
Easy. Add a dependencies array. It doesn’t matter if it’s empty or contains some values; a dependencies array will either cause your effect to run once on the first render or depending on any of its values. That way, we have control over our effects.
Functions, Objects and Arrays as Dependencies
What happens when we make a function a dependency? Let’s take a look at a short example.
function App() {
  const [count, setCount] = useState(0);

  function determineRender() {
    return 2 * 3;
  }
  useEffect(() => {
    setCount((count) => count + 1);
  }, [determineRender]); //set our function as dependency
  return (
    <div className="App">
      <p> value of count: {count} </p>
    </div>
  );
}
If we run this code, we find ourselves in yet another infinite loop. This is because of our determineRender() function.
You see, functions, as well as arrays and objects, are what we call reference types.
This means that our computers do not directly save the reference data type you give to a variable when you create it and use it as a value (as is the case with primitive types).
What they do is create a pointer or reference pointing to the memory address of that data type and assign that to a variable, and for this reason, every time a function is called its reference changes.
How does that get us in an infinite loop?
If we have a function as a dependency, React does a shallow comparison of the function reference to see if it has changed before running our effect again, and because the reference for our function changes every time determineRender() gets called, we end up in an infinite loop.
How do we fix this?
React provides a useCallback() Hook that memoizes our function, i.e. it does a shallow comparison of our previous results and the current result of our function and prevents a recall of that function if they’re the same. If they are, then our component does not re-render, ultimately avoiding a Check out this article on useCallback() by Dmitri Palvutin to learn more about this hook.
Let us demonstrate this;
const determineRender = useCallback(() => {
  return 2 + 2;
}, []); //determineRender is memoized now.
useEffect(()=> {
  setCount((count)=> count+1);
},[determineRender]);
So now our function runs only once because useCallback memoizes our results and prevents determineRender() from updating.
That’s it. Problem solved!
What about Arrays and Objects?
As reference types, we also end up stuck in an infinite loop if we make them dependencies.
However, instead of useCallback(), array values are memoized using the useRef() hook, while objects are memoized using the useMemo() hook.
Check out this article by Dmitri Pavlutin to learn more about the useRef() and the useMemo() and their uses in preventing infinite loops with array and object dependencies.
Side-effect cleanup
We can categorize side effects into two different groups.
The ones that require a cleanup function and those that don’t.
You could liken each group to a bowl of soup and an ice-cream cone, respectively.
An ice-cream cone is edible, meaning we don’t have to clean up anything. A soup bowl on the other hand, is reusable, meaning we need to clean it up after use so someone else can use it.
Some side effects need to be cleaned up.
Why?
We could think of it like this; if I use my bowl and don’t clean it up, the next person using that exact bowl is exposed to several health risks due to bacteria.
In our React application, when we do not clean up effects that need to be cleaned up, we put our application at risk of errors, memory leaks and security breaches.
Now you may ask, what kind of effect needs to be cleaned up.
Timers, subscriptions, and even requests. These and several others are examples of effects that require cleanup.
Below is the basic structure of the useEffect hook with a cleanup function.
useEffect(() => {

  // Side-effect...

  return function cleanup() {

    // Side-effect cleanup...

  };

}, dependencies);
Clean-ups are carried out as follows:
useEffect() calls the callback running the side-effect after the first render. Here, the effect cleanup function plays no part.
In subsequent renderings, however, useEffect() first calls the cleanup function from the most recent side-effect execution (to clear everything left over from the most recent side-effect), then executes the current side-effect.
Finally, useEffect() calls the cleanup function from the most recent side-effect after unmounting the component.
To learn more about cleanups, check out this cool tutorial by Net Ninja.
Basic use cases of the useEffect() hook
useEffect() combines the functionality of three lifecycle methods and even more. Here are a few use cases of React useEffect();
- HTTP Requests,
- Updates on the state or prop change,
- Intervals and Timeouts,
- API subscriptions,
- Input field validation,
- Live filtering, etc
React’s useLayoutEffect hook: useEffect’s not-so-distant cousin
While useEffect is the most popular hook for handling effects, it’s not the only hook available for this purpose. Its not-so-distant cousin, useLayoutEffect(), also helps us handle side effects in a React component, with only a slight difference between both hooks.
In fact, they’re so similar in functionality that if you replaced all the useEffect() functions in your React application with useLayoutEffect(), your app would most likely still work perfectly.
However, there is one problem with doing that, and that is because of a slight difference in execution.
What is the difference between useEffect() and useLayoutEffect() in React?
Unlike useEffect, which runs asynchronously after every render, useLayoutEffect runs synchronously immediately after React has performed all DOM mutations. This means that instead of waiting for the browser to be repainted before it runs, it runs at the same time repainting happens.
This operates in the same manner as componentDidUpdate() and componentDidMount() in terms of scheduling. When making DOM measurements (such as determining the scroll position of animated elements or other styles for an element) and afterwards making DOM changes or causing a synchronous re-render by updating state, this can be helpful, however not in other cases.
This is because the user doesn’t actually see the updates until the browser has repainted; thus your function runs immediately after the DOM has been updated but before the browser has had a chance to “paint” those changes. This means changes are not visible to the user until the browser has been repainted.
This consequently increases the time before First Contentful Paint, which is less performant and an indicator of a bad user experience.
For this reason, 99% of the time, you are better off handling your effects asynchronously with useEffect() except they’re observable or involve inconsistent visual changes.
To learn more about useEffect and useLayoutEffect, check out this article by Kent C. Dodds or this video by Hitesh Choudhary.
useEffect vs. useLayoutEffect: An overview(Table)
Below is a short table that compares useEffect and useLayoutEffect;
useEffect() vs. useLayoutEffect()
| useEffect() | useLayoutEffect() | |
| Performance | More performant | Less performant |
| Time of Execution | After browser re-paint. | Simultaneously with browser re-paint |
| Inconsistent Visual Changes | Poor handling of inconsistent visual changes | Handles inconsistent visual changes seamlessly |
Conclusion
Being able to comprehend the useEffect Hook’s underlying mental model, design principles, and best practices is essential if you want to advance as a React developer.
Need to learn more about the useEffect hook? Check out this article by Dmitri Pavlutin.
We have built a product to cut down development time by converting your Figma files to code; check it out here!
For more cool React tutorials, check out our blog!
Interesting Read From Our Blog:
- Manage App State Better with React useReducer Hook
- React UseRef: Create Scalable Apps That Perform Like a Dream
Related Articles
-
 React.js
Popular React Dropdown Libraries – Creating Dropdowns with Bootstrap
Consider CopyCat, an AI-powered plugin that can convert your Figma designs to production-ready UI code, freeing up your time to focus on the app's business logic. Convert Design to Code with CopyCat Introduction Dropdowns are useful components that allow users…
December 23, 2022 -
React.js
Master React PropTypes With This Comprehensive Guide
Introduction In React, we build applications by breaking down the UI into several components. Often, we use React props to pass data from one React component to another. React props allows us to pass different type of data between two…
July 15, 2022