

In a React application, by convention, you need to follow a parent-child component hierarchy. While building a React app, you might encounter scenarios where you want to render children into a DOM node outside of its component hierarchy like a modal or a widget.
So how can you achieve it?
To solve this exact problem, React version 16.0 introduced a concept known as React Portals. In this article, we are going to learn what are React Portals and how to implement them using lots of examples.
Let’s get started!

What are React Portals?
A React Portal is a feature introduced by React to render children into a DOM node that exists outside the DOM hierarchy of the parent component. Portals allow you to insert react elements into specific DOM positions which are typically not the part of usual DOM tree. This way, the parent-child component relationship is maintained even when the child component is outside its own parent DOM.
Syntax:
ReactDOM.createPortal(child, container)
The createPortal() accepts two arguments:
- first argument (child) – any renderable React child, such as an element, string, or fragment
- second argument (container) – the DOM element
Why do we need it?
Before React v16.0, it was very difficult to render the child component outside the hierarchy of its parent component.
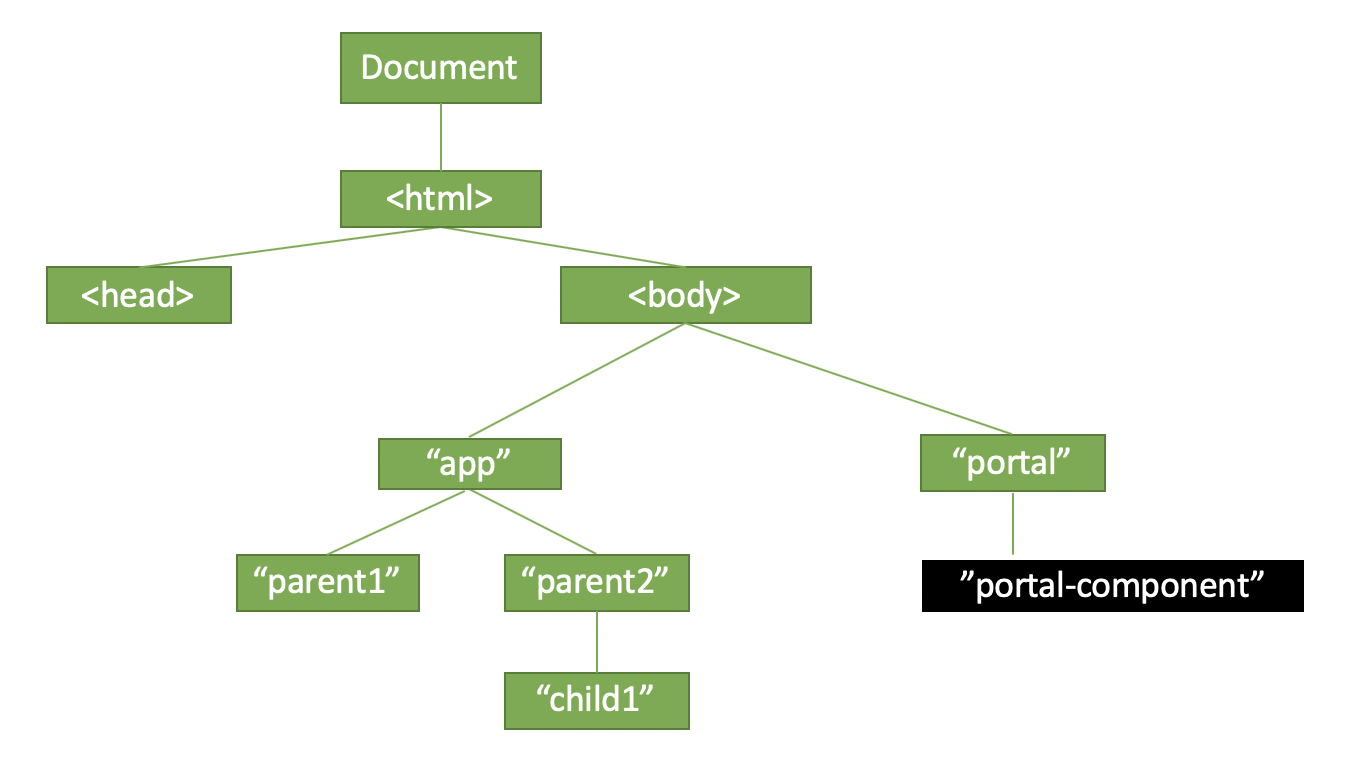
In a React app, as we know, we have only a single HTML file called index.html which is placed inside the public folder. Inside this index.html, we are having one root DOM element, into which our react application is mounted.

So by convention, we are having an <div> element with id=”root” which takes the role of the root DOM element and every single React component within the application will fall inside this root DOM element forming a parent-child hierarchy.
From top to bottom, the standard DOM hierarchy is as follows:
root node => parent nodes => child nodes => leaf nodes
The concept of React portal helps us to break out of this DOM tree and provides us the ability to render a component into a DOM node, that is directly not under this root element
Advantages of React Portals
- Portals come as a part of React v16’s official API
- Minimalistic Implementation. Portals do not produce any DOM mess.
- Event bubbling is possible inside a portal.
- React portals can use context API for data transfer between components.
When to use React Portal?
The React portal allows you to insert a child component into a different location in the DOM rather than as a child of the nearest parent node. A few common use cases of React Portals are:
- Modals or Dialog boxes
- Tooltips
- Widgets
- Floating menus
- Notifications
- Pop-up messages
- Lightboxes
- Loaders etc.
How to use React Portal in your app?
The simplest way to implement a portal in your React app is to make use of the default API. Let us see how!
Step 1: Create a React application. For this demo, I am making use of CRA.
npx create-react-app react-portal-app
Step 2: Move to the project root folder using the following command.
cd react-portal-app
Step 3: Inside the public/index.html add an extra mount point in a DOM node outside of the root node.
  <body>
    <noscript>You need to enable JavaScript to run this app.</noscript>
    <div id="root"></div>
    <div id="portal-root"></div>
  </body>
All the normal react components will be mounted inside the <div id=”root”></div>.While, the portals (like modals, tooltips etc,) will be mounted inside <div id=”portal-root”></div> using React Portal.
Step 4: Create a Portal wrapper component inside src/components. For this demo, we are creating a simple component to showcase how a portal works.
The Portal component imports ReactDOM and creates a portal using createPortal() and the child node is rendered inside the root node for the portal.
//Portal.js

import React from "react";
import ReactDOM from "react-dom";
import "./Portal.css";

const Portal = ({children}) => {
  return ReactDOM.createPortal(
    <div className="portal-container">
      {children}
    </div>,
    document.getElementById("portal-root")
  );
};

export default Portal;
I have added a simple CSS style to the component as below:
//Portal.css

.portal-container{
    text-align: center;
    background-color: #282c34;
    color: white;
    display: flex;
    flex-direction: column;
    align-items: center;
    justify-content: center;
    height: 100vh;
    width: 100vw;
    overflow: hidden;
}
Step 5: Call the Portal component inside App.js.
//App.js

import React from "react";
import Portal from "./components/Portal";
import "./App.css";

function App() {
  return (
    <div className="app">
      <Portal>
        <h1> Welcome to React Portal!</h1>
      </Portal>
    </div>
  );
}

export default App;
Step 6: Run the application using the following command.
npm run start
Output:
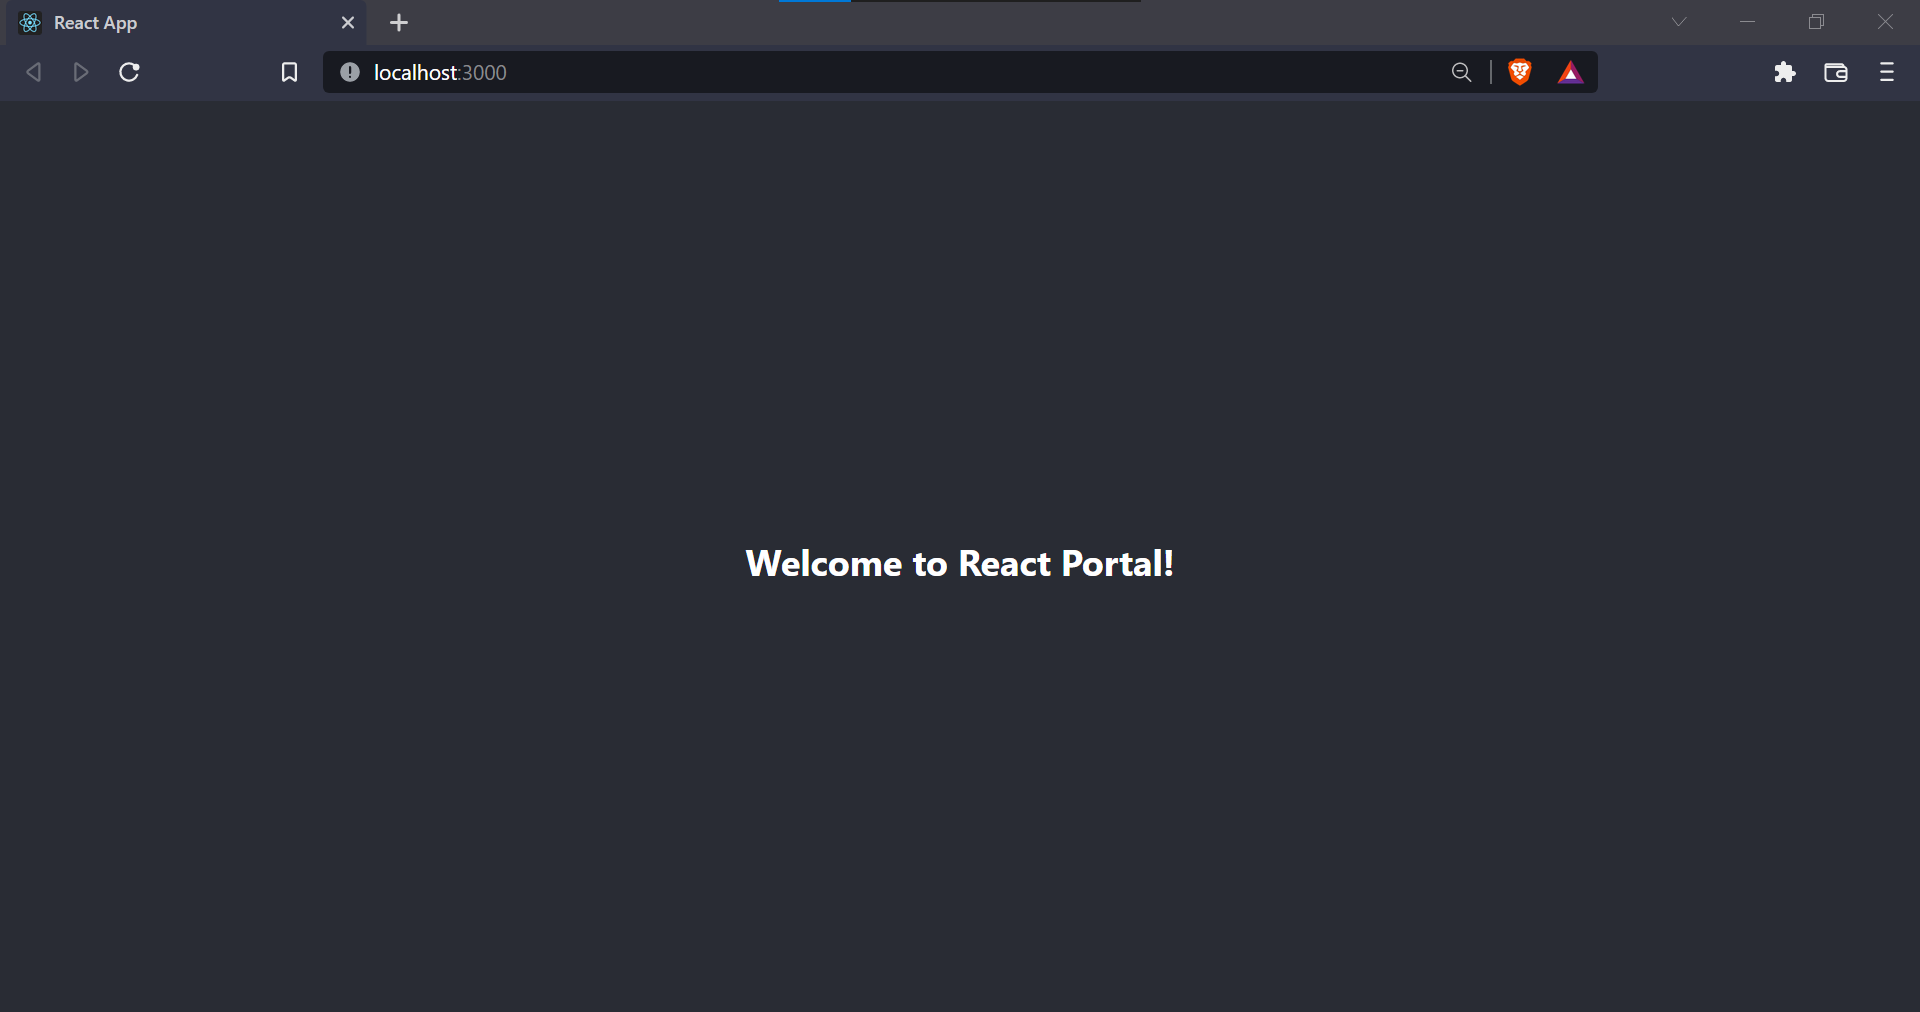
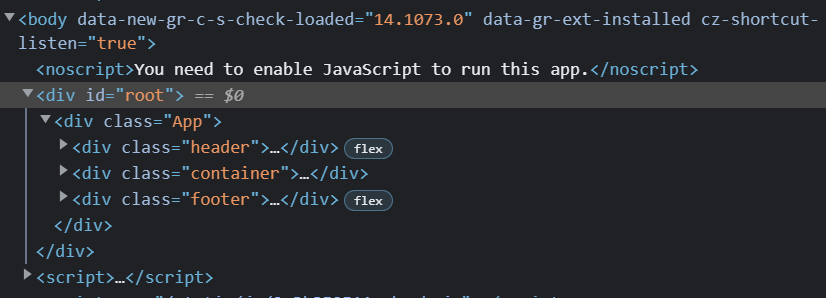
Let us observe the DOM structure now.
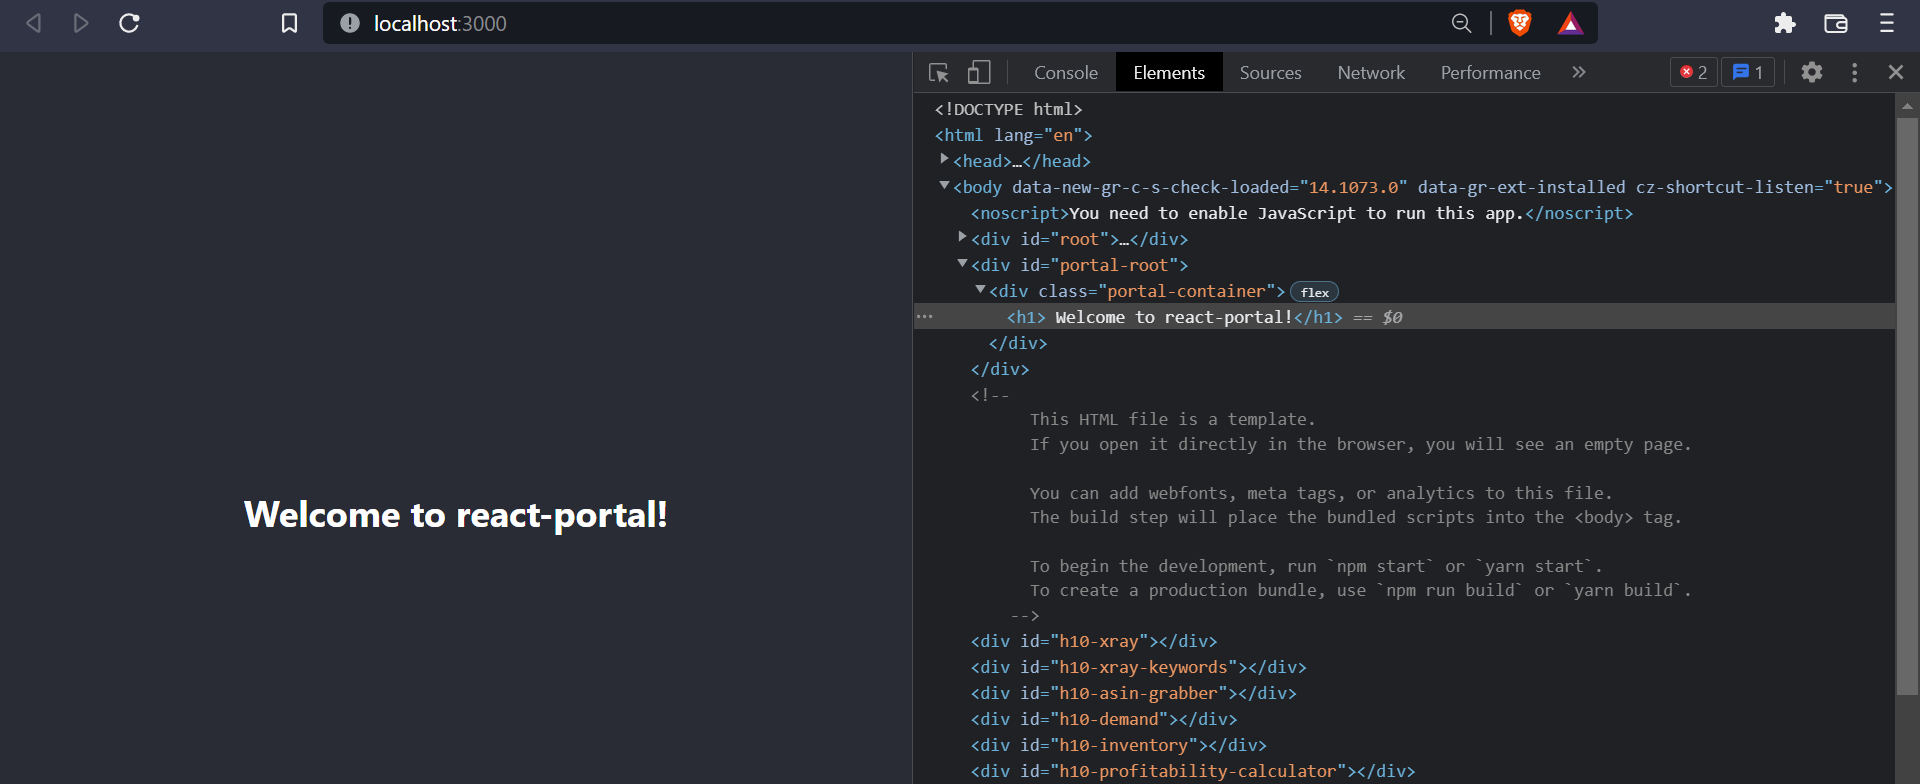
As you can see, using Portals, we were able to “break out” of the parent root node and render the child inside a different DOM node location.
How to create a portal using the react-portal library?
Alternately, you may also make use of the react-portal library for easily creating a portal in a React app. In this section, let us talk about it.
Features of react-portal library
According to the official documentation, key features of the react-portal library are:
- uses React v16 and its official API for creating portals
- has a fallback for React v15
- transports its children into a new React Portal which is appended by default to the document.body
- can target user-specified DOM element
- supports server-side rendering
- supports returning arrays (no wrapper divs needed)
- <Portal /> and <PortalWithState /> so there is no compromise between flexibility and convenience
- doesn’t produce any DOM mess
- provides close on ESC and close on outside mouse click out of the box
- no dependencies, minimalistic
Implementation of react-portal
Now let us move on to the implementation. For this demo, I will be modifying the App.js file of the project created in the above example.
Step 1: Install the library to your React project.
npm install react-portal
Step 2: Make the import from the react-portal inside your component. Then…
import { Portal } from "react-portal";
Step 3: Call the imported Portal component. Simple as that!
//App.js

import React from "react";
import { Portal } from "react-portal";
import "./App.css";

function App() {

  return (
    <div className="App">
      <Portal>
        <h1> Welcome to react-portal!</h1>
      </Portal>
    </div>
  );
}

export default App;
Step 4: Run the application
npm run start
Output:
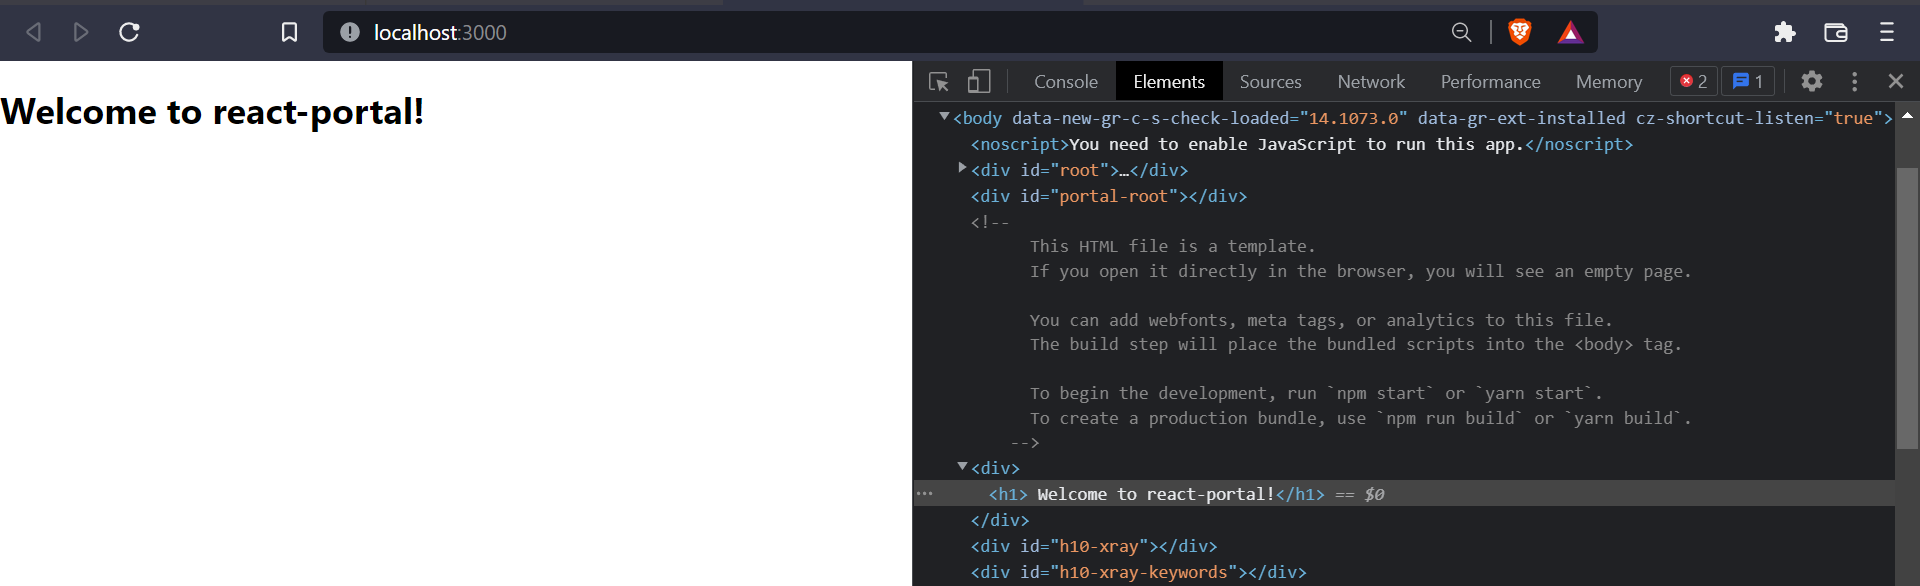
We were able to “break out” of the parent root node and render the child inside a different DOM node location.
[Demo] How to create a modal using Portals?
In the previous sections, we learned what are Portals and how to implement a React portal. Now, let us learn how to create a modal using Portals.
Step 1: Create a Modal component inside components/Modal.js.
//Modal.js

import React, { useState, useEffect } from "react";
import ReactDOM from "react-dom";
import "./Modal.css";

export const Modal = ({ children, showModal, handleClose }) => {
  const [mounted, setMounted] = useState(false);

  useEffect(() => {
    setMounted(true);

    return () => setMounted(false);
  }, []);

  const modalContent = showModal ? (
    <div className="modal-container">
      <div className="modal-content">
        <div>{children}</div>
        <button onClick={handleClose} className="close-btn">
          Close
        </button>
      </div>
    </div>
  ) : null;

  if (mounted) {
    return ReactDOM.createPortal(
      modalContent,
      document.getElementById("portal-root")
    );
  } else {
    return null;
  }
};
Here, the component receives the following props to toggle the opening and closing of the modal.
- showModal – when set to true, Modal will be opened
- handleClose – when set to false, Modal will be closed.
I have also given a bit of CSS styling to this component in the Modal.css file
//Modal.css

.modal-container {
    position: fixed;
    inset: 0;
    background-color: rgba(0, 0, 0, 0.2);
    display: flex;
    flex-direction: column;
    align-items: center;
    justify-content: center;
    transition: all 0.3s ease-in-out;
    overflow: hidden;
    z-index: 999;
    padding: 40px 20px 20px;
  }

  .modal-content {
    width: 60%;
    height: 60%;
    background-color: #282c34;
    color: #fff;
    display: flex;
    flex-direction: column;
    align-items: center;
    justify-content: center;
    font-size: 2rem;
  }

  .close-btn{
    padding: 10px;
  }
Step 2: Render the Modal component inside App.js
//App.js

import React, { useState } from "react";
import { Modal } from "./components/Modal";
import "./App.css";

function App() {
  const [showModal, setShowModal] = useState(false);

  return (
    <div className="app">
      <h1> React Portals Demo</h1>
      <button className="modal-btn" onClick={() => setShowModal(true)}>
        Open Modal
      </button>

      <Modal showModal={showModal} handleClose={() =>  setShowModal(false)}>
        <h1>Hello from Modal</h1>
      </Modal>
    </div>
  );
}

export default App;
//App.css

.app {
  text-align: center;
  background-color: #282c34;
  color: white;
  font-size: 2rem;
  display: flex;
  flex-direction: column;
  align-items: center;
  justify-content: center;
  height: 100vh;
  width: 100vw;
  overflow: hidden;
}

.modal-btn {
  padding: 10px;
}
Step 3: Run the code
npm run start
Output:

We have successfully created a modal!
How do you use React Portal in Next.js?
Next.js is a Javascript framework that has gained tremendous popularity by enabling you to create React applications faster than ever. In this section, let us learn how to implement a portal in the Next.js framework. Do check out this article for learning what is the difference between React and Next.js.
Steps:
1: Create a Next.js project using the following command.
npx create-next-app@latest my-app
2: Move to the project root folder.
cd my-app
3: Now, inside the pages folder let us create a _document.js file.
4: Paste the following code inside _document.js as mentioned in the official docs.
//_document.js

import { Html, Head, Main, NextScript } from "next/document";

const Document = () => {
  return (
    <Html>
      <Head />
      <body>
        <Main />
        <NextScript />
      </body>
    </Html>
  );
};

export default Document;
5: Now define the mount point for the portal in the DOM inside <body>.
//_document.js

import { Html, Head, Main, NextScript } from "next/document";

const Document = () => {
  return (
    <Html>
      <Head />
      <body>
        <Main />
        <NextScript />
        <div id="portal-root"></div>
      </body>
    </Html>
  );
};

export default Document;
6: Now, let us create our wrapper component for Portal inside ./components/Portal.js.
//Portal.js

import { useEffect, useState } from "react";
import { createPortal } from "react-dom";

const Portal = ({ children }) => {
  const [mounted, setMounted] = useState(false);

  useEffect(() => {
    setMounted(true);

    return () => setMounted(false);
  }, []);

  return mounted
    ? createPortal(children, document.getElementById("portal-root"))
    : null;
};

export default Portal;
7: Use the Portal component and pass the child node. For this demo, I am using the component inside the Home Page i.e pages/index.js file
//index.js

import Portal from "../components/Portal";

export default function Home() {
  return (
    <div>
      <h1>React Portals Demo</h1>
      <Portal>
        <h3>Welcome to React Portal!</h3>
      </Portal>
    </div>
  );
}
8: Run the app
npm run dev
Output:
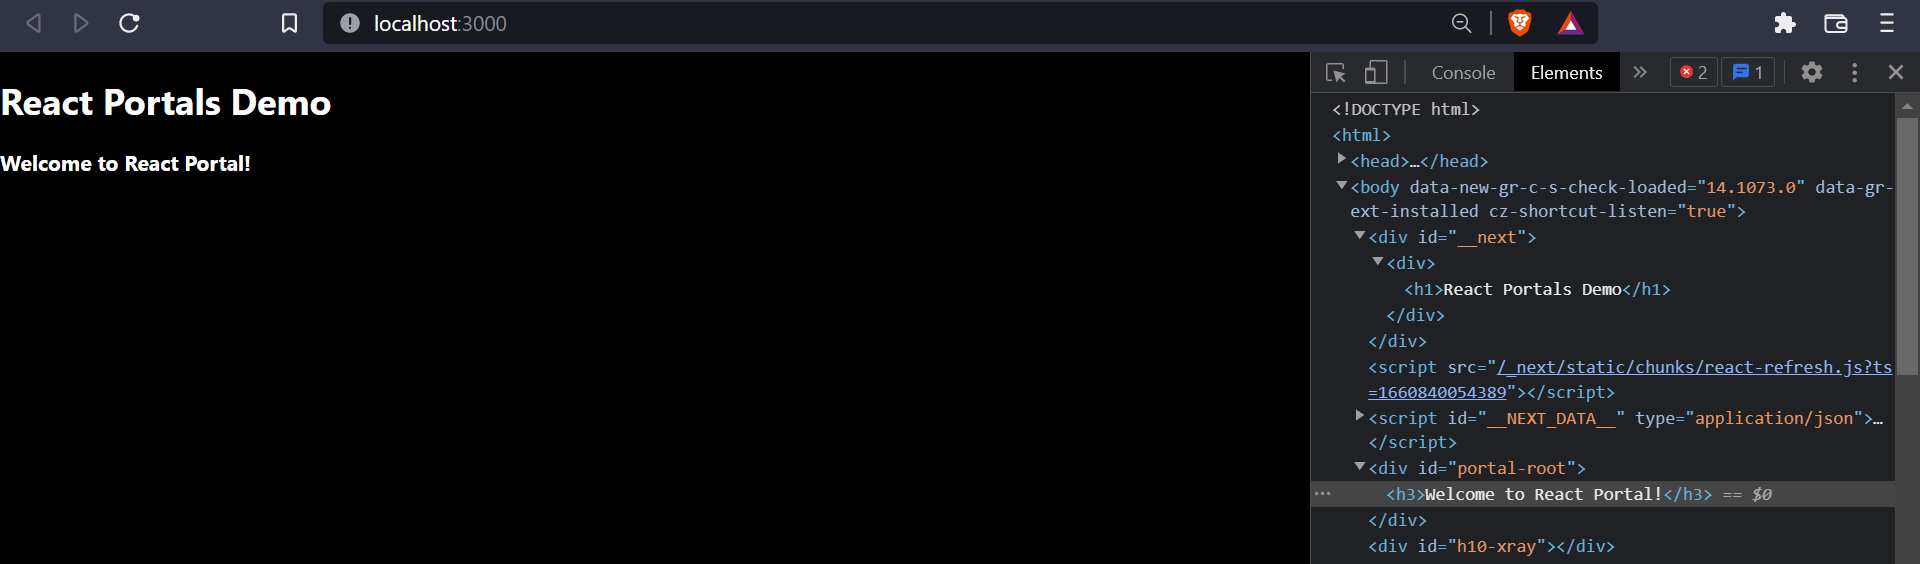
We have successfully created a Portal in the Next.js framework!
Things to consider when using Portals
While using React portals there are a few things that you need to be mindful about.
- You have to pre-define an HTML DOM element as the Portal node mount point.
- Portals only affect the DOM structure and have no impact on the React component tree.
- Event bubbling will be working as normal regardless of the portal node location in the DOM. It is still possible to propagate events to React tree ancestors.
- React still has control over the Portal node and its lifecycles.
FAQ
What are Portals in React and when do we need them?
React portal is a concept used to render children into a DOM node that exists outside the DOM hierarchy of the parent component. We use a portal when we don’t want the child component to overlap with the parent component and visually break out of the parent container. Common usage is in modals, loaders, tooltips, etc.
What is Portal in React Native?
In React Native, portals are used to teleport a react-native element from one place to another regardless of the hierarchy. The portal can be implemented with the help of Context API.
Does React modal use Portal?
Yes. React modal is one of the common uses for Portal implementation.
Wrapping Up

In this blog, we have discussed what are React portals and how to implement them with lots of examples. To dive more deeply into using React portals, do check out the additional references given below.
Additional References
Blogs:
- https://blog.bitsrc.io/understanding-react-portals-ab79827732c7
- https://blog.logrocket.com/learn-react-portals-by-example/
Videos:
If you’re looking out for cool React tools that’ll help you to write component code faster and be production ready faster than your competition, don’t forget to check out the CopyCat plugin for React!
Happy Coding!
Interesting Reads From Our Blogs
- The Most Complete Guide for React Navigation
- Complete Guide to React Lazy Loading and Code Splitting
- How to Build a Good React Modal
Related Articles
-
 React.js
React Router Redirect: How to Use in Your App
Redirecting is a vital feature in a frontend application, such as a React app, because it allows us to programmatically redirect from one URL to another without using an anchor link <a> or a React Router <Link/> component. In this…
October 31, 2022 -
React.js
Reactjs PopUp: How to Easily Create Popups in React?
Great user experience and user interfaces plays a vital role in the success of any Application. Whether it is a Hybrid Application or a Native one, the end-user demands good UX. When creating any such good experience on an App,…
February 7, 2022