


- What are React Hooks?
- What is useCallback Hook in React?
- When should I use React useCallback Hook?
- useMemo vs useCallback in React
- UseMemo vs React.memo
- How do you use useCallback Hook in React?
- Detecting problems with our todo app
- Test 1: On page load:
- Test 2: Typing inside the input box:
- Test 3: Adding a todo item:
- Test 4: Typing inside the input box with TodoListItem component:
- Test 5: Deleting a Todo:
- Optimizing component rendering
- Test 2 after memoize: Typing inside the input box:
- Test 4 after memoize: Typing inside the input box with TodoListItem component:
- Frequently Asked Questions on useCallback Hooks
- Wrapping Up
What are React Hooks?
They let us “hook into” React class component features like state, reducer, and component lifecycle methods and use them within a functional component.
React hooks are built-in Javascript objects or functions that allow developers to utilize React as a functional component instead of a class component.
NB: Hooks in React cannot be used in class components but only in a functional component.
What is useCallback Hook in React?
The useCallback is a memoization hook in a React component that accepts a callback function and returns a memoized/memorized version of the function.
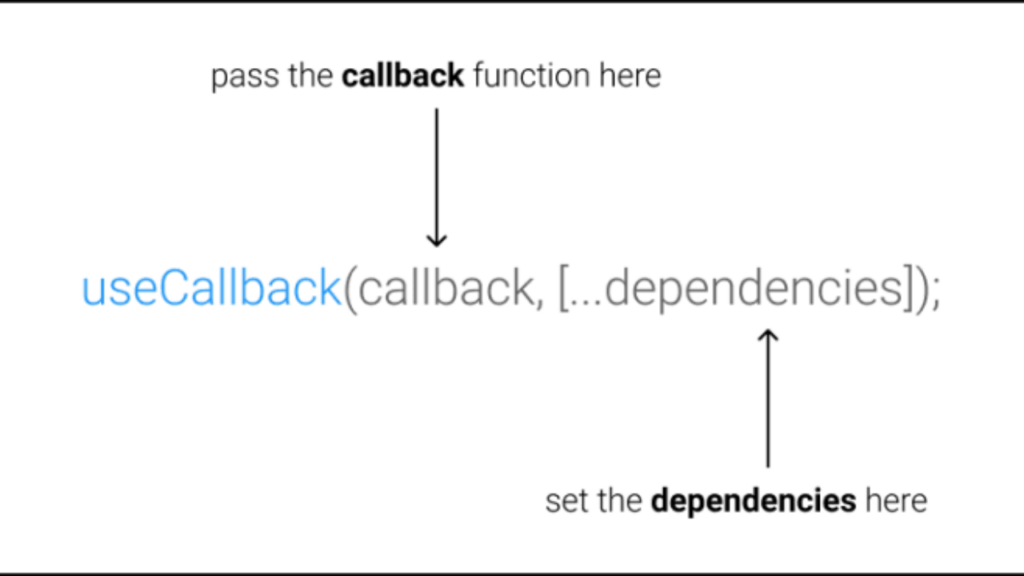
The callback function is prevented from being redefined until any value in the array of dependencies has changed.
The React useCallback hook syntax looks something like this:
const memoizedCallback = useCallback(() => {
    doSomething(a, b);
  },[a, b],
);
This is useful because every time a component re renders its functions is also recreated, which makes every child component that received the function as a prop to re-render as well.
The useCallback hook is useful to prevent these functions from being recreated every time unless necessary i.e when any of the dependencies changed.
Then we can pass the memoizedCallback function to any component like this:
<ChildComponent
	handleClick={memoizedCallback}
/>
The above expression will always receive a memoized version of the memoizedCallback function until one of the dependencies (a or b) has changed.
When should I use React useCallback Hook?
Not all function needs to be memoized, having too many useCallback can be expensive for your application because React has to compare the previous dependencies with the values each time the component re-render.
Apply React useCallback when it’s crucial that the child components should not re-render unnecessarily because a callback function prop is redefined during render. useCallback will make React memorize this callback function to return the same function instance between renders and prevent unnecessary renders.
useMemo vs useCallback in React
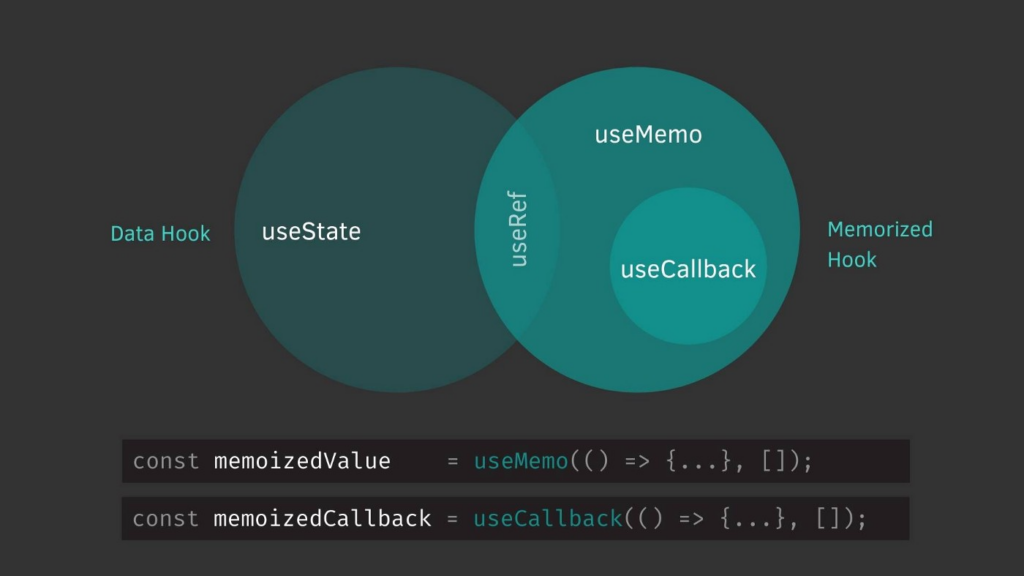
We’ve learned that the useCallback hook is used to memoize a callback function so it doesn’t re-define when the parent component changes to avoid re-renders that are completely unnecessary of a child component that accepts the callback function as a prop.
useCallback also helped to check referential equality, which means checking if the reference of an object or an array is exactly the same as it was before.
The useMemo hook on the other hand is useful for memoizing a function value, it prevents a function value from being re-calculated if it’s the same as it was before. The function only re-calculates the value when the dependency array changes.
The useMomo hook syntax looks something like this:
const calculation = useMemo(() => slowFunction(count), [count]);
Given that we have a very slow function that takes a long time to calculate and provide a value. We can apply the useMemo hook to the slowFunction so that it does not run the function until the count value has changed.
For example, if the count argument in the slowFunction was previously 1 then the function should be skipped during render when the argument remains 1. The result of value 1 is memoized and will be returned.
| useCallback | useMemo |
|---|---|
| Use to memoize a callback function (referential equality) between render | Use to memorize a function result or value between a function’s calls and between renders |
| return a memoized function | return a memoized value |
| Changes when the dependencies have changed | Changes when the dependencies have changed |
useCallback useMemo Use to memoize a callback function (referential equality) between render Use to memorize a function result or value between a function’s calls and between renders return a memoized function return a memoized value Changes when the dependencies have changed Changes when the dependencies have changed
UseMemo vs React.memo
React.memo is another method to memoize a functional component in a React app. It is a higher-order function (or HOF) that accepts a component as its own prop and memoizes the prop passed to the React component.
The useMemo hook prevents a function from recalculating until a dependency changes to avoid being redefined, while the React.memo will prevent a component from rendering until the prop changes:
export const TodoListItem = memo((prop) => {});
You can read more about the difference between useMemo hook and React.memo here.
How do you use useCallback Hook in React?
In this section, we’ll take a look at how to optimize a component with a useCallback hook in a React application.
Step 1 – Creating a New React Project
We’ll create a new react app named todo-list-app ****to experiment useCallback. This tutorial makes use of CRA (Create React App).
Create a new React todo-list-app application with the command below:
npx create-react-app todo-list-app
Navigate into the newly created todo-list-app ****directory:
cd todo-list-app
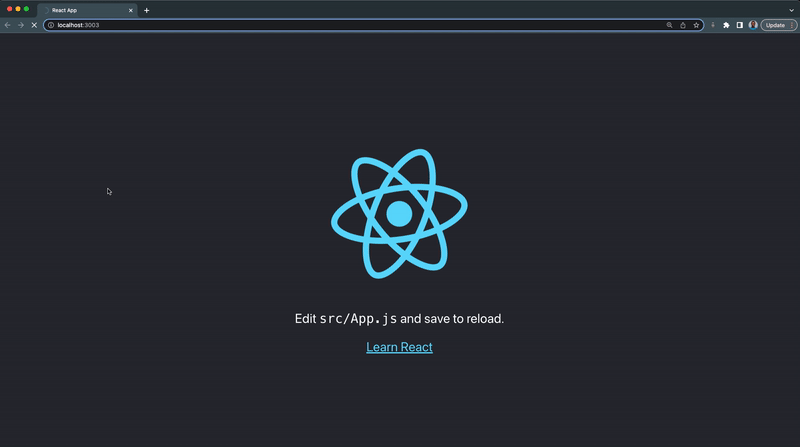
Next, start the React app server:
npm run start
Your React app will open a new tab on your browser and should look something like this:
Step 2 – Creating the TodoForm Component
In this section, we’re going to create a TodoForm component that’ll be used to create a new to-do item.
From your src folder:
- Create a new component folder
- Next, create a new TodoForm.jsx file inside the component folder with the following lines of code:
import React from "react";

export const TodoForm = ({ addTodo, title, setTitle }) => {
  console.log("TodoForm rendered");

  const handleSubmit = (e) => {
    e.preventDefault();
    addTodo(title);
  };

  return (
    <>
      <form className='todo-form'>
        <input
          type='text'
          value={title}
          onChange={(e) => setTitle(e.target.value)}
        />
        <button onClick={handleSubmit}>Add</button>
      </form>
    </>
  );
};
The TodoForm component will receive the following props:
- An addTodo function that will be called when the add button is clicked
- A title prop
- And the setTitle prop to update the title each time the user types in the input box
Step 3 – Creating the TodoList Component
We’ll create the to-do list component which contains a ul tag in this section. This component will serve as a parent component for the li tag that’ll render the to-do list items.
From your component folder:
- Create a new todo.css and TodoList.jsx file with the following code:
import React from "react";
import "./todo.css";
import { TodoListItem } from "./TodoListItem";

export const TodoList = ({ todos, handleCompleted, trashTodo }) => {
  console.log("TodoList component rendered");
  return (
    <ul className='todo-list'>
      {todos?.map((item) => {
        return (
          <TodoListItem
            key={item.id}
            item={item}
            handleCompleted={handleCompleted}
            trashTodo={trashTodo}
          />
        );
      })}
    </ul>
  );
};
The TodoList component will receive the following props:
- The todos array renders the todo items using the TodoListItem component.
- The handleCompleted function is needed in the TodoListItem component to toggle the todo completion.
- The trashTodo function is needed in the TodoListItem component to delete a todo.
Copy and paste the following CSS inside the todo.css file:
body{
  background-color: #282c34;
  padding: 20px;
  display: flex;
  justify-content: center;

}

h2 {
  font-size: 3rem;
}

.header{
  width: 100%;
}

.todo-container {
  display: flex;
  min-height: 100vh;
  flex-direction: column;
  color: white;
  margin: 0 auto;
  max-width: 600px;
}

.todo-form {
  display: flex;
}

.todo-form input {
  padding: 12px 32px;
  border: none;
  border-radius: 4px;
  font-size: 1.2rem;
  outline: none;
}

.todo-form button {
  font-size: 1.2rem;
  padding: 0px 32px;
  cursor: pointer;
  background-color: #61dafb;
  color: white;
  border: none;
  border-radius: 4px;
  margin-left: 10px;
}

.todo-list {
  list-style: none;
  margin: 0;
  padding: 0;
  display: flex;
  flex-direction: column;
  align-items: flex-start;
  margin-top: 30px;
  position: relative;

}

.todo-list-item {
  padding: 10px 0px 5px 0px;
  margin-bottom: 10px;
  border-bottom: 1px solid #c2c2c2;
  display: flex;
  gap: 15px;
  justify-content: center;
  align-items: center;
  border-radius: 5px;
}

.todo-checkbox {
  margin-right: 5px;
  height: 20px;
  width: 20px;
}

.todo-title {
  font-size: 1.2rem;
  font-weight: bold;
}

.todo-title.completed {
  text-decoration: line-through;
  filter: blur(0.7px);
}

.todo-trash {
  all: unset;
  padding: 2px 5px;
  font-size: 15px;
  font-weight: 700;
  border-radius: 3px;
  width: 15px;
  background-color: red;
  text-align: center;
  cursor: pointer;
}

.trashing{
  padding: 2rem 0;
    width: 100%;
    background-color: lightgray;
    position: absolute;
    opacity: 0;
    top: 0;
    left: 0;
    transform: translateY(-300px);
    transition: all 0.6s ease-out;
}
Step 4 – Creating the TodoListItem Component
In this section, we’ll create a TodoListItem component. This component will contain a li tag with the handleCompleted, trashTodo functions of our to-do items.
From your src folder:
- Create a new TodoListItem.jsx file with the following lines code:
import React from "react";

export const TodoListItem = ({ item, handleCompleted, trashTodo }) => {
  console.log("TodoListItem component rendered");

  const { id, title, completed } = item;
  const [trashing, setTrashing] = React.useState(false);

  return (
    <div className={`${trashing && "trashing"}`}>
      <li className='todo-list-item'>
        <input
          type='checkbox'
          className='todo-checkbox'
          checked={completed}
          onChange={() => handleCompleted(id)}
        />
        <p className={`todo-title  ${completed && "completed"}`}>{title}</p>
        <button
          className='todo-trash'
          onClick={() => {
            setTrashing(true);
            setTimeout(() => {
              trashTodo(id);
              setTrashing(false);
            }, 500);
          }}
        >
          x
        </button>
      </li>
    </div>
  );
};
Step 5 – Creating the CRUD Functions in App Component
In this section, we’ll create the addTodo, handleCompleted and trashTodo functions, then we’ll render the TodoList and TodoForm components in the App.js.
Update your App.js file with the code below:
import { useState } from "react";
import { TodoList } from "./component/TodoList";
import { TodoForm } from "./component/TodoForm";

function App() {
  const [todos, setTodos] = useState([]);
  const [title, setTitle] = useState("");

  console.log(`App component rendered`);

  // Add a new todo
  const addTodo = (title) => {
    const newTodo = { title, completed: false, id: todos.length + 1 };
    setTodos([newTodo, ...todos]);

    // clear form
    setTitle("");
  };

  // Toggle a todo as completed
  const handleCompleted = (id) => {
    setTodos(
      todos.map((todo) => {
        if (todo.id === id) {
          todo.completed = !todo.completed;
        }
        return todo;
      })
    );
  };

  // Delete a todo
  const trashTodo = (id) => {
    setTodos(todos.filter((todo) => todo.id !== id));
  };

  return (
    <div className='todo-container'>
      <div className='header'>
        <h2>Todo List App</h2>
      </div>
      <TodoForm title={title} setTitle={setTitle} addTodo={addTodo} />
      <TodoList
        todos={todos}
        handleCompleted={handleCompleted}
        trashTodo={trashTodo}
        addTodo={addTodo}
      />
    </div>
  );
}

export default App;
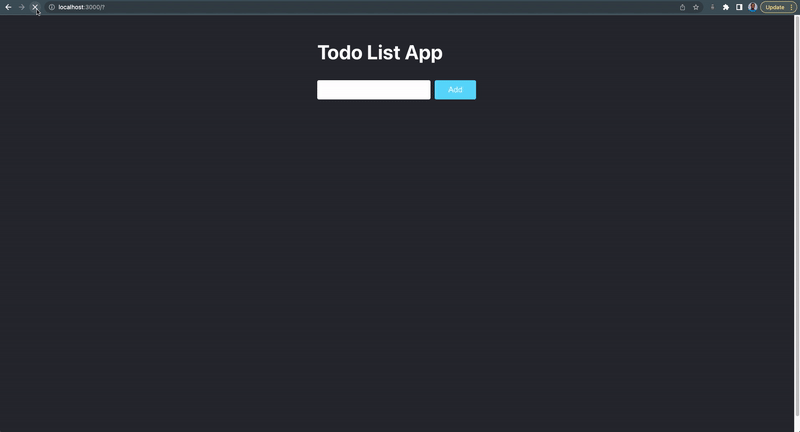
Putting everything together, our to-do app should look and work like this:
Detecting problems with our todo app
We’ve added console.log() to our components so we can observe how many times each component is rendering and what’s causing it to render so we can optimize it.
Test 1: On page load:

The following other components are rendered when the page loads or is refreshed:
- The App component ☑️
- The TodoForm component ☑️
- The TodoList component ☑️
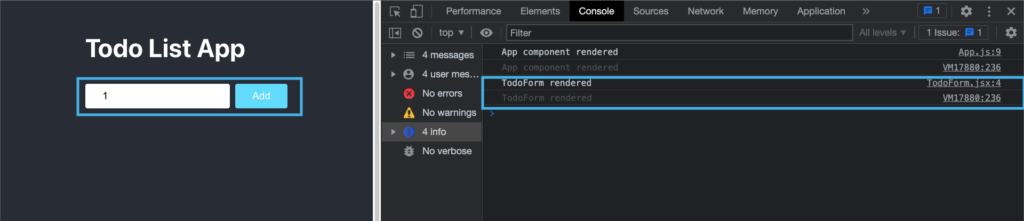
Test 2: Typing inside the input box:

The following components are rendered when we type inside the TodoForm input box:
- The App component ☑️
- The TodoForm component ☑️
- The TodoList component ✖️
Because we are not rendering the todo when we’re typing, the TodoList component does not need to re-render when the TodoForm component is updated. This must be optimized.
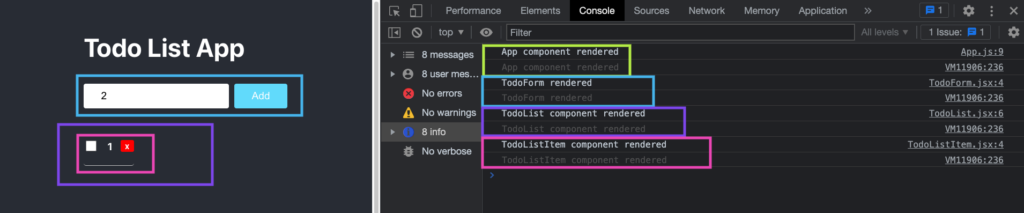
Test 3: Adding a todo item:

The following components are rendered when we add a new todo item:
- The App component ☑️
- The TodoForm component ☑️
- The TodoList component ☑️
- The TodoListItem component ☑️
This re-rendering is ideal because all of the props supplied to the components have been modified, and a re-rendering is required to update the UI.
Test 4: Typing inside the input box with TodoListItem component:
Now that we’ve rendered the TodoListItem component, let’s see if typing inside the TodoForm input box causes the component to re-render.
The following components are rendered when a user types inside the TodoForm input box:
- The App component ☑️
- The TodoForm component ☑️
- The TodoList component ✖️
- The TodoListItem component ✖️
We now have two components that are being re-rendered unnecessarily when we’re typing. The re-rendering is caused by the components receiving the title as a prop, which is updated with settittle every time we type, causing all components that rely on it to re-render as well.
We should optimize our app so that it only re-renders the App and TodoForm components when we type.
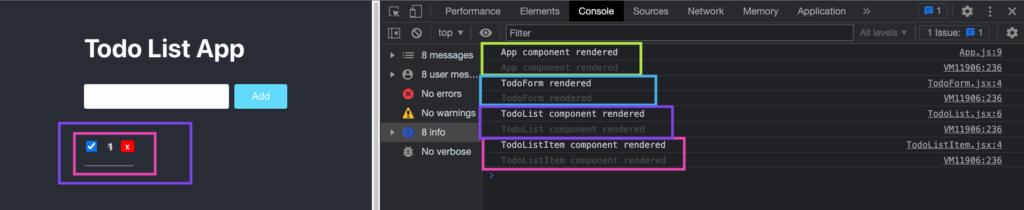
Test 5: Deleting a Todo:

The following components re render when we delete a todo item:
- The TodoListItem component ☑️
- The App component ☑️
- The TodoForm component ☑️
- The TodoList component ☑️
Test 6: Toggle Todo Item Completion:
The following components are rendered when we toggle a todo item completion state:
- The App component ☑️
- The TodoForm component ☑️
- The TodoList component ☑️
- The TodoListItem component ☑️
Optimizing component rendering
It’s clear that we need to reduce the needless re-rendering of the TodoList and TodoListItem components while the user is typing.
This re-rendering is caused by two factors:
- The value prop the component received
- The function prop the component received
Let’s examine the props supplied to the TodoList component from the App.js file:
<TodoList
  todos={todos}
  handleCompleted={handleCompleted}
  trashTodo={trashTodo}
  addTodo={addTodo}
/>
According to the snippets above, the TodoList component received four props:
- The todos state
- The handleCompleted function
- The trashTodo function
- The addTodo function
The TodoList component re-renders because the todos value prop and the three functions props are redefined each time the App component re-renders while the user is typing.
When the TodoList component re-renders the TodoListItem component also re-renders because of the item, handleCompleted and trashTodo props.
Then, in the TodoList.js file, we passed the same props to the TodoListItem component:
<TodoListItem
  key={item.id}
  item={item}
  handleCompleted={handleCompleted}
  trashTodo={trashTodo}
/>
Because of the item, handleCompleted, and trashTodo properties from TodoList, the TodoListItem component re-renders when the TodoList component re-renders.
The key prop help React identify which items have changed, are added, or are removed. You can read more about keys here. The item prop is an object instance of each todo item in the todos array.
Solving the Todos Prop Problem
We can solve the todos prop problem by passing the TodoList component to the memo higher-order function, which will memorize the todos value and prevent the TodoList component from rendering while we are typing.
Only when the value of the todos changes from the memorized value will the TodoList component re-render.
We don’t need to memoize the TodoListItem component because it shares the memoize prop with the TodoList component.
import memo:
import { memo } from "react";
The memoized TodoList component will look something like this:
export const TodoList = memo(({ todos, handleCompleted, trashTodo }) => {
  console.log("TodoList component rendered");
  return (
    <ul className='todo-list'>
      {todos?.map((item) => {
        return (
          <TodoListItem
            key={item.id}
            item={item}
            handleCompleted={handleCompleted}
            trashTodo={trashTodo}
          />
        );
      })}
    </ul>
  );
});
Then, using the React useCallback hook, we’ll memoize the addTodo, handleCompleted, and trashTodo functions so they don’t get redefined when they’re not needed, i.e. when the user is typing.
import useCallback:
import { useCallback } from "react";
Our memoized functions will look like this:
// Add a new todo
  const addTodo = useCallback(
    (title) => {
      const newTodo = { title, completed: false, id: todos.length + 1 };
      setTodos([newTodo, ...todos]);

      // clear form
      setTitle("");
    },
    [todos]
  );

  // Toggle a todo as completed
  const handleCompleted = useCallback(
    (id) => {
      setTodos(
        todos.map((todo) => {
          if (todo.id === id) {
            todo.completed = !todo.completed;
          }
          return todo;
        })
      );
    },
    [todos]
  );

  // Delete a todo
  const trashTodo = useCallback(
    (id) => {
      setTodos(todos.filter((todo) => todo.id !== id));
    },
    [todos]
  );
Test 2 after memoize: Typing inside the input box:
- Without memoization

Without memoize the App, TodoForm, and TodoList components are being rendered when we type inside the TodoForm input box.
- With memoization
Only the App and TodoForm components are being rendered when we type inside the TodoForm input box after memoizing our TodoList component.
Test 4 after memoize: Typing inside the input box with TodoListItem component:
- Without memoization

Without memoize the App, TodoForm, TodoList, and TodoListItem components are being rendered when we type inside the TodoForm input box.
- With memoization

Only the App and TodoForm components are being rendered when we type inside the TodoForm input box after memoizing our TodoList component.
You can find the complete source code of this tutorial in this repository.
Frequently Asked Questions on useCallback Hooks
Can I use useCallback in useEffect?
Ans: You’ll get this error when you try to use useCallback in a useEffect or any callback function:

Should I use useMemo or useCallback?
Ans: Use the useMemo hook if a value prop is forcing your component to re-render; however, if it’s a function, use the useCallback as demonstrated in this tutorial.
Can useMemo replace useCallback?
Ans: No, the useMemo hook is used to memoize a value while the React useCallback hook is used to memoize a function.
What are the performance benefits of React useMemo and useCallback?
Ans: Both useMemo and useCallback hooks are used for memorization optimation to prevent needless rendering in React and may lead to a performance boost.
Drawbacks of React useCallback
Ans: Memory allocation: the more memoized functions you have, the more memory you’ll need, this is similar to garbage collection.
Wrapping Up
It can be challenging to prevent unnecessary renders in a component in a React application when it isn’t supposed to. The useCallback, useMemo, and React.memo hooks can be used to stop a function or a value change from necessitating an unnecessary re-render, respectively. As a result, you’ll improve performance for your app.
In this article, you’ve learned about the optimization of a React application using the useCallback and React.memo hooks.
If you’re looking out for cool React tools that’ll help you to write component code faster and be production ready faster than your competition. Don’t forget to check out the CopyCat plugin for React! It will change your web development and lead to a performance boost.
Happy Coding!
Related Articles
-
 React Best Practices
How to Virtually Render Large Lists Using React Virtualized
All web applications display lists and tabular data in one way or another. You have probably done it hundreds of times. But what if you need to show a large number of items in a row at the same time?…
November 29, 2022 -
React.js
Understanding and Using Material UI Checkbox Component like a Pro
https://images.surferseo.art/d51484dd-6d0d-4b95-9f1d-d17058c15ba0.png Introduction Checkboxes are form elements that allow the user to choose one or more options from a list. They're frequently used in web forms to let users select multiple options. Such as multiple items in a shopping cart or…
December 23, 2022