- What is Virtualization in Rendering?
- What is React Virtualized
- Pure Components For Efficiently Rendering Large Lists
- Creating a List without React Virtualized
- How React Virtualized Work?
- Components in React Virtualized
- Higher Order Components in React Virtualized
- Creating React Components for Efficiently Rendering Virtualized Lists
- Automatically Resizing a Virtualized List Using AutoSizer Component in React Virtualized
- Automatically Calculating the Height of a Row
- Creating a Virtualized Table
- Alternatives to React Virtualized Library
- Recommended Resources
- Conclusion
- More Interesting Reads from our Blogs
- Easily Convert Figma Design to Code
All web applications display lists and tabular data in one way or another. You have probably done it hundreds of times. But what if you need to show a large number of items in a row at the same time?
You probably must be thinking of solving this with pagination or infinite scrolling, but what if you still have a lot of data to show?
In this article, I’ll show you how to use React Virtualized to get what we need in a more efficient way.
First, you’ll see the problems with rendering a huge data set.
Then, you’ll learn how React Virtualized solves those problems and how to efficiently render lists and tabular data.
What is Virtualization in Rendering?
Virtualization, also called windowing or virtual scrolling, is a technique used in web development for optimizing the performance of rendered components on the document object model (DOM) by selectively rendering only elements in view.
It makes sense to render only the components that are visible and unmount them when they are no longer visible by replacing them with new ones. In other words, you wouldn’t render components that appear outside of the visible bounds of the user’s viewport.
What is React Virtualized
React Virtualized is an open-source library that provides many components used to display or render lists more efficiently. It creates a window frame that allows data records to slide in and out of view as the user scrolls through it.
Pure Components For Efficiently Rendering Large Lists
By default, all react-virtualized components use shallowCompare to avoid re-rendering unless props or state has changed. This occasionally confuses users when a collection’s data changes:
['a','b','c'] => ['d', 'e', 'f']
But props do not:
array.length
The solution to this is to let react-virtualized know that something external has changed and there are a couple of different ways.
Pass-thru Props
The shallowCompare method detects changes to any props, even if they aren’t declared as propTypes. This means you can also pass through additional properties that affect cell rendering and detect changes. For example, if you’re rendering a list of items using List that may be re-sorted after initial render, react-virtualized would not normally detect the sort operation because none of the properties it deals with change. However, you can pass through the additional sort property to trigger a re-render. For example:
<List {...listProps} sortBy={sortBy} />
Public Methods
You can use forceUpdate to forcefully update Grid and Collection components. For Table and List, you’ll need to call forceUpdateGrid to ensure that the inner Grid updates. For MultiGrid, call forceUpdateGrids to ensure that the inner Grids update.
Creating a List without React Virtualized
Let’s start by creating a React app:
npx create-react-app virtualized-app
This app is going to show a list of one thousand profiles. Something like this:

We’re going to want data to work with, so we will set up a custom hook which uses faker to create a large data set and lorem-ipsum to generate a placeholder bio. Let’s cd into the project directory and install them:
cd virtualization
npm install @faker-js/faker --save-dev
npm install lorem-ipsum --save-dev
Now, let’s create our custom hook in src/customHooks/useCreateRecord.js, before we proceed, let’s import faker and lorem-ipsum into the useCreateRecord.js file:
// useCreateRecord.js
import { faker } from '@faker-js/faker';
import { loremIpsum } from 'lorem-ipsum';
We can now proceed with building the custom hook function in the newly created useCreateRecord.js file:
// useCreateRecord.js
// ..
const useCreateRecord = (count) => {
  let records = [];

  for (let i = 0; i < count; i++) {
    records.push({
      userId: faker.datatype.uuid(),
      avatar: faker.image.avatar(),
      username: faker.internet.userName(),
      email: faker.internet.email(),
      bio: loremIpsum({
        count: 1,
        units: 'sentences',
        sentenceLowerBound: 4,
        sentenceUpperBound: 8
      })
    });
  }

  return records;
}

export default useCreateRecord;
The above code generates an array of objects with the properties below where count represents the number of generated objects or the length of the array:
- userId
- avatar
- username
- And a bio of between four and eight words
renderRow Function
And let’s create a renderRow function in src/components/renderRow.js used to render the list of profiles in the following way:
// renderRow.js
const renderRow = (item) => {
  return (
    <div key={item.userId} className="row">
      <div className="image">
        <img src={item.avatar} alt={item.username} />
      </div>
      <div className="content">
        <div>
          <strong>Username:</strong> {item.username}
        </div>
        <div>
          <strong>Email:</strong> {item.email}
        </div>
        <div>
          <strong>Bio:</strong> {item.bio}
        </div>
      </div>
    </div>
  );
};

export default renderRow;
The above code is a function that returns JSX used to create each profile list. It takes an object as an argument which contains the information for each profile such as the ones listed below:
- Username
- User avatar
- User Bio and more.
Now that we have our useCreateRecord hook and our renderRow() function ready, let’s go ahead and use them in src/App.js; first, we need to import the custom hook and the renderRow() function into the App.js file
import useCreateRecord from "./customHooks/useCreateRecord";
import renderRow from "./components/renderRow";
After importing our custom hook and renderRow() function, let’s create an array of one thousand records of user profiles.
// App.js
// ...
const App = () => {
  const users = useCreateRecord(1000);
}
Alright, now we have what we need to work on rendering a list of those user profiles! Let’s create the list now using our renderRow() function:
// App.js
// ...
const App = () => {
  const users = useCreateRecord(1000);
  return <div className="list">{users.map(renderRow)}</div>;
};

export default App;
Now, let’s style our list with the code below:
.list {
  padding: 10px;
}
.row {
  border-bottom: 1px solid #ebeced;
  text-align: left;
  margin: 5px 0;
  display: flex;
  align-items: center;
}
.image {
  margin-right: 10px;
}
.image img {
  height: 50px;
}
.content {
  padding: 10px;
}
If you run the app with npm start, you should see something like this:

If you inspect the page using the Elements panel of your browser’s developer tools, you shouldn’t be surprised to find one thousand div nodes in the DOM:
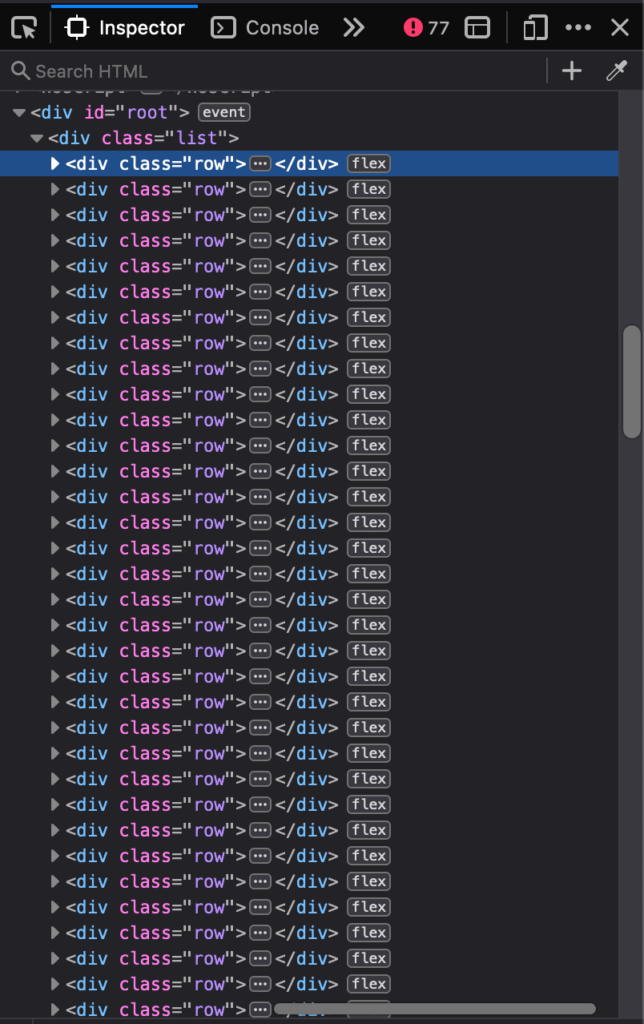
When there are too many elements in the DOM, it causes problems such as:
- It makes the initial rendering of the page or list slow
- Scrolling gets delayed
Although, you may not observe any delay if you scroll through the page because we’re not rendering anything complicated.
These problems could cause the UI to come to a halt or crash the browser when viewed with weak devices or when the layouts are more complicated.
What’s the best performant way to show all of these rows?
An effective way of doing this is by making use of a React-Virtualized library that makes use of virtual rendering.
How React Virtualized Work?
React Virtualized renders only what is in the visible view of what the browsers can show to users at a time or only what fits on the screen until users scroll to see more content.
For example in our app, we’ve got a list of one thousand profiles which can not fit into a user’s screen all at once. So it makes sense to render only the elements that are visible and then unload them when they are no longer visible by replacing them with new ones when users scroll.
React Virtualized uses a set of components for efficiently rendering large lists and tabular data virtually. These components;
- calculate which items are in the visible area of the screen or viewport.
- use a container div element as a parent element with its position set to relative so its children elements can be positioned absolutely to the parent container div element by controlling its top, left, width and height style properties.
Components in React Virtualized
React Virtualized has five main components that it uses for virtual rendering. Aside from these main components, it also includes some Higher Order Components but let’s take a look at the five main components first;
- Grid. Renders tabular data along vertical and horizontal axes.
- List. Renders a list of elements using the Grid component internally.
- Table. Renders a table with a fixed header and body content with vertical scrolling support. This component also uses the Grid component internally.
- Masonry. Renders dynamically-sized, user-positioned cells that can also scroll vertically.
- Collection. Renders arbitrarily positioned and overlapping data.
These components extend from React.PureComponent, which boosts performance if your component is rendering the same result with the same props and state.
All react-virtualized components use shallowCompare so as to avoid re-rendering unless props or state has changed which in turn increases the performance of the application.
Higher Order Components in React Virtualized
Now that we’ve seen the five main components that React Virtualized uses, let’s also see the Higher Order Components that we can use in React Virtualized. By the way, what are Higher Order Components?
Another name for Higher Order Components is HOCs. They’re basically components that take in another component as an argument and then return a new component out of the components passed as an argument.
This way you don’t need to rewrite the logic in the other component passed as an argument.
- ArrowKeyStepper. Can be used to decorate another component so it can respond to arrow-key events.
- AutoSizer. Can be used to automatically adjust the width and height of another component.
- CellMeasurer. Can be used automatically measure a cell’s content by temporarily rendering it in a way that is not visible to the user.
- ColumnSizer. Can be used to calculate column widths for Grid cells.
- InfiniteLoader. Can be used to manage the fetching of data when users scroll through a List, Table, or Grid.
- MultiGrid. Can be used to decorate a Grid component so as to add fixed columns and/or rows.
- ScrollSync. Can be used to synchronize scrolling between two or more components.
- WindowScroller. Can be used to enable a Table or List component to be scrolled based on the window’s scroll positions.
Let’s look at how we can use the List component to virtualize the one thousand profiles example.
Creating React Components for Efficiently Rendering Virtualized Lists
First, we need to import the List component in src/App.js from react-virtualizer:
// App.js
// ...
import { List } from "react-virtualized";
Now we’ll need to refactor how we’re rendering the profile list, so instead of doing it in this way:
// App.js
// ...
const App = () => {
  const users = useCreateRecord(1000);

  // without react-virtualized
  return <div className="list">{users.map(renderRow)}</div>;
}
Let’s use the List component to render the profile list in a virtualized way:
// App.js
// ...

const listHeight = 700;
const rowHeight = 80;
const rowWidth = 800;

const App = () => {
  const users = useCreateRecord(1000);

  // with react-virtualized
  return (
    <div className="list">
      <List
        width={rowWidth}
        height={listHeight}
        rowHeight={rowHeight}
        rowRenderer={renderRow}
        rowCount={users.length}
      />
    </div>
  );
};
The List component needs the width and height of each list, and also the height of the rows. This is what it uses to calculate which rows are going to be visible when users scroll.
The rowHeight property can either take a fixed row height as we specified in the code above or a function that will return the height of a row given its index.
The List component also requires the number of rows or lists and a function used to render each row.
The List component doesn’t take the data (array of profiles) directly. So, we’ll need to refactor the renderRow function to accommodate this new change.
This function won’t receive the current element (user object) as an argument again, because the List component will automatically pass an object with the following properties to it:
- index. The index of the row.
- isScrolling. Indicates if the List is currently being scrolled.
- isVisible. Indicates if the row is visible on the list.
- key. A unique key for the row.
- parent. A reference to the parent List component.
- style. The style object that’s to be applied to the row to position it.
For this refactoring, we’ll need to create a src/data/index.js file so that we can move our users’ record there, and then export it so it can be used anywhere in our project.
// data/index.js
import generateRecord from "../customHooks/generateRecord";

export const users = generateRecord(1000);
Did you notice anything? Yeah, we imported a function that doesn’t exist yet, don’t worry we’re going to replace our useCreateRecord hook with this new function. Now, change the name of the useCreateRecord hook to generateRecord.
But why do we have to change the hook and file name from useCreateRecord to generateRecord?
It’s simply because it’s against React’s rule to make use of a hook outside a component that is returning JSX. And our src/data/index.js file doesn’t have any component returning JSX.
Now your new folder structure should look like this:
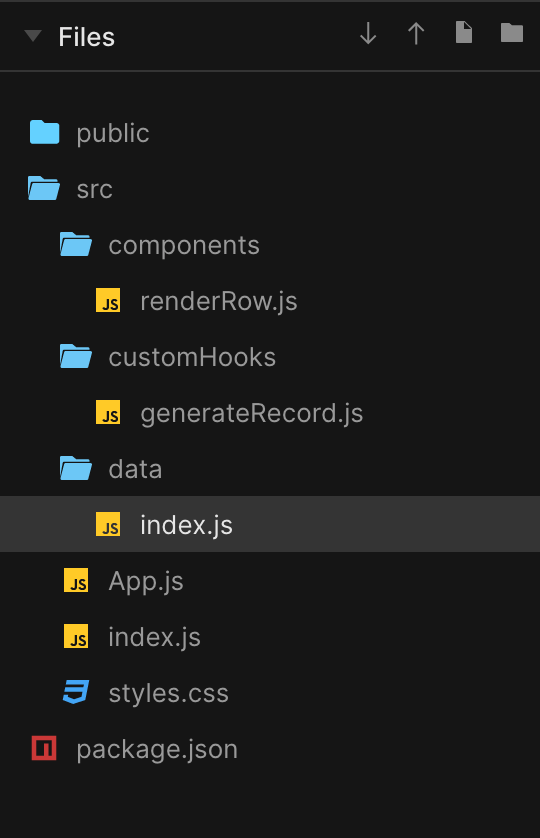
Let’s refactor our renderRow function and our App component and import users’ record from the newly created src/data/index.js file.
Now, our src/components/renderRow.js will look like this:
// renderRow.js
import { users } from "../data";

// with react virtualized
const renderRow = ({ index, key, style }) => {
  return (
    <div key={key} style={style} className="row">
      <div className="image">
        <img src={users[index].avatar} alt="" />
      </div>
      <div className="content">
        <div>
          <strong>Username:</strong> {users[index].username}
        </div>
        <div>
          <strong>Email:</strong> {users[index].email}
        </div>
        <div>
          <strong>Bio:</strong> {users[index].bio}
        </div>
      </div>
    </div>
  );
};
From the code above, notice that the index property accesses each list’s element rendered in a row.
Now, let’s also refactor our App component
// App.js
import { List } from "react-virtualized";
import renderRow from "./components/renderRow";
import { users } from "./data";
import "./styles.css";

const App = () => {
  const listHeight = 700;
  const rowHeight = 80;
  const rowWidth = 800;

  // with react-virtualized
  return (
    <div className="list">
      <List
        width={rowWidth}
        height={listHeight}
        rowHeight={rowHeight}
        rowRenderer={renderRow}
        rowCount={users.length}
      />
    </div>
  );
};

export default App;
If you run the app, you’ll see something like this:

In my case, seven and a half rows are visible.
Now, notice that two additional div elements wrap the rows in the developer tools tab:
- One with a CSS class of ReactVirtualized__Grid ReactVirtualized__List
- Another with a CSS class of ReactVirtualized__Grid__innerScrollContainer
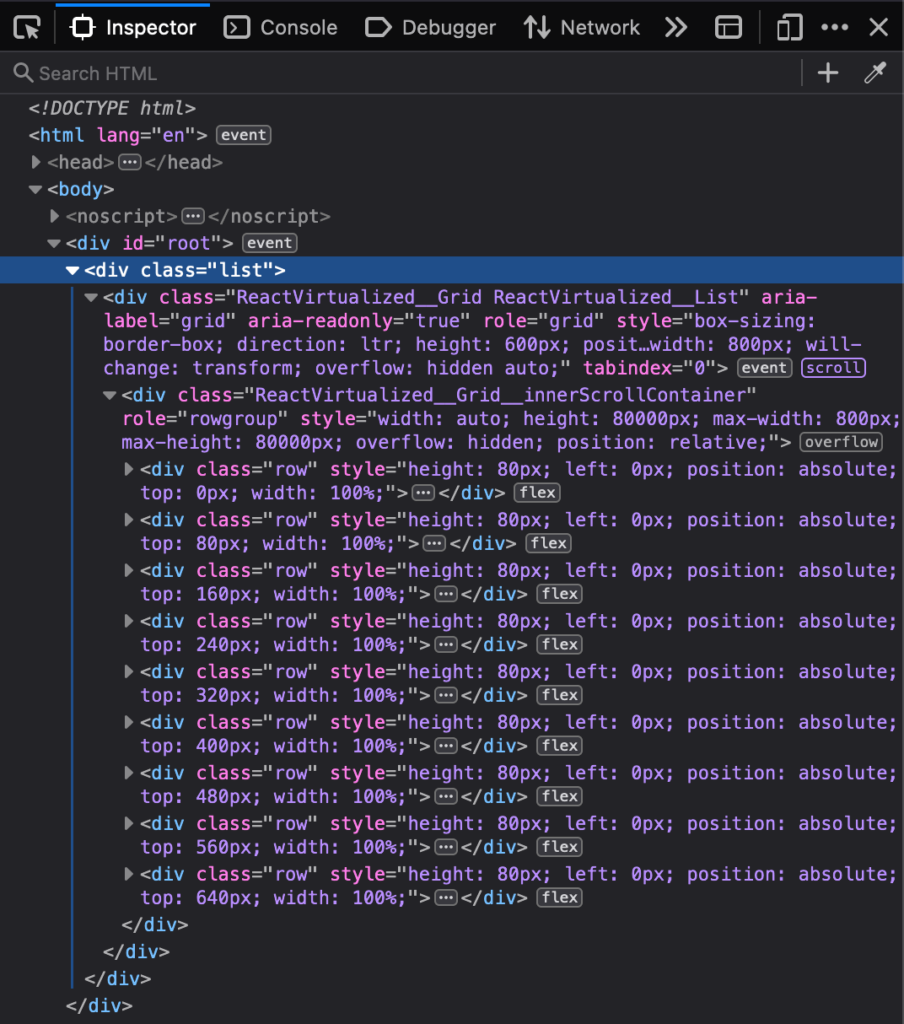
The first one is where 800px and 600px are specified as the width and height of the component respectively. It also has a relative position and the value auto for overflow so to enable scrollbars.
While the other inner one is where 800px is specified as the max-width and 80000px as the height. The 80000px used as height is the result of multiplying the number of rows (1000) by the height of each row (80). It also has a relative position but the value is hidden for overflow.
All the rows are children of this inner div element with the CSS class ReactVirtualized__Grid__innerScrollContainer, but this time, there are not one thousand elements or profiles.
However, there are not seven or eight elements either. The List component renders additional elements, reducing the chances that the user scrolls faster than the rendered virtualized content.
We control the number of additional elements with the property overscanRowCount which renders additional rows in the direction that users scroll. For example, if I set 3 as the value of this property:
<List
width={rowWidth}
height={listHeight}
rowHeight={rowHeight}
rowRenderer={this.renderRow}
rowCount={this.list.length}
overscanRowCount={3} />
The number of elements you’ll see in the Elements tab should be around twelve.
The downside is that you have to specify the width and height of the list as well as the height of the row.
Luckily, you can use the AutoSizer and CellMeasurer components to solve this.
Let’s start with AutoSizer
Automatically Resizing a Virtualized List Using AutoSizer Component in React Virtualized
The AutoSizer component uses a pattern called “function as child components”.
With this pattern, You’ll have to pass a function as a child of the AutoSizer component. In this scenario, a function that receives the calculated width and height and returns the List component configured with the width and height:
<AutoSizer>
  {({ width, height }) => (
    <List
      width={width}
      height={height}
      rowHeight={rowHeight}
      rowRenderer={renderRow}
      rowCount={users.length}
      overscanRowCount={3} />
  )}
</AutoSizer>
Let’s modify our CSS a little bit to fill up all the space because the AutoSizer component will fill all of the available space of its parent.
.list {
  ...
  height: 100vh
}
The “vh” unit corresponds to the height of the viewport. The viewport is simply another name for the browser window size, so 100vh is equivalent to 100% of the height of the viewport.
Import the component if you haven’t already:
import { List, AutoSizer } from "react-virtualized";
And when you run the app, you should see something like this:

Now, if you resize the window, the list height will adjust automatically. Let’s see how we can also calculate the height of a row automatically.
Automatically Calculating the Height of a Row
Before calculating the rowHeight automatically, let’s make some adjustments to our generateRecord function in src/customHooks/generateRecord.js and see what the output will look like.
Let’s start by changing the settings of the lorem-ipsum generator to something like this:
// customHooks/generateRecord.js

import { faker } from "@faker-js/faker";
import { loremIpsum } from "lorem-ipsum";

const generateRecord = (count) => {
  let records = [];

  for (let i = 0; i < count; i++) {
    records.push({
      //...
      bio: loremIpsum({
        count: 2,
        units: "sentences",
        sentenceLowerBound: 10,
        sentenceUpperBound: 100
      }),
    });
  }

  return records;
};

export default generateRecord;
Now, let’s take a look at the output:

As you can see from the output above, everything is clustered together that’s because the height of each row has a fixed value of 80 which can no longer accommodate all the text that was generated. To implement a dynamic height, we’ll have to use the CellMeasurer component.
In order to make use of the CellMeasurer component we’ll need to cache measurements using the CellMeasurerCache class that the library provides for us to avoid recalculations all the time.
First, let’s create our cache in our src/data/index.js file. Then export it so we won’t have any issue using it in both the renderRow function and the App component just like we did with the users‘ record:
import { CellMeasurerCache } from "react-virtualized";
import generateRecord from "../customHooks/generateRecord";

// generate users list
export const users = generateRecord(1000);

// create instance of CellMeasurerCache
export const cache = new CellMeasurerCache({
  fixedWidth: true,
  defaultHeight: 100,
});
Set the fixedWidth property to true because we don’t need to calculate the width of the rows.
Now, let’s refactor our renderRow function to use the CellMeasurer component. The CellMeasurer component takes a component measured as a child, unlike AutoSizer which takes a function as a child.
import { CellMeasurer } from "react-virtualized";
import { users, cache } from "../data";

const renderRow = ({ index, key, style, parent }) => {
  return (
    <CellMeasurer key={key} cache={cache} parent={parent} columnIndex={0} rowIndex={index}>
      <div style={style} className="row">
        <div className="image">
          <img src={users[index].avatar} alt="" />
        </div>
        <div className="content">
          <div>
            <strong>Username:</strong> {users[index].username}
          </div>
          <div>
            <strong>Email:</strong> {users[index].email}
          </div>
          <div>
            <strong>Bio:</strong> {users[index].bio}
          </div>
        </div>
      </div>
    </CellMeasurer>
  );
};

export default renderRow;
From the code above, you’ll notice the following about CellMeasurer:
- The CellMeasurer component takes the key to differentiate between elements.
- It also takes the cache which was configured in src/data/index.js.
- It takes the parent component (List) where it’s going to be rendered which is why the parent parameter was destructured.
Finally, let’s also refactor the List component in src/App.js so it uses the cache and gets its height from that cache:
import { List, AutoSizer } from "react-virtualized";
import renderRow from "./components/renderRow";
import { users, cache } from "./data";
import "./styles.css";

const App = () => {
  return (
    <div className="list">
      <AutoSizer>
        {({ width, height }) => (
          <List
            width={width}
            height={height}
            deferredMeasurementCache={cache}
            rowHeight={cache.rowHeight}
            rowRenderer={renderRow}
            rowCount={users.length}
            overscanRowCount={3}
          />
        )}
      </AutoSizer>
    </div>
  );
};

export default App;
Now, when you start the app, everything should look fine and well organized:

https://codesandbox.io/embed/react-virtualization-p9jwdn?fontsize=14&hidenavigation=1&theme=dark
Creating a Virtualized Table
The main purpose of this article is to cover lists, but what if we actually want to render large data to a table, can React Virtualized help us help here?
The answer is absolutely yes. React Virtualized also provides a Table and Column component used when working with tables or tabular lists and tabular data.
Let’s see how these components perform in this case. In this table, we’ll only be rendering the username and email from our generated record. Now, let’s to business, we have to create a new component called UserTable in src/components/UserTable.js:
import { Table, Column } from "react-virtualized";
import { users } from "../data";

const UserTable = () => {
  return (
    <>
      <Table width={500} height={300} headerHeight={20} rowHeight={40} rowCount={users.length} rowGetter={({ index }) => users[index]}>
        <Column label="Username" dataKey="username" width={100} />

        <Column label="Email" dataKey="email" width={200} />
      </Table>
    </>
  );
};

export default UserTable;
As you can see from the code above the Table component accepts the following parameters:
- width: The width of the table.
- height: The height of the table.
- headerHeight: The height of the table header.
- rowHeight: The height of each row.
- rowCount: This is the initial number of rows we want in the table. It’s similar to how we defined the number of records we wanted to start with, in the List component example.
- rowGetter: Returns the data of a specific row by its index.
Now, let me explain the parameters added to the Column component:
- label: The name of the column.
- dataKey: This is a unique identifier that passes the data for each column. Remember that in the generateRecord function that was used to generate an array of objects holding each user’s information such as their username, email, bio, etc. And as we know already an object is made up of a key-value pair where the key is the property name. This is why we set the dataKey of one column to username and the other to email.
- width: The width of the column.
Okay! Let’s import and use our new UserTable component into src/App.js. We’ll need to refactor our code a little and replace the List component with this new UserTable component since we have already tested and seen how to render a virtualized list. You can just comment out the code for the List component if you don’t want to delete it but in my case, I’ll just replace the code:
import UserTable from "./components/UserTable";
import "./styles.css";

const App = () => {
  return (
    <UserTable />
  );
};

export default App;
Alternatives to React Virtualized Library
Recommended Resources
Conclusion
In this article, we saw what we can do with React Virtualized, and how it renders large data into lists and tables super fast.
You can access the complete source code used in this article on this github repository.
This article covers just the surface of what the library is capable of handling. The library is also capable of the following:
- Generating placeholders for the data records on scroll.
- Infinite loading component to fetch and cache data in real-time.
- A method for allowing arrow keys to navigate through the data.
- A slick grid and masonry layouts that weren’t even covered in this article.
The highly maintained library has over 58 million downloads, confirmed from npm-stat. It has its own StackOverflow tag which is a good resource to find answers to questions asked by other people or even post your own questions.
They have a Slack Community and Gitter Chat that you can join if you’d like to keep up with the project, contribute to it or even connect with other folks.
More Interesting Reads from our Blogs
- Top 33 Free React Charts (Libraries)
- React Calendar: How to Build a Reusable Calendar Component
- How to Add Toast Notifications to a React App Using React Toastify
- React Table Tutorial: How to Build a Table with React Table Library
- Your Introductory Guide to React Intl
Easily Convert Figma Design to Code
You can build UI faster than your competition with CopyCat. Just copy production-ready code generated directly from Figma designs using CopyCat AI. As a result, you can focus on building interactions, animations, networking, and everything else that will make you stand out. You can be an exceptional front-end developer who develops UI quickly using CopyCat.
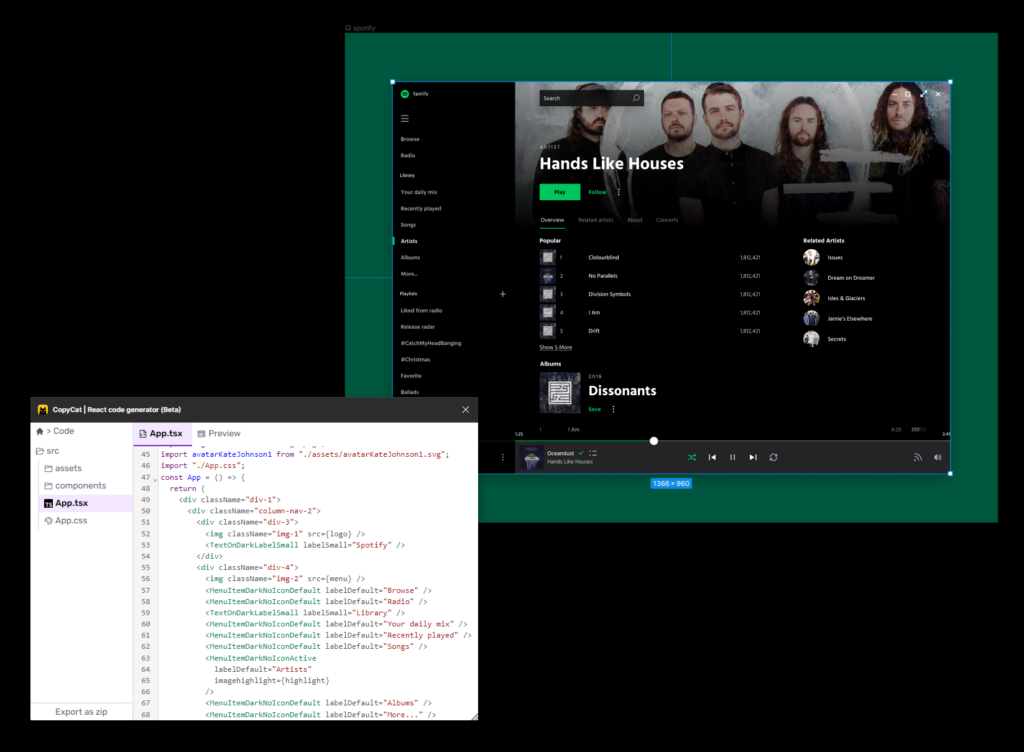
This tool can also help you convert Figma designs to tailwind-CSS projects and react low code if you’re working on an application.
You’ll be 2X faster at developing UI. You’ll meet your deadlines and spend your time solving exciting challenges, too! Best of all, you’ll eliminate sprint delays and design inconsistencies.
Related Articles
-
 React Best Practices
10 Secrets to React Speed: Quickly Optimize Your React Apps
Introduction One of the biggest challenges for developers is improving app performance without a complete code rewrite. A code rewrite can be time-consuming and costly, and it's only sometimes necessary. The good news is that there are several ways to…
January 31, 2023 -
React.js
Top 17 VSCode Plugins to Boost Productivity as a Developer
As front-end developers or software developers, you must work smartly, efficiently, productively, and DRY. You are known for building problem-solving tools for users. In this article, I will outline some VSCOde plugins that will help you increase your productivity as…
December 8, 2022