


- Introduction
- Why Use Tailwind CSS in React Application
- Getting started with your React app
- Using Tailwind CSS in React Step-by-step Guide
- Adding Tailwind CSS to your React application
- Extensions
- Questions
- Disadvantages of using Tailwind CSS
- Top Alternatives to Tailwind CSS
- Conclusion
- Further readings
- Video on React Query and Examples
Introduction
In software engineering, there is no need for you to reinvent the wheel, instead, it is better to use libraries and frameworks to put together your application when possible tweaking it to fit your need, thereby saving you time, and effort.
Writing vanilla CSS3 can be difficult, let us face this fact. Imagine having to write all pieces of CSS code for a very large application. Why will a developer in this era subject themself to such exhaustion and stress when you could use any framework such as Tailwind CSS to handle that for you?

Tailwind CSS is a very popular utility-first CSS framework built to enable you as a developer to build modern websites with CSS classes like flex, pt-4, text-center, and rotate-90 that can be composed to build any design, in your markup.
Tailwind CSS is a name known among many developers today, although it is not surprising if this is your first time learning about it.

Why Use Tailwind CSS in React Application
- Tailwind CSS allows the flexibility to create intuitive UI while still giving the developer control over customization. In simple terms, Tailwind CSS is unopinionated.
- It allows you to create custom components using Tailwind CSS’s utility-first classes.
- You do not need to reinvent the wheel, this is because Tailwind CSS framework provides classes for almost everything you need to create your beautiful UI, ranging from layout, color, spacing, typography, to shadows and more.
- Tailwind CSS allows you to write atomic CSS which means writing small, single-purpose classes with names based on visual function, more like writing semantic CSS (if you may).
css

    .bg-green {
      background-color: green;
    }

    .bg-red {
      background-color: red;
    }

    .text-green {
      color: green;
    }

    .text-red {
      color: red;
    }

    .text-center {
      text-align: center;
    }

    .text-left {
      text-align: left;
    }

    .text-right {
      text-align: right;

    }
    .text-underline {
      text-decoration: underline;
    }
Looking at the classes, you will understand what each `class` does. This and more is what Tailwind CSS gives you.
- Write fewer CSS codes thereby allowing you to have a smaller CSS file. All you need to do is style your React components by applying pre-existing classes to your components.
- Tailwind CSS is a low-level framework, it gives you the power to use its utility classes to create your reusable components. Tailwind CSS does not offer styled components such as accordions, buttons, navigation, dropdowns, etc. Instead, it provides utility classes with which you can create your custom components.
- Developing with Tailwind CSS is faster and easier compared to using other CSS frameworks such as Bootstrap or Foundation.
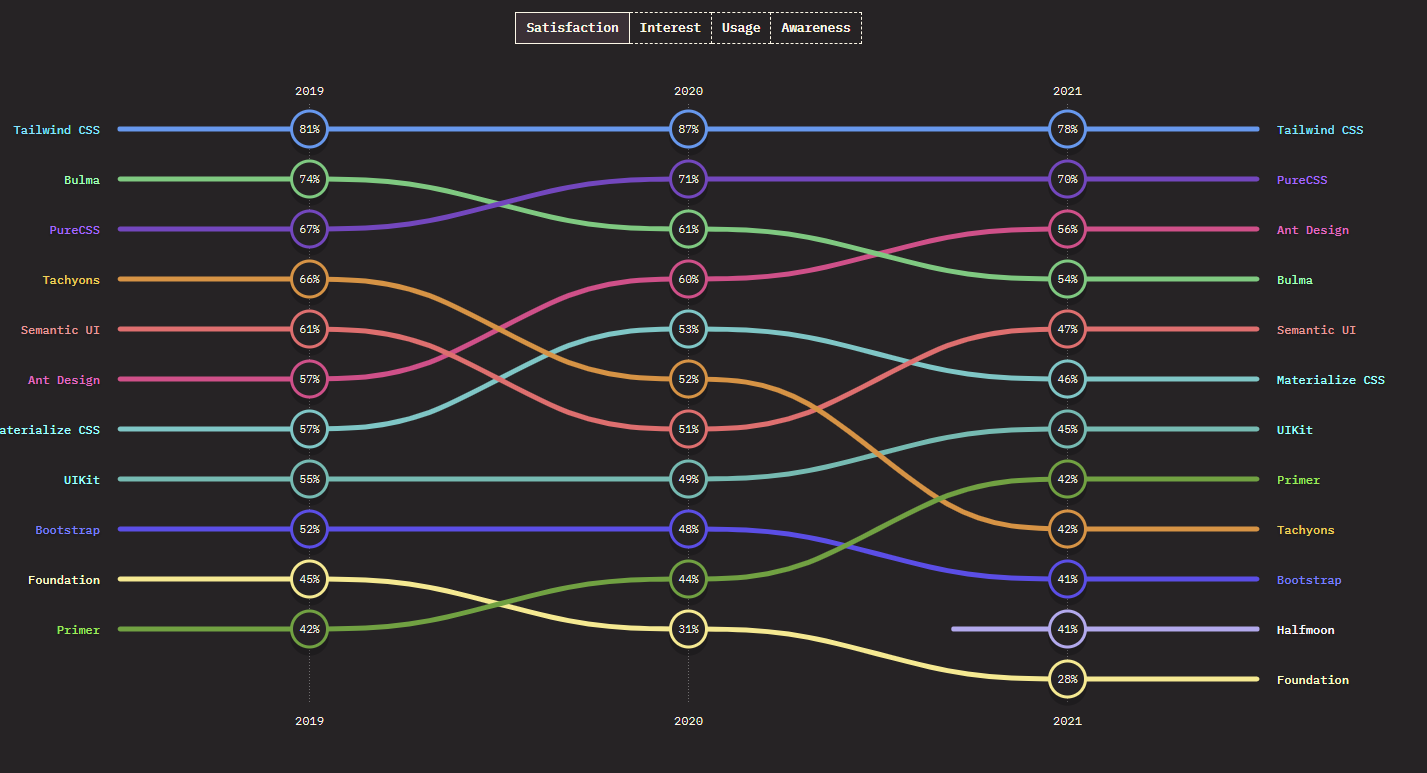
- Tailwind CSS has been the most preferred CSS framework since 2019 according to a survey carried out by StateOfCSS. Also, the same survey shows that 51% of developers who took part in the survey responded that they “want to learn” Tailwind CSS in 2021 compared to other CSS frameworks.
Getting started with your React app
In this tutorial, you will be creating a React app using CRA. You will be walked through the installation process for Tailwind CSS in your React Application. At the end of this tutorial, you will be on your way to creating interactive web applications using Tailwind CSS utility classes.
Setup your development environment
You will scaffold a new React project. In this tutorial, I refer to my React app as `tailwind-react`. In your terminal, type the following:
npx create-react-app tailwind-react
After having created your app and all dependencies automatically installed, you will need to navigate into the project directory and run the app. For that, run the following command in your terminal:
cd tailwind-react && npm start
You should see similar output below in your terminal:
 $ npm start

> tailwind-react@0.1.0 start
> react-scripts start
Your React app will then start hot reloading your development environment and your app should be running on `localhost:3000` by default.

Using Tailwind CSS in React Step-by-step Guide
Tailwind CSS works well with lots of frameworks like Next, React, Angular, and more. However, for this tutorial, you will be walked through setting Tailwind CSS in React. Follow the steps below to get up and running with Tailwind CSS.
Adding Tailwind CSS to your React application
1. The first step you need to take is to install Tailwind CSS in your React application. To do this run the following commands still in the tailwind-react directory:
   npm install -D tailwindcss postcss autoprefixer

   npx tailwindcss init -p
Explanation of what the above commands do:
- You just installed tailwindcss, postcss, and autoprefixer
- You initialized Tailwind CSS and this generates a tailwind.config.js file in the root directory of your application.
2. You need to generate the configuration file for Tailwind CSS. To generate the configuration file, run this command in the root directory of your project.
npx tailwindcss init -p
The above command will generate two files which are tailwind.config.js and postcss.config.js with this output on your terminal:
HP@Eunit MINGW64 /d/tailwind-react (main)


   Created Tailwind CSS config file: tailwind.config.js
   Created PostCSS config file: postcss.config.js
3. Expand the configuration template paths inside the tailwind.config.js file. This will tell Tailwind CSS where your React template files can be found which will be processed by Tailwind. To do this, open up the file and paste the code below:
 // tailwind.config.js


   module.exports = {
     purge: [],
     darkMode: false, // or 'media' or 'class'
     content: [
       "./src/**/*.{js,jsx,ts,tsx}",
     ],

     theme: {
       extend: {},
     },
     variants: {
       extend: {},
     },
     plugins: [],
   }
4. Next, set up Tailwind CSS directives inside the src/index.css file. To do this, open up src/index.css and paste the following snippet:
 /* src/index.css */


   @tailwind base;
   @tailwind components;
   @tailwind utilities;
5. If you followed through up to this point and have set up your Tailwind project as outlined above, congratulations 🎉🎉🍾
6. Next is to test your React Tailwind application. For this, I prepared a simple snippet to display “Hello World!“, “I am learning Tailwind CSS.” Open up your src/App.js file and paste the following snippet to test that Tailwind CSS is set up properly and up and running.
     // src/App.js


   function App() {
     return (
       <div className="container w-80 mt-5 mx-auto bg-green-200 rounded-xl shadow">
         <div className="text-3xl p-8 text-green-700 font-bold mb-5">
           Welcome!
           <p className="text-green-500 mt-3 text-lg">
             I am learning Tailwind CSS
           </p>
         </div>
       </div>
     );
   }

   export default App;
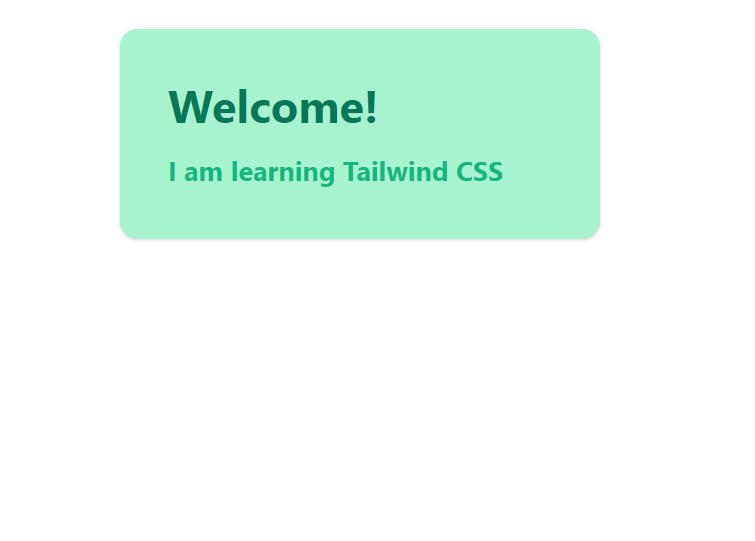
Live application here.
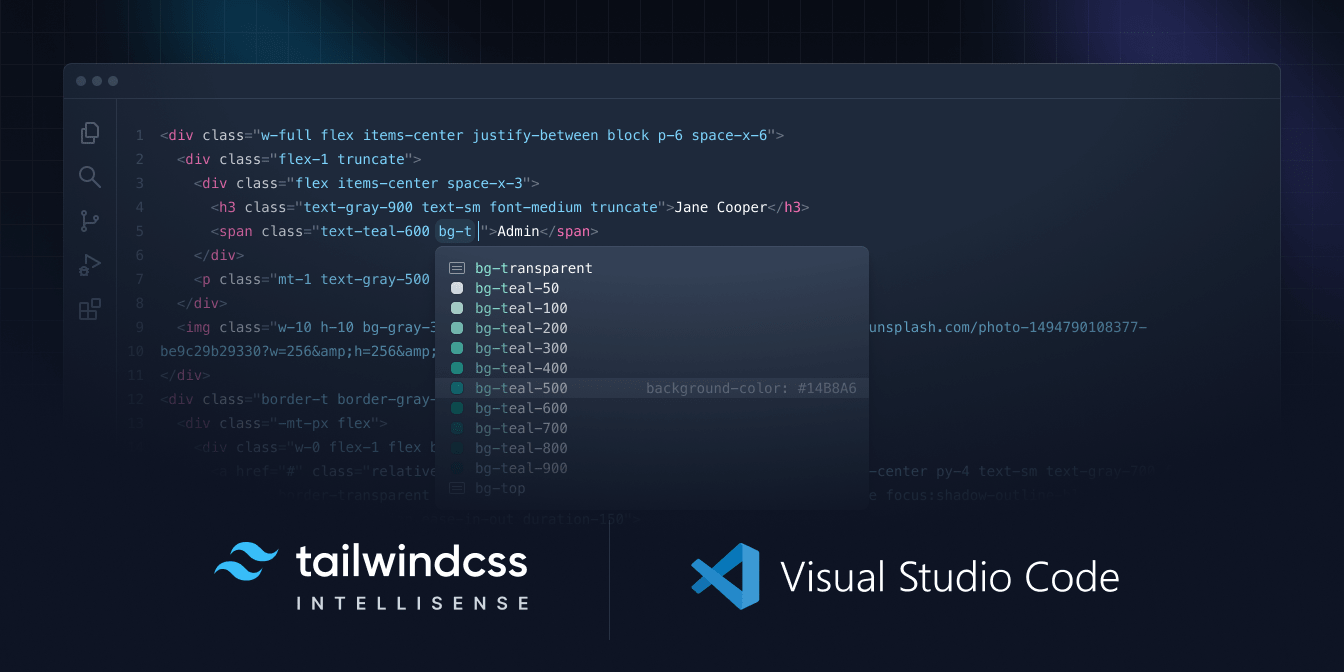
Extensions
To get the most out of Tailwind CSS, consider installing Tailwind CSS IntelliSense on VS Code. This extension enhances the Tailwind development experience by providing you with advanced features such as autocomplete, syntax highlighting, and linting.
Questions
- Can you use Tailwind CSS in React?
- Yes, you can.
- Is Tailwind CSS free
- Yes, Tailwind CSS is free
Disadvantages of using Tailwind CSS
- You get to write CSS in HTML thereby missing styling and markup
- Steeper learning curve compared to other frameworks
Top Alternatives to Tailwind CSS
Below are some alternative frameworks to Tailwind CSS in no particular order.
- Bootstrap– Bootstrap is an open-source collection of tools for creating browser sites and applications.
- Bulma – Bulma is a free, open-source CSS framework based on Flexbox and built with Sass.
- Materialize– Materialize is a modern responsive CSS framework based on Material Design by Google.
- Semantic UI – Semantic empowers designers and developers by creating a shared vocabulary for UI.
- Foundation– The most advanced responsive front-end framework in the world.
- UIkit – A lightweight and modular front-end framework for developing fast and powerful web interfaces.
Conclusion
This tutorial taught you how to set up Tailwind CSS in your ReactJS application. You also learned the top reasons why you choose Tailwind CSS over other UI frameworks and also learned the advantages of using Tailwind CSS, and also its top alternatives.
You can find the complete source code of this tutorial in this repository. Also, check out the Tailwind CSS cheat sheet here.
Further readings
- Set Up Tailwind In React – The fastest way! by Savio Martin
- Setting Up Tailwind CSS In A React Project – Smashing Magazine
- Install Tailwind CSS with Create React App – Tailwind CSS
Video on React Query and Examples
- How To Use Tailwind CSS With React
- Install Tailwind CSS for React – React Tutorial
- How to Setup Tailwind CSS in React
CopyCat provides awesome tools to help you speed up your software development processes by providing a way for you to write component code faster and be production ready faster than your competition. Don’t forget to check out the CopyCat plugin for React!
Related Articles
-
 React.js
Utilize React to the Max With The Top 15 React Component Libraries
React is without a doubt the best JavaScript frontend library, powering over 10 million websites on the internet. Because React is the most popular UI library, many UI component libraries have been created to help developers in creating visually attractive…
October 1, 2022 -
React.js
React or Svelte: Which JavaScript Framework Should You Be Using in 2022?
Introduction For frontend development, it is usually the battle of the Javascript frameworks. Almost every year, new Javascript frameworks emerge with features that promise to outperform previous frameworks and libraries, especially the big three; React, Vue and Angular. One such…
October 14, 2022


