- Introduction
- What is a React Fragment?
- Setting Up a New React App
- How React Fragment Component works in React
- Exercise: Using React Fragment for Group Multiple Elements
- Using React Fragment in Conditional Rendering
- Using React Fragment in Array.map() with Key Prop
- When to use React Fragments in React Components
- Wrapping Up
- What's Next?
- Interesting Reads From Our Blogs
CopyCat is an AI-powered plugin helps you streamline your workflow by automatically converting your Figma designs into production-ready UI code. This frees up your time to focus on the app’s business logic, allowing you to work more efficiently and effectively. Check out CopyCat here.
Introduction
React is well-known for thinking in terms of components, which means breaking complex UI components down into smaller ones. However, we may encounter UI bugs or syntax errors if the JSX structures are not properly maintained after breaking large components into junks.
The UI bugs might vary but the syntax errors usually look something like this:
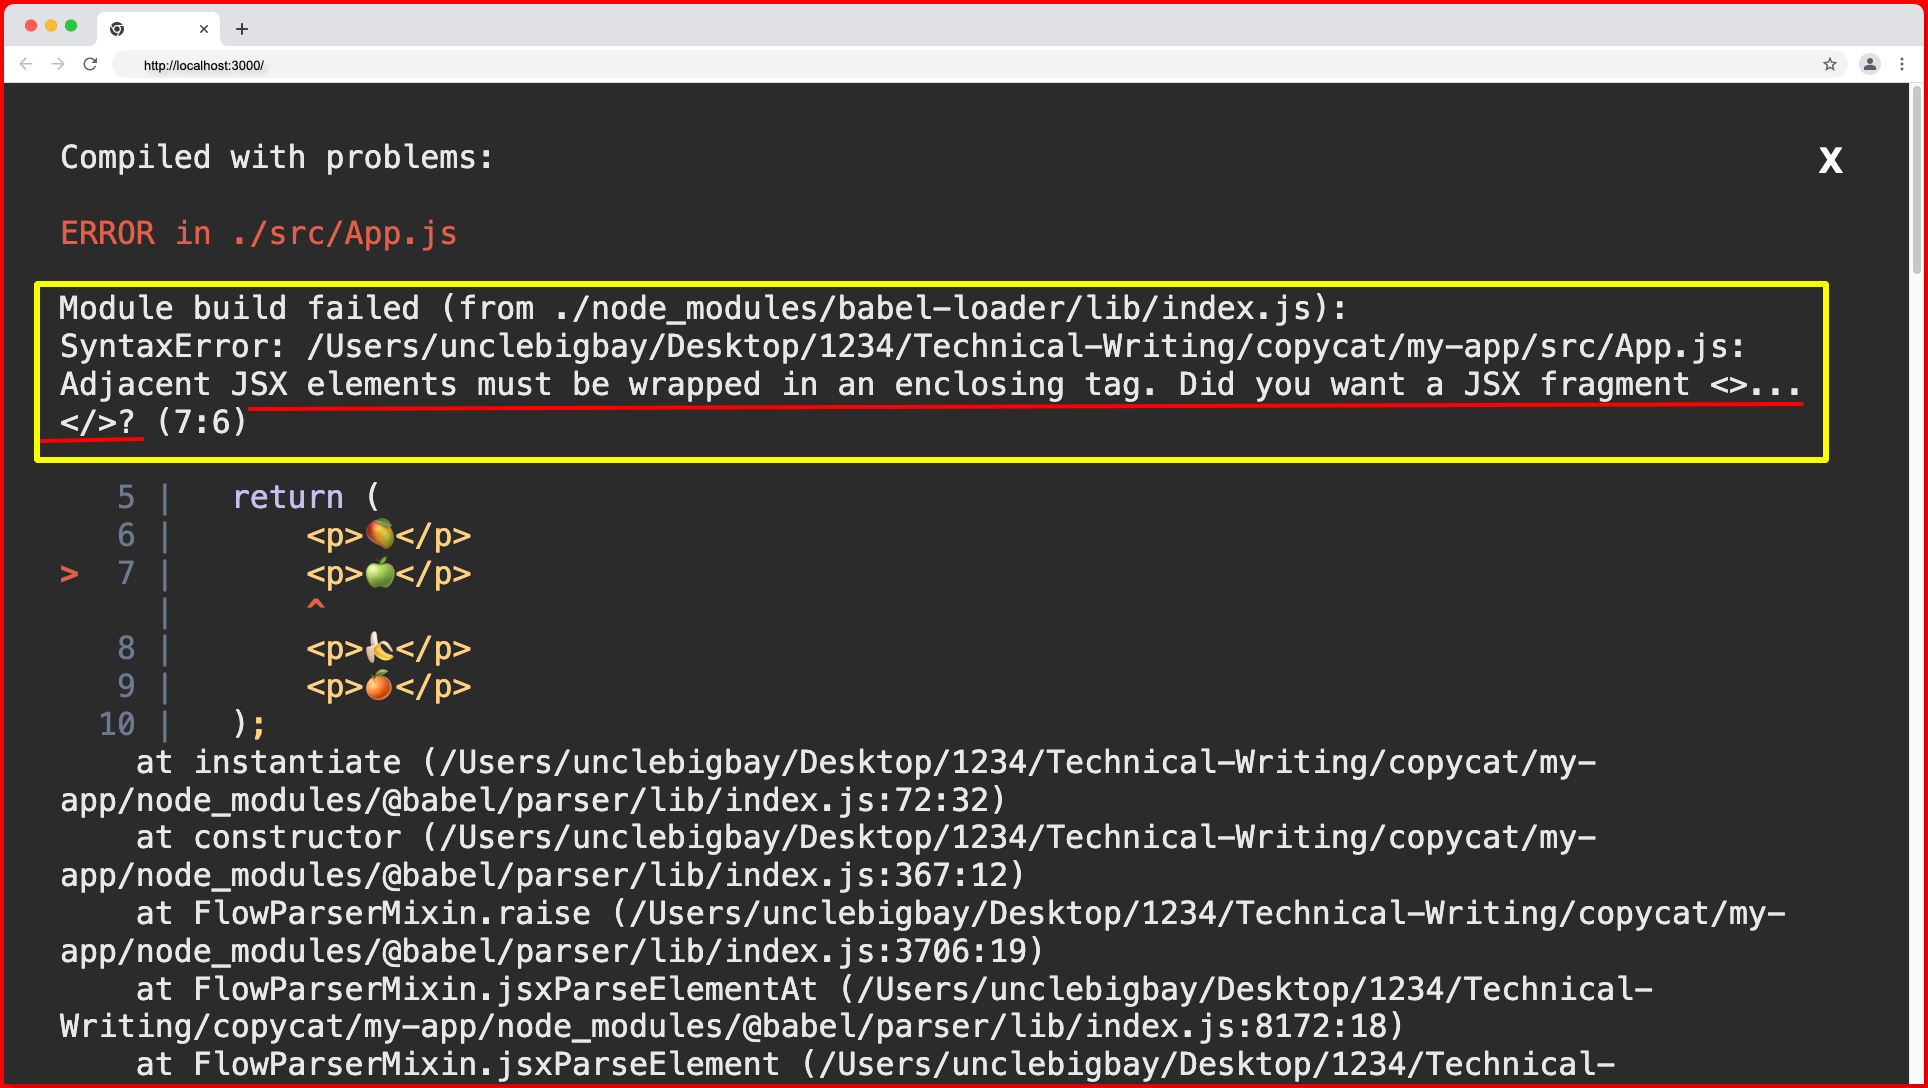
The error screen appears when we’re trying to return multiple elements from JSX in a react component. React also suggest we make use of a JSX fragment (<React.Fragment> or <Fragment> )or use an empty pair of angle brackets (<>) as the parent wrapper of these multiple JSX elements.
What is a React Fragment?
Fragment is a react component that was introduced in React v16.2.0 in November 2017. It is created with the main purpose of resolving the issue where we need to return multiple elements or adjacent JSX multiple elements from a react component without making use of an actual JSX element such as div, section, span, etc that will create an extra node in the DOM. React fragment allows one to add multiple elements to a react component, saving the headache of returning multiple elements for react developers.
The extra node can also be referred to as an extra div, section or span tag, etc.
Why do we use Fragments in React?
We use react fragment components anywhere we need to return multiple elements from JSX from react components (function or class component). It allows you to wrap multiple elements without extra DOM elements.
React Fragment Typical use cases
Typical use cases of react fragment components include:
- Returning multiple JSX from a component return statement.
- Returning multiple JSX from a map function return statement.
Setting Up a New React App
Use the following command to create a new react application:
npx create-react-app my-app
Next, run the following command to navigate to your newly generated app directory:
cd my-app
Then run the following command to start your React server:
yarn start
Or using npm:
npm start
Your server should launch in your browser at http://localhost:3000/, as shown below:
How React Fragment Component works in React
React fragment works in your code as any other root JSX element would. The only difference is that the fragment tag will not be created as a node in the DOM. Their main purpose is to serve as a root element for groups of JSX child elements.
Importing React Fragments
Fragment is a react component and imports in two ways. This also depends on your personal preference and there’s no performance difference between the two methods.
Chaining fragment from react library:
We can use react fragment when react is already imported within a component by using the dot notation as follows:
import React from "react";

export const MyComponent = () => {
  return (
    <React.Fragment>
        {/* Multiple JSX element goes here */}
    </React.Fragment>
  );
};
This is in fact the most commonly used method of using the fragment component in a React component.
Importing fragment as named module:
Another possible method of importing fragments from react is by using the named react component import as follows:
import { Fragment } from "react";

export const MyComponent = () => {
  return (
    <Fragment>
      {/* Multiple JSX element goes here */}
    </Fragment>
  );
};
This method allows you to import the Fragment component direct from the react library without chaining, removing the extra React. syntax everywhere.
Fragment Short Syntax
You can greatly improve the concept of wrapping multiple JSX elements with a root element through a short syntax, an empty pair of angle brackets (<>) that works exactly as the <Fragment> component.
This syntax uses an empty opening (<>) and closing (</>) tag to wrap multiple JSX elements without importing react or the Fragment component itself, as shown below:
export const MyComponent = () => {
  return (
    <>
      {/* Multiple JSX element goes here */}
    </>
  );
};
Now that we’re familiar with the react fragment syntax and multiple ways in which we can import it. We’ll learn the application of the react fragment component through an exercise in the next section.
Exercise: Using React Fragment for Group Multiple Elements
Task:
Given that we’re to create a Fruit component with four fruits in a button element, all buttons must have a fruit class with a dark background color except for the first button, which should be yellow. The Fruit component should then be rendered in the App.jsx file and the first button should be styled as the first child of the container class in the App.css using the CSS :first-child pseudo-class.
Solution:
Follow the folder creation below to solve this challenge:
- Create a new component folder in the src folder.
- Next, create a new Fruit.jsx file in the component folder with the following code:
import React from "react";

export const Fruits = () => {
  return (
    <div>
      <button className='fruit'>🥭</button>
      <button className='fruit'>🍏</button>
      <button className='fruit'>🍌</button>
      <button className='fruit'>🍊</button>
    </div>
  );
};
The above code returns four fruits wrapped in button elements. We then wrap the buttons with a div tag to avoid React throwing the adjacent JSX element error we discussed earlier.
Next, we’ll render the Fruit component inside a div element with a container class name in the App.js file as follows:
import { Fruits } from "./components/Fruits";
import "./App.css";

function App() {
  return (
    <div className='container'>
      <Fruits />
    </div>
  );
}

export default App;
Finally, we’ll update our App.css file with the style rules below:
.container{
    display: flex;
    align-items: center;
    justify-content: center;
    height: 100vh;
}

.container .fruit{
    background-color: #282c34;
    margin: 5px 10px;
    padding: 5px;
    border-radius: 100%;
}

.container :first-child{
    background-color: yellowgreen;
}
From the CSS above code, we center the container class using flexbox then we gave all the buttons with fruit class name a dark background color. Then we target the first button in the buttons sibling within the container element and assign it a yellowgreen background color.
Below will be the output of the above code when you visit your browser:
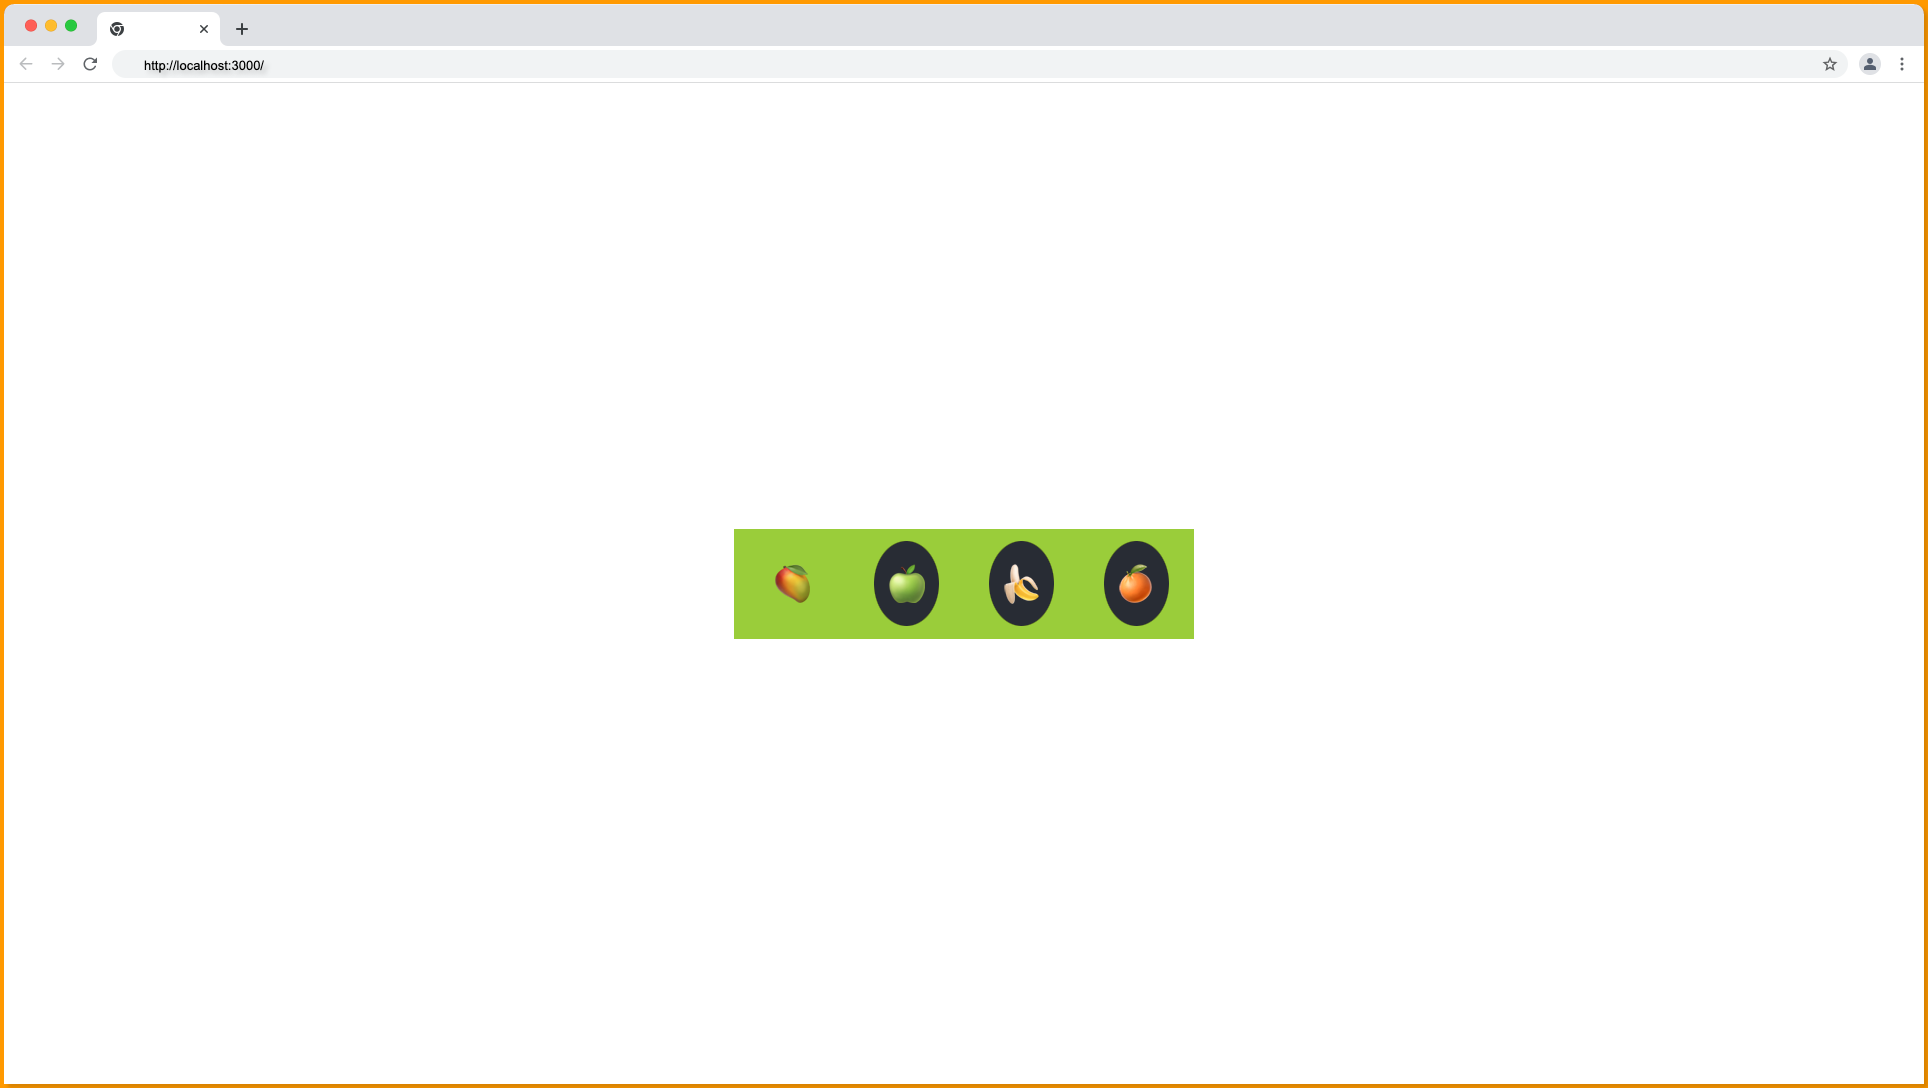
❌ The output result above is incorrect because only the first sibling (button) should have the green color and not the background of all four siblings (buttons).
This is a UI bug due to the redundant div tag we introduced to avoid returning multiple elements in the react component.
Below is what our DOM structure looks like on the Chrome element inspect tool:
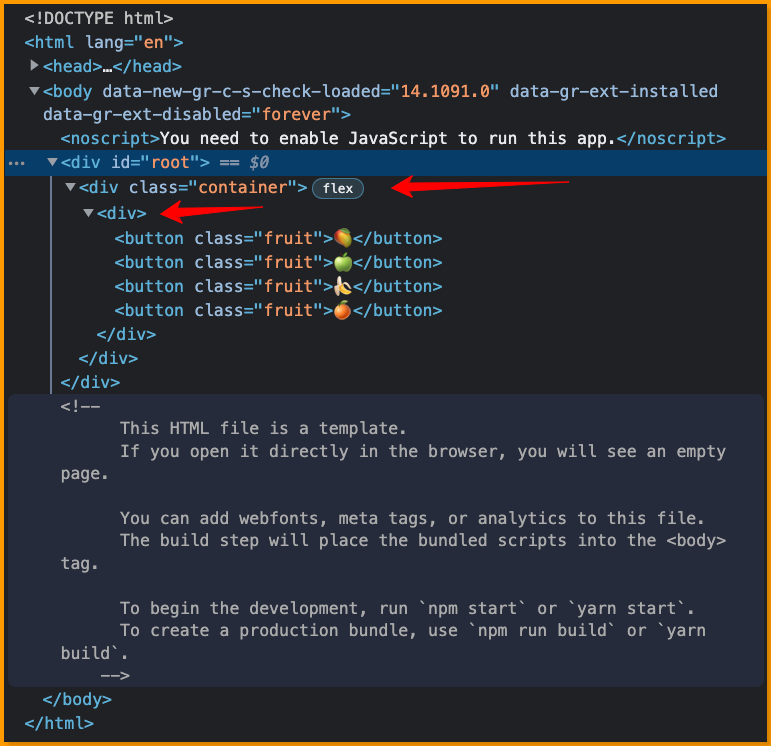
The above code screenshot shows that the button is not the first child of the container element, and the yellowgreen background color is applied to the div tag which should only serve as a root element but is also now the immediate child of the container element.
This is where the Fragment component comes to play! We can make use of the Fragment component to resolve this issue by replacing the div JSX element with the <React.Fragment> component as follows:
import React from "react";

export const Fruits = () => {
  return (
    <React.Fragment>
      <button className='fruit'>🥭</button>
      <button className='fruit'>🍏</button>
      <button className='fruit'>🍌</button>
      <button className='fruit'>🍊</button>
    </React.Fragment>
  );
};
When you check your browser, the component should now update as follows:
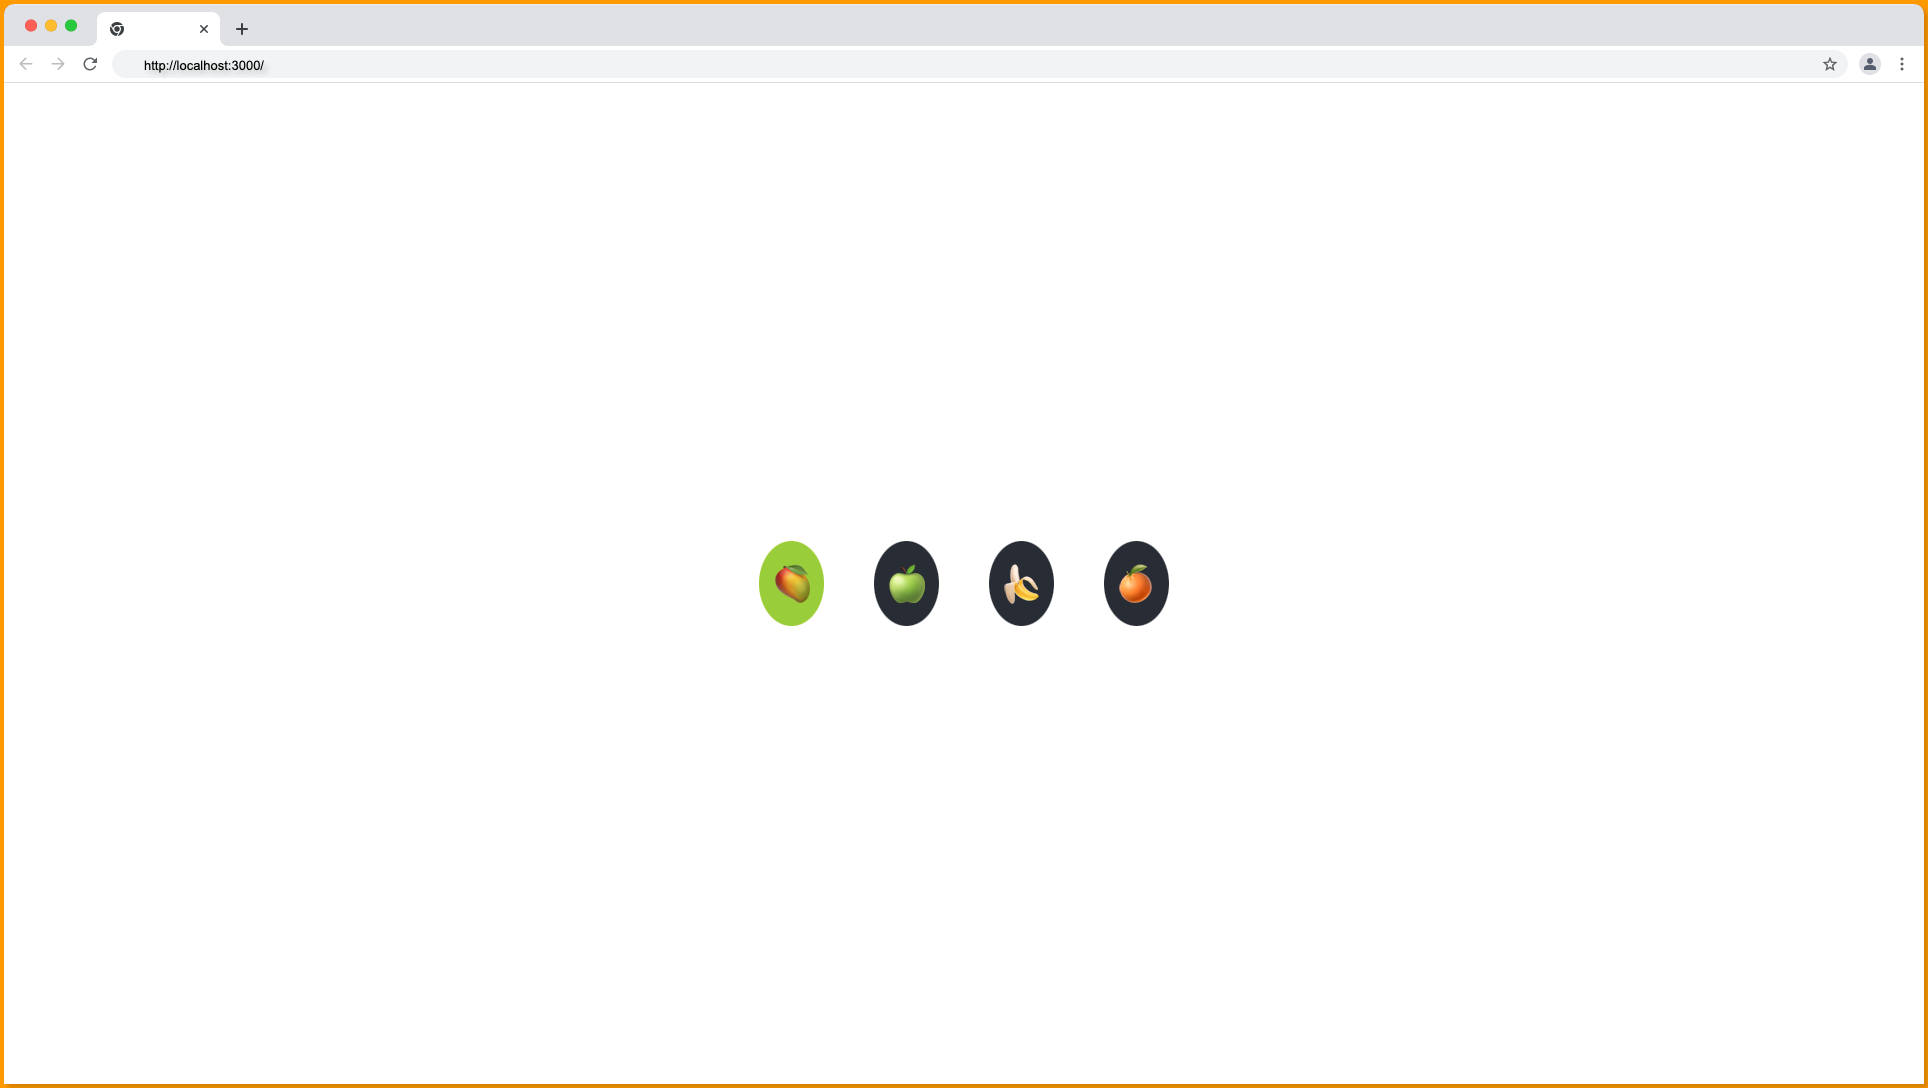
As shown above, it’s only the first button that’s now having a yellowgreen background color, while others are having a dark background color. This is the correct solution ✅.
Then when we check the browser element inspection, we should have the following:
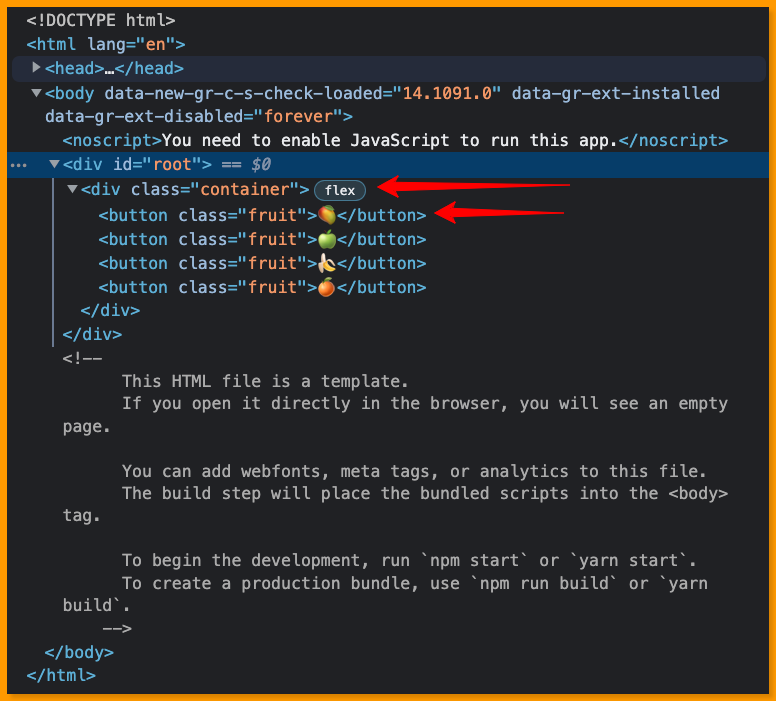
The above screenshot shows that there is no redundant tag between the div container element, and a fruit button is the first child of the div container.
Note: We can skip wrapping the element with fragments if we have only one element.
Using React Fragment in Conditional Rendering
Conditional rendering is one of the most fundamental concepts in React, it helps to render different react components based on conditions, prop, and state of the component.
Task:
Given that we’re to conditionally render some elements in a react component based on the authentication state of the user. We’re to render the You’re Logged In text in an h3 tag when the authentication state of the react component is true and render a login button when it’s false.
Solution:
We can implement the above task with the code below:
import { useState } from "react";

export const MyComponent = () => {
  const [isAuthenticated, setIsAuthenticated] = useState(false);
  return (
      {isAuthenticated ? (
        <h3>You're Logged In</h3>
      ) : (
        <button
            onClick={() => setIsAuthenticated(true)}
        >
            Login
        </button>
      )}
  );
};
The above implementation is wrong, and we’ll get the following error on the screen:
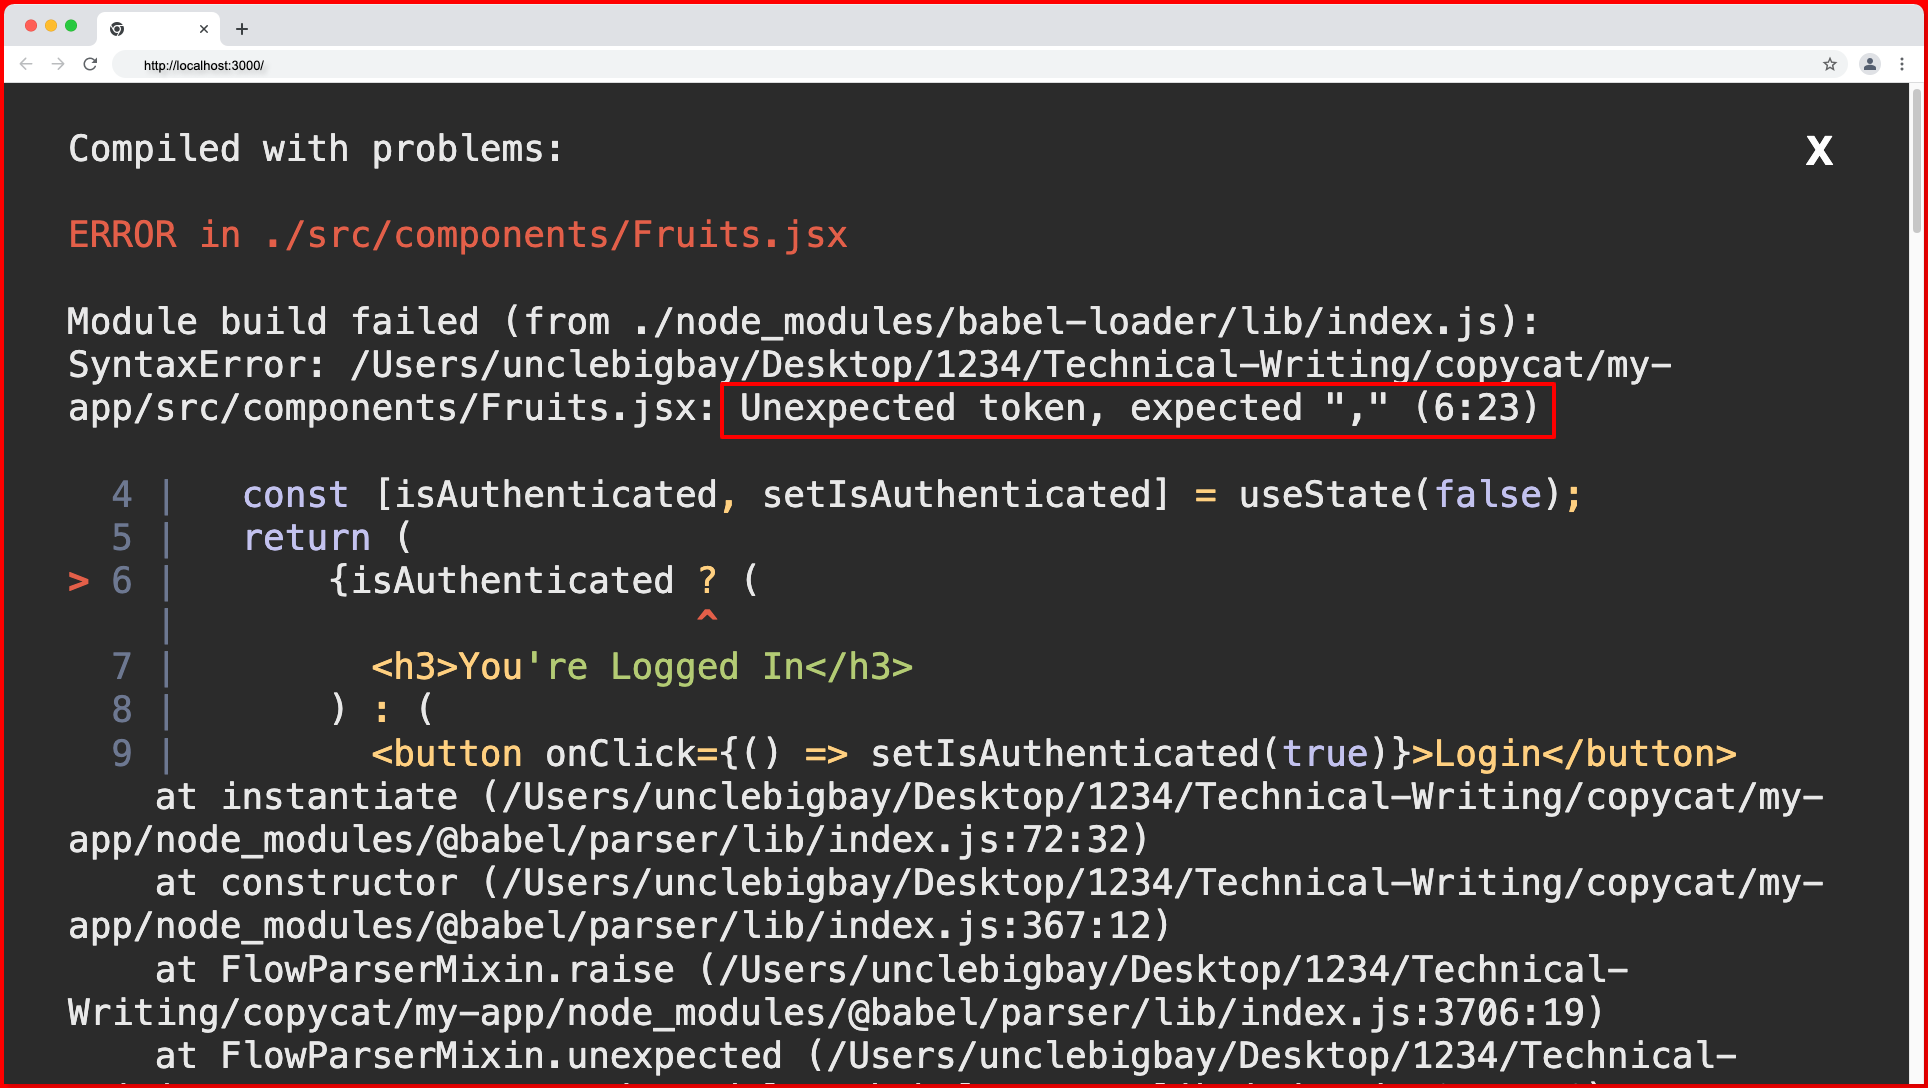
This error occurred because we’re trying to directly return a JavaScript ternary expression in the component, and this is not allowed.
We can make use of the React fragment component to resolve this issue by wrapping the React Fragment component or empty angle brackets <></> around the ternary operator expression as follows:
import React, { useState } from "react";

export const MyComponent = () => {
  const [isAuthenticated, setIsAuthenticated] = useState(false);
  return (
    <React.Fragment>
      {isAuthenticated ? (
        <h3>You're Logged In</h3>
      ) : (
        <button
            onClick={() => setIsAuthenticated(true)}
        >
            Login
        </button>
      )}
    </React.Fragment>
  );
};
Now, our app should look and function as follows:

Let’s take it a step further by rendering a logout button below the h3 element, we’ll then need to wrap the Fragment component around the multiple elements as follows:
import React, { useState } from "react";

export const MyComponent = () => {
  const [isAuthenticated, setIsAuthenticated] = useState(false);
  return (
    <React.Fragment>
      {isAuthenticated ? (
        <React.Fragment>
          <h3>You're Logged In 😃</h3>
          <br />
          <button
            onClick={() => setIsAuthenticated(false)}
        >
            Logout 🔐
        </button>
        </React.Fragment>
      ) : (
        <button
            onClick={() => setIsAuthenticated(true)}
        >
            Login 🔓
        </button>
      )}
    </React.Fragment>
  );
};
Now, we’re making use of the Fragment component in two places, first, as the root element for the returned JSX in the component and secondly as a root element within the ternary operator expression itself where we have the h3, br and button elements as siblings.
Our app should now look and function as demonstrated below:

Add flex-direction: column; to the container CSS rule in the App.css file to have the same output as shown above.
We can also make use of fragments along or within other conditional rendering operators such as the AND (&&) and OR (||) operator as shown below.
import React, { useState } from "react";

export const MyComponent = () => {
  const [isAuthenticated, setIsAuthenticated] = useState(false);
  return (
    <React.Fragment>
      {isAuthenticated && (
        <React.Fragment>
          <h3>You're Logged In 😃</h3>
          <br />
          <button
            onClick={() => setIsAuthenticated(false)}
        >
            Logout 🔐
        </button>
        </React.Fragment>
      )}

      {isAuthenticated || (
        <button
            onClick={() => setIsAuthenticated(true)}
        >
            Login 🔓
        </button>
      )}
    </React.Fragment>
  );
};
This will function exactly the same way as the ternary operator.

Using React Fragment in Array.map() with Key Prop
The map method is the most used array method in React, it is very useful for iterating array data to the DOM.
One of the most important concepts or best practices when using the map method in React for rendering array data to the DOM is to assign each element (or children) a unique key. The key prop helps React identify which element was added, updated, or removed in the DOM during renders.
Task
Given that we’re to render an array of four fruits objects to the DOM using the map array method, with the name and emoji of each fruit displayed in the UI side by side.
Solution
We can approach this task with the following component snippet.
import React from "react";

export const Fruits = () => {
  const fruits = [
    { name: "Mango", emoji: "🥭" },
    { name: "Apple", emoji: "🍏" },
    { name: "Banana", emoji: "🍌" },
    { name: "Orange", emoji: "🍊" },
  ];
  return (
    <React.Fragment>
      {fruits.map((fruit) => {
        return (
          <React.Fragment>
            <h3>{fruit.name}</h3>
            <button className='fruit'>{fruit.emoji}</button>
          </React.Fragment>
        );
      })}
    </React.Fragment>
  );
};
From the code above we mapped through the fruits array and return each of the fruit’s name and emoji in an h3 and button respectively, we then wrap them in a React.Fragment component because they’re multiple JSX elements (siblings without a parent tag in the component).
Update your App.css file with the code below:
.container {
    display: flex;
    align-items: center;
    justify-content: center;
    height: 100vh;
    max-width: 100%;
}

.container .fruit {
    background-color: #282c34;
    margin: 5px 10px;
    padding: 5px;
    border-radius: 100%;
}
When you open your browser, our app should look something like this:
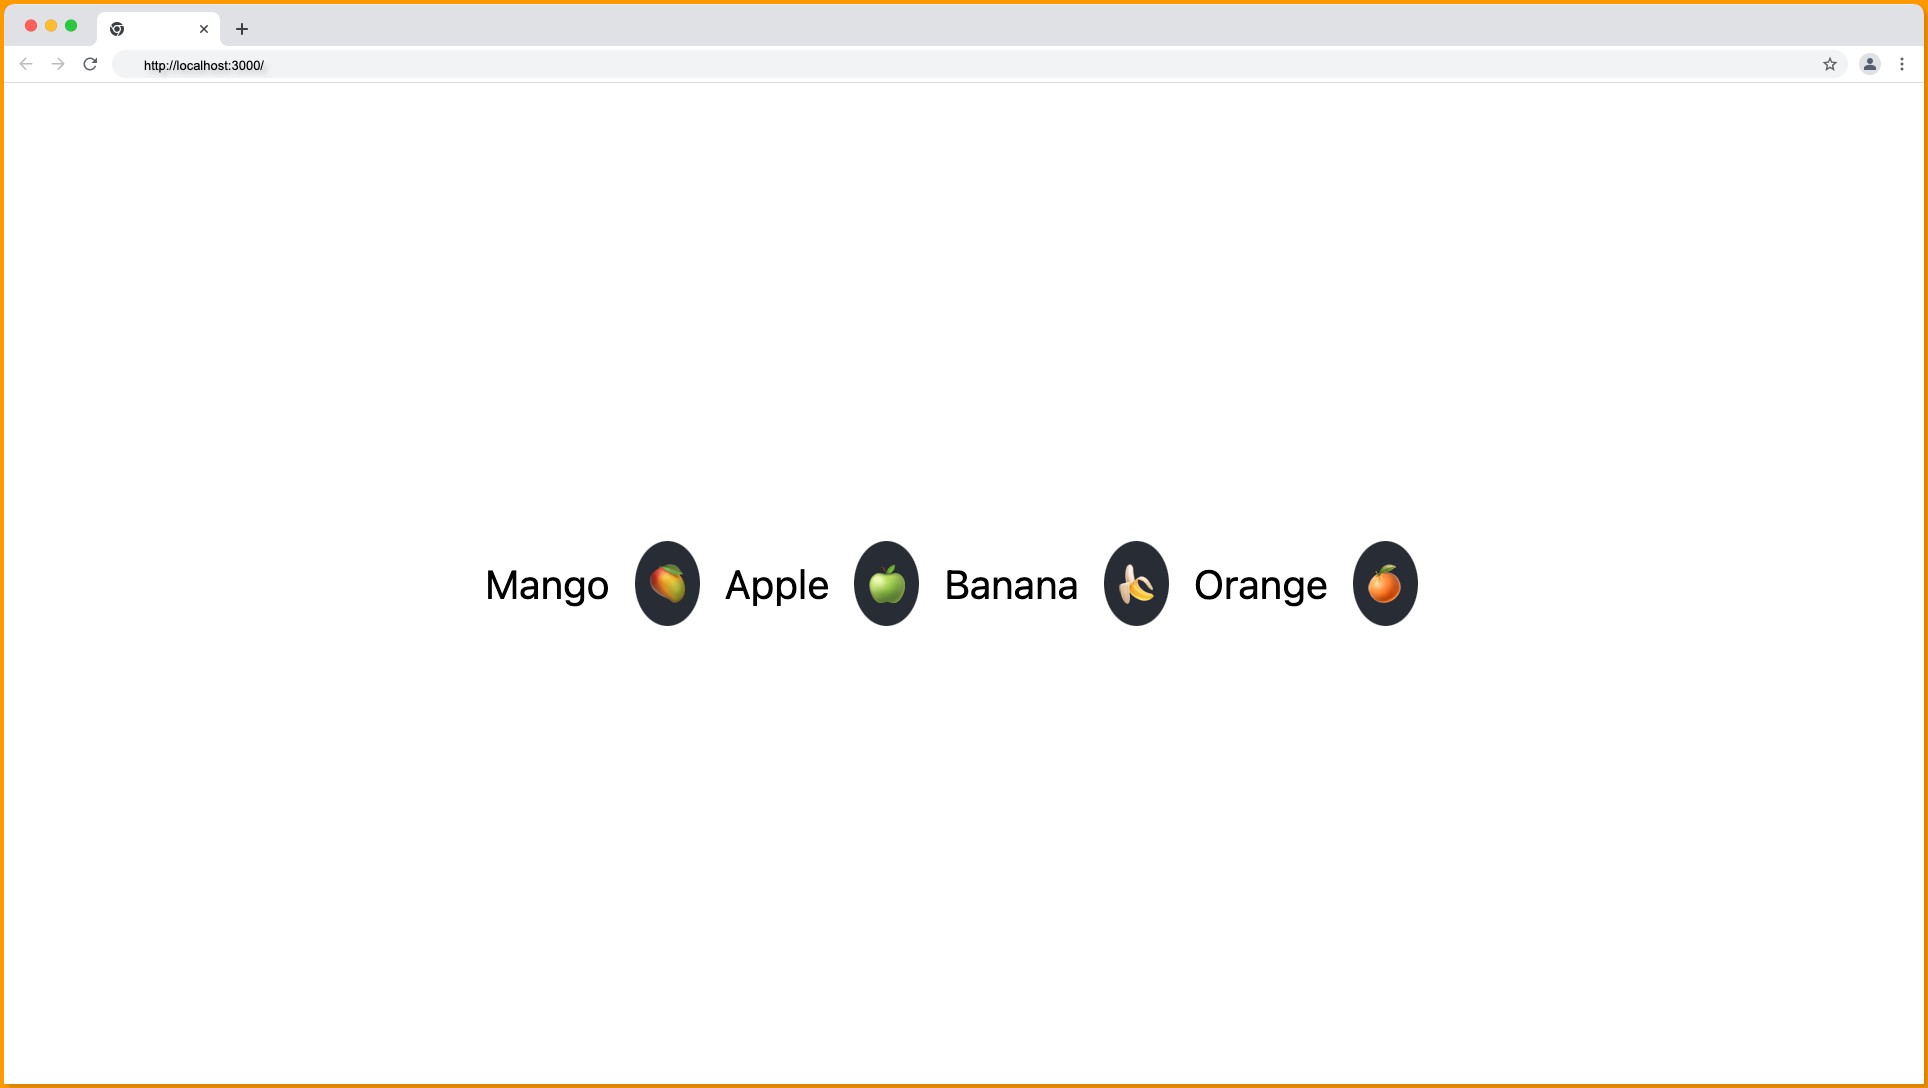
Cool right!
But we’ll get the following error in our console:

This error is informing us that we need to assign a unique key to each root element we’re returning from the map function. The root element of our map function is the React.Fragment and that’s where we’ll pass the key prop.
import React from "react";

export const Fruits = () => {
  const fruits = [
    { name: "Mango", emoji: "🥭" },
    { name: "Apple", emoji: "🍏" },
    { name: "Banana", emoji: "🍌" },
    { name: "Orange", emoji: "🍊" },
  ];
  return (
    <React.Fragment>
      {fruits.map((fruit) => {
        return (
          <React.Fragment key={fruit.name}>
            <h3>{fruit.name}</h3>
            <button className='fruit'>{fruit.emoji}</button>
          </React.Fragment>
        );
      })}
    </React.Fragment>
  );
};
From the code above, we pass the key prop to the React.Fragment component and set it to the name (fruit.name) of each fruit because the name property is unique and we’re sure there won’t be a duplicate.
Pro tip: It is best practice to make use of id or equivalent from the database in a real application or make use of reliable id generator libraries like UUID as the value of the key prop in the map function.
Moving on, when you refresh your browser the error clears:

We can also make use of a div tag, however, our UI will crash for this use case:
import React from "react";

export const Fruits = () => {
  const fruits = [
    { name: "Mango", emoji: "🥭" },
    { name: "Apple", emoji: "🍏" },
    { name: "Banana", emoji: "🍌" },
    { name: "Orange", emoji: "🍊" },
  ];
  return (
    <React.Fragment>
      {fruits.map((fruit) => {
        return (
          <div key={fruit.name}>
            <h3>{fruit.name}</h3>
            <button className='fruit'>{fruit.emoji}</button>
          </div>
        );
      })}
    </React.Fragment>
  );
};
This will result in a UI bug because we’re making use of flexbox on the .container of the fruits (see the App.css file), and adding the div tag as the root element will make it the immediate child of the flex container instead of the h3 and the button elements.
Below is how our app will be rendered instead:
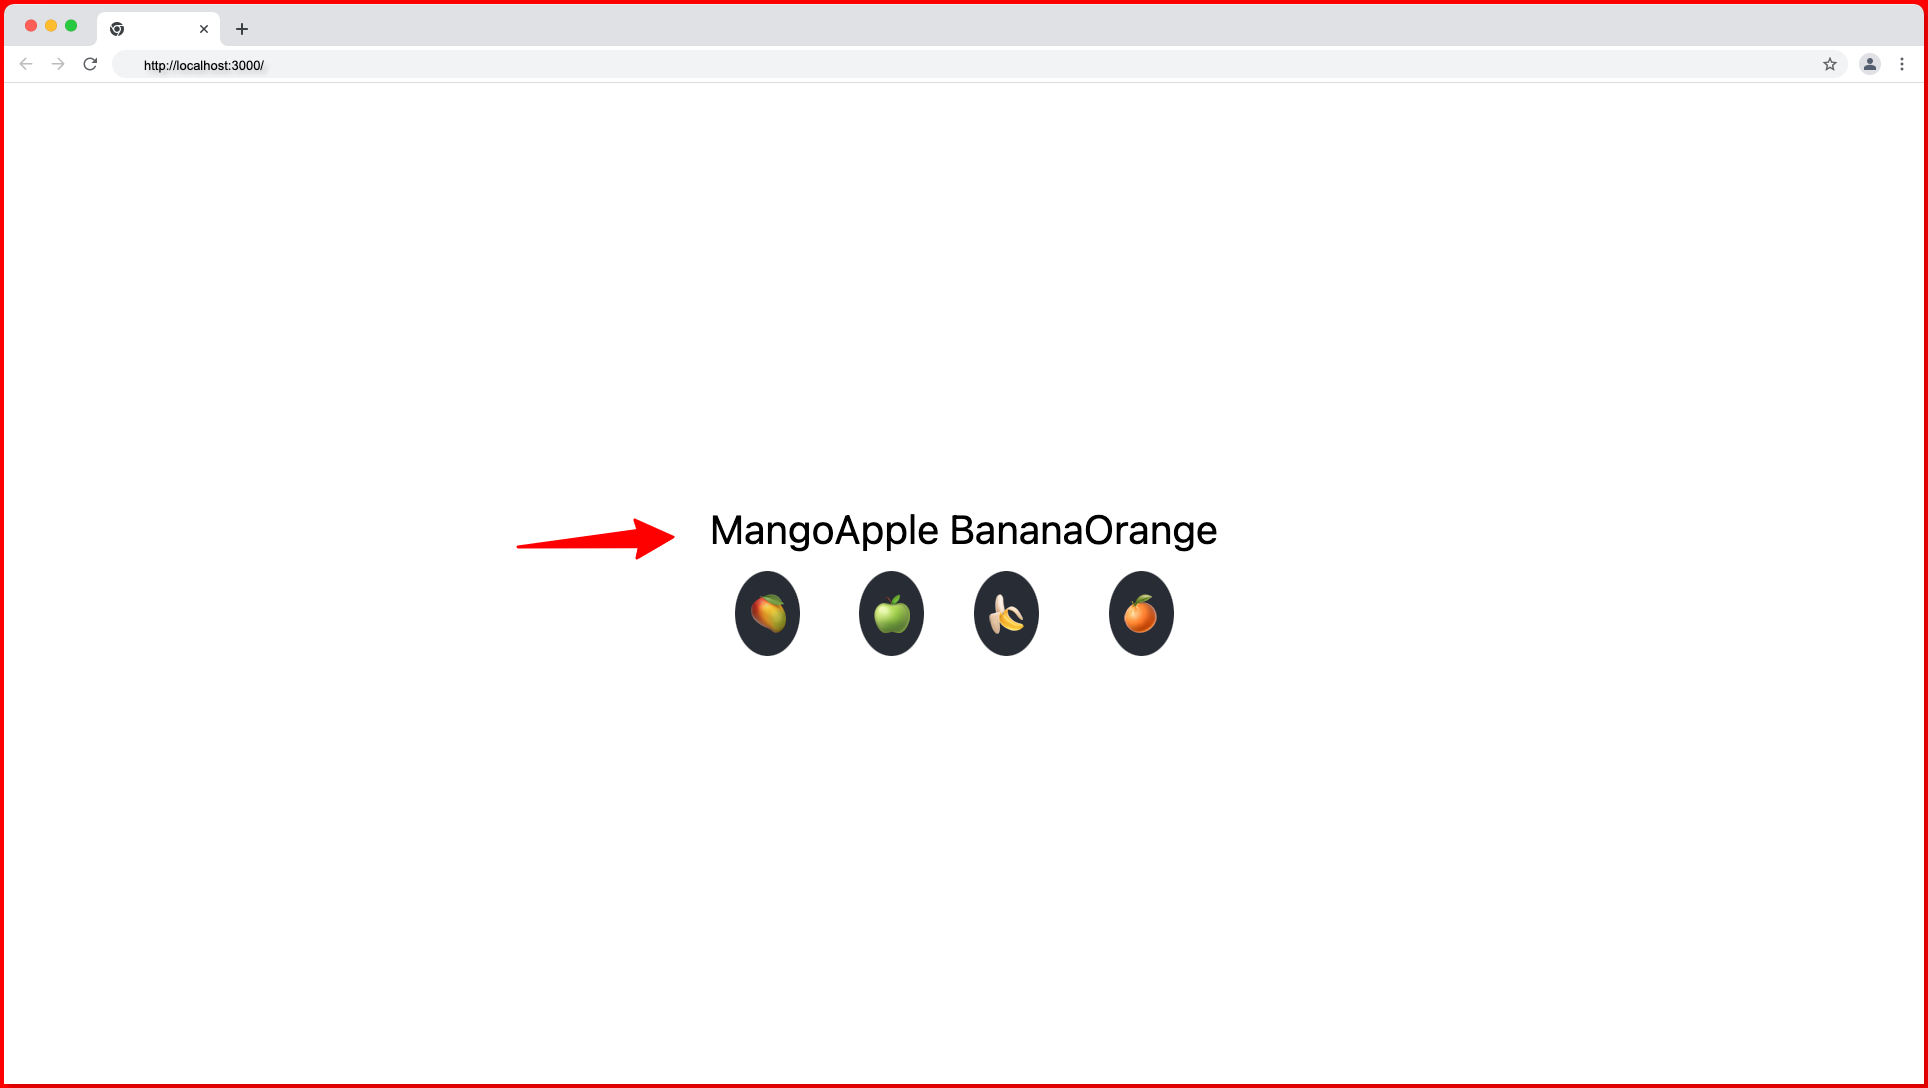
So, we’ll not be using the div tag because it’ll break the UI and because it creates a redundant node (tag) in the DOM.
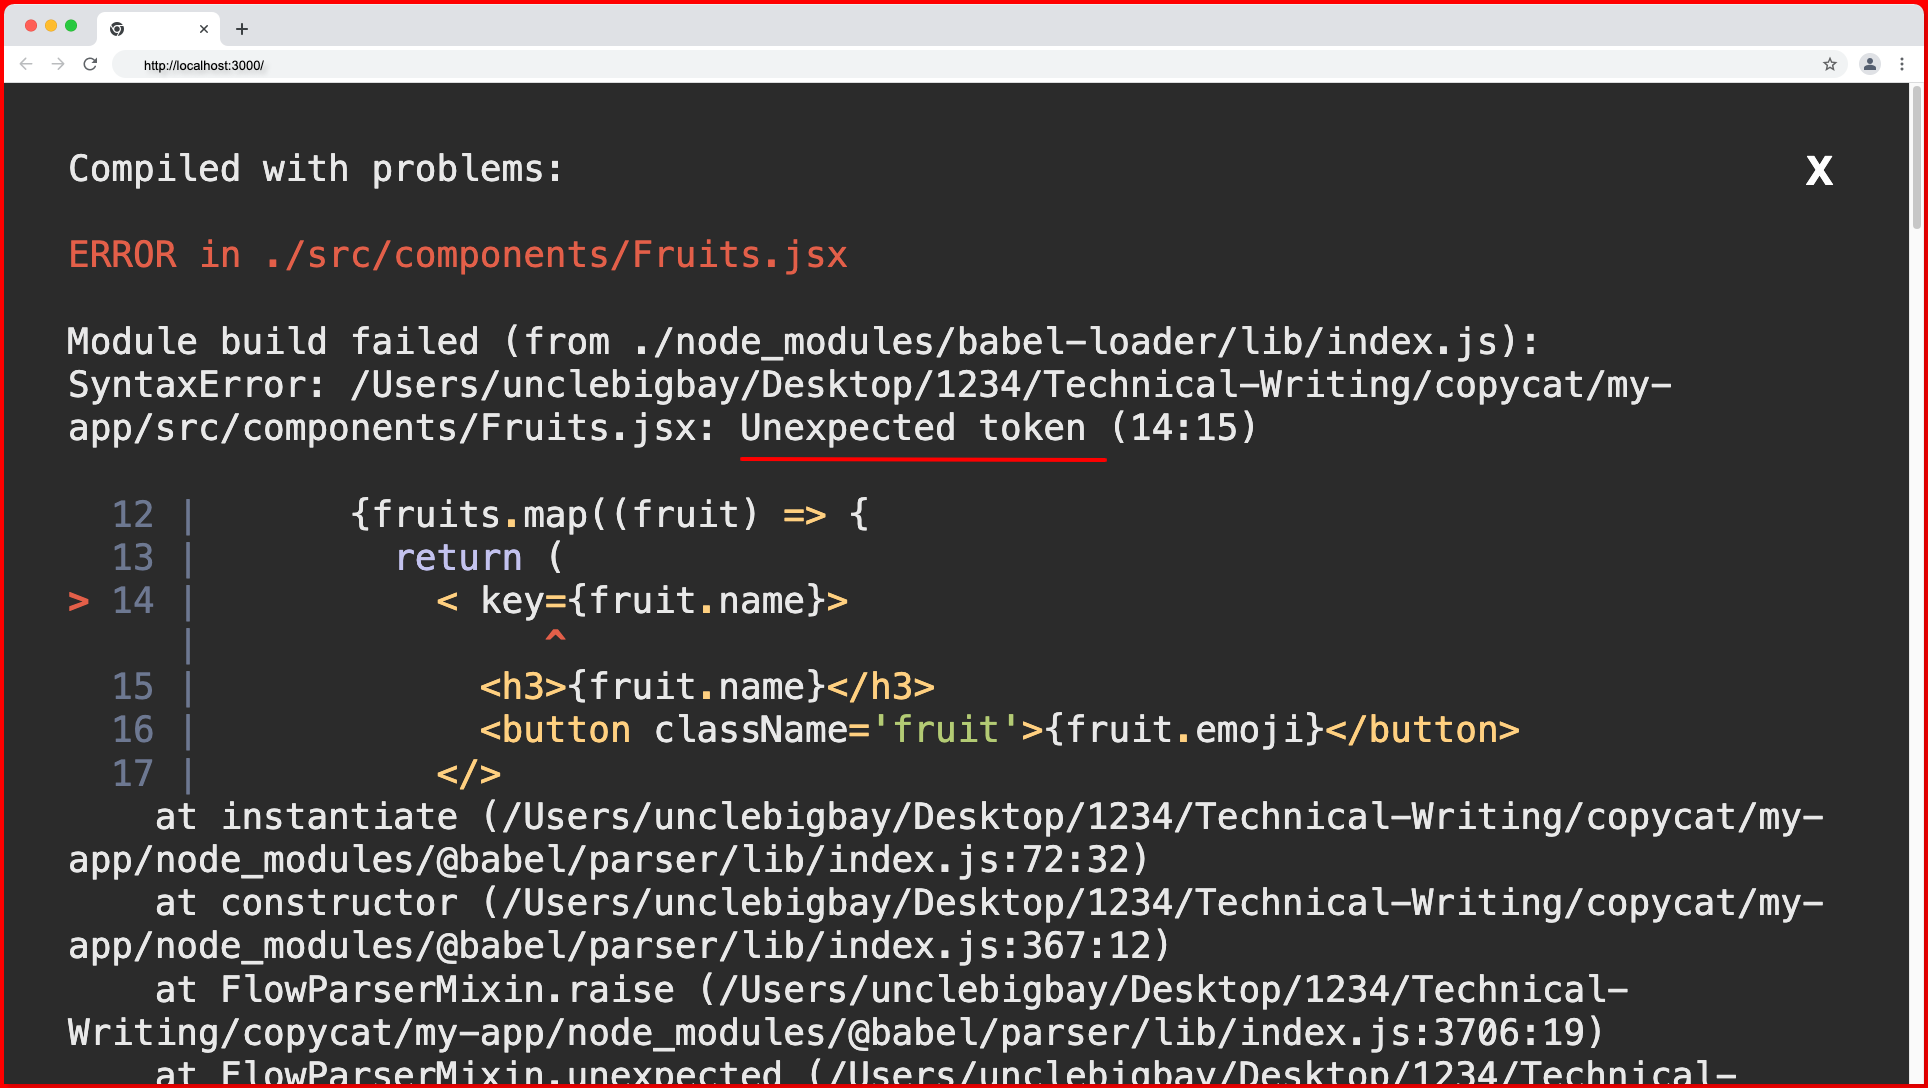
We also can’t make use of an empty tag <></> in the map function because we cannot pass the key prop to it. If we do, our linter, if installed, will throw the following warning:
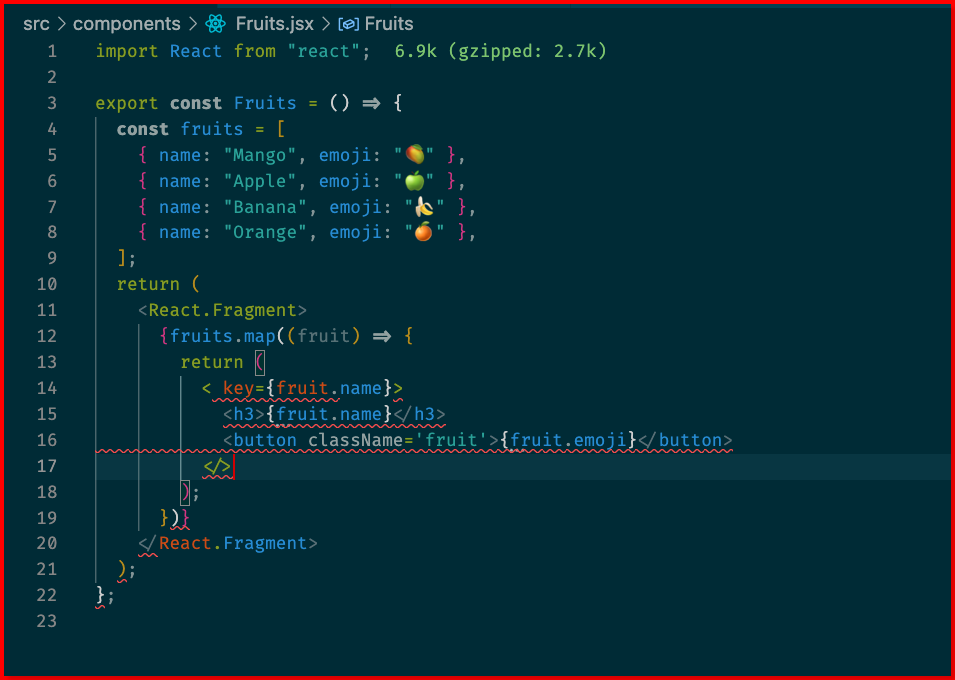
We’ll also encounter the following parsing error on our browser:
When to use React Fragments in React Components
You can make use of the react fragment in react components in the following scenario:
- Use React.Fragment or <> to group a list of children without adding extra nodes (tags) to the DOM.
- Use React fragments when you want to return multiple elements from a react component’s render method (class) or return statement (functional), but you don’t want to wrap those elements in an extra DOM element.
Wrapping Up
In this article, you’ve learned about the React Fragment component, how to use it, and when to use it through hands-on tasks and code samples. You also learn that you can create a React fragment using either the <React.Fragment> syntax or the short syntax <>.
What’s Next?
If you prefer a video tutorial on how to use fragments in React, watch the tutorial by @WebDevSimplified below:
Finally, more articles like this can be found on our CopyCat blog. CopyCat converts your Figma files into a ready-to-use React project, saving react developers over 35% of development time. You can check out CopyCat here.
Interesting Reads From Our Blogs
- What is TypeScript: A Beginner’s Guide
- Your Complete Guide To Bootstrap Grid
- Creating a Dropdown Selection in React Using Material UI Select
Happy Coding 👨🏽💻

