Introduction
In web development, forms are used to collect required information in a logical, useable format for communication and data transfer to another entity such as database or component. Additionally, React Hook Form is one of the libraries in which data are retrieved, validated and processed in a React application.
In this article, we’ll dive down into getting started with React Hook Form and why the library is useful in building forms in a React application with less code.
What Is React Hook Form?
React Hook Form is a form state management and validation library for React web-based applications and React Native mobile applications. It focuses on reducing the amount of code that developers need to write when creating forms in React, as well as eliminating unnecessary re-renders of form components.
Unlike other form libraries that handle the implementation of their form management library with React state, React Hook Form makes use of ref to control the form inputs. As a result, the use of ref resolves the unnecessary re-rendering of forms in React.
React Hook Form Features
React Hook Form is distinguished from other React form libraries by a number of features and good efficiency. The following are some of the features:
- It has zero dependency
- High performance
- Great user experience (UX) and developer experience (DX)
- Support for native HTML form validation
- Supports third party form validation
- Support for third party UI libraries
- Light weight
React Hook Form is usually compared with Formik, a popular React form library. When it comes to Formik vs React Hook Form, below are the most obvious difference:
- Small bundle size
- Form component renders lesser than Formik’s
- Easy to integrate with any third UI libraries
- Uses uncontrolled method to improve the performance of form state while Formik that uses the controlled method.
- Has less boiler code than Formik.
How to Use React Hook Form
Create a new React app with the Create React APP (CRA) command below:
npx create-react-app my-react-hook-form
Next, navigate into the newly created project directory with the command below:
cd my-react-hook-form
The easiest way to work with React Hook Form in your React project is by installing it with the command below:
npm install react-hook-form
or
yarn add react-hook-form
These two commands will install the React Hook Form package into your React project.
How to Use React Hook Form
After installing the react-hook-form package into your app, the next step is to import the useForm hook from react-hook-form into your component:
Update your App.js file with the following lines of code:
import "./App.css";
import { useForm } from "react-hook-form";
function App() {
  const {
    register,
    handleSubmit,
    formState: { errors },
  } = useForm();
  const onSubmit = (data) => {
    alert(data);
  };
  return (
    <div className='App'>
      <form onSubmit={handleSubmit(onSubmit)}>
        {/* Username */}
        <section>
          <label>Enter username</label>
          <input
            type='text'
            placeholder='username'
            {...register("username", { required: true })}
          />
          {errors.username && <span>Username is required</span>}
        </section>
        {/* Age */}
        <section>
          <label>Enter age</label>
          <input
            type='number'
            placeholder='age'
            {...register("age", { required: true })}
          />
          {errors.age && <span>Age is required</span>}
        </section>
        {/* Submit button */}
        <section>
          <input type='submit' />
        </section>
      </form>
    </div>
  );
}
export default App;
In the code above, we’re importing the useForm hook from the react-hook-form package, the useForm hook is also an object that contains methods that we can use to interact with the form state.
These methods can also be used to watch changes in our form, display errors, reset the form, access the form state etc.
Next, update your App.css file with following CSS file to style our React hooks:
body{
  display: flex;
  justify-content: center;
  align-items: center;
  min-height: 100vh;
  padding: 10px;
}
form section{
  margin-bottom: 0.6rem;
  width: 300px;
}
label{
  display: block;
  margin-bottom: 0.3rem;
  font-size: 14px;
}
input{
  width: 100%;
  box-sizing: border-box;
  padding: 12px 16px;
}
span{
  color: red;
  font-size: 13px;
  padding-left: 4px;
}
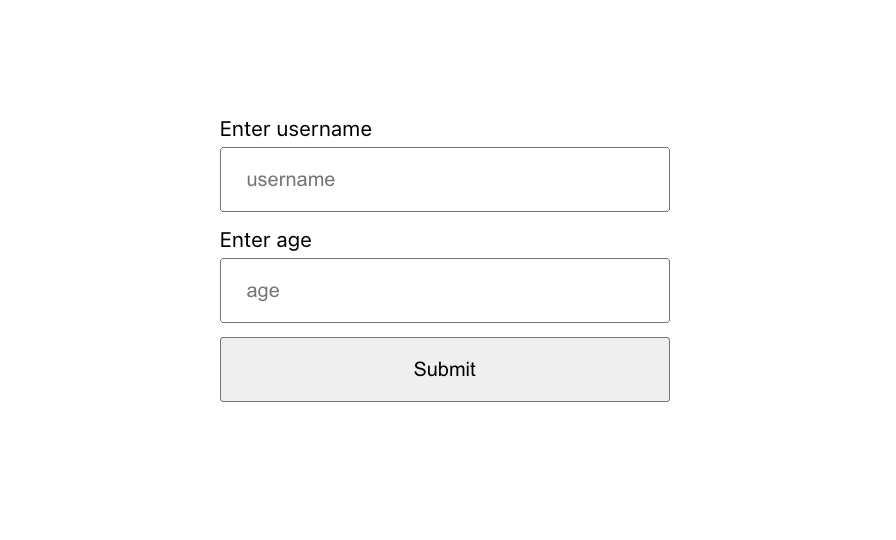
Our form should look something like below:
Error Handling in React Hook Form
When an error is detected in a React Hook Form, it means one or two form field validations are not completed by the user.
Validation errors can be accessed through an error object from the formState property in the useForm hook. For instance,
const { formState: { errors } } = useForm();
or
const { formState } = useForm()
const { errors } = formState;
Validation error for a particular form field can be detected like this:
{errors.inputBox && <span>Error occurred in inputBox</span>}
A specific validation error type can also be accessed through the error type like this:
{errors.inputBox?.type === "validation-type" && <span>Custom error message</span>}
How To Validate React Forms With React Hook Form
React Hook Form has support for native HTML form validation, which are ways of ensuring the user is providing the right information on the React hooks.

Required Validation
The required validation is one of the most popular ways to validate forms that ensures the user does not leave the input field empty.
For example, a form field can be made required by setting the required to true as shown below:
<input
  type='text'
  placeholder='username'
  {...register("username", { required: true })}
/>
The above code will produce the result below:

Min Validation
The min number validation can be used to set the minimum number a form field should accept.
The code below will only accept age from 18 and above:
{/* Age */}
<section>
  <label>Enter age</label>
  <input
    type='number'
    placeholder='age'
    {...register("age", { required: true, min: 18 })}
  />
  {errors.age?.type === "required" && <span>Age is required</span>}
  {errors.age?.type === "min" && <span>Age is too small</span>}
</section>
When a user enters any age below 18, our min validation will look something like this:

Max Validation
The max number validation can be used to set the maximum number a form field should accept.
The form field below will only accept a maximum age of 70:
{/* Age */}
<section>
  <label>Enter age</label>
  <input
    type='number'
    placeholder='age'
    {...register("age", { required: true, min: 18, max: 70 })}
  />
  {errors.age?.type === "required" && <span>Age is required</span>}
  {errors.age?.type === "min" && <span>Age is too small</span>}
  {errors.age?.type === "max" && <span>Age is too high</span>}
</section>
When a user enters any age above 70, our max validation will look something like this:

MinLength Validation
The minLength validation specifies the minimum length of a value that will be accepted in a form field.
The form field below will only accept four-letter usernames:
{/* Username */}
<section>
  <label>Enter username</label>
  <input
    type='text'
    placeholder='username'
    {...register("username", { required: true, minLength: 4 })}
  />
  {errors.username?.type === "required" && (
    <span>Username is required</span>
  )}
  {errors.username?.type === "minLength" && (
    <span>Username must be at least 4 letters long</span>
  )}
</section>
When a user enters a username less than 4 letters, our minLength validation will look something like this:

MaxLength Validation
The maxLength validation specifies the maximum length of a value that can be accepted in a form field.
The form field below will only accept usernames with less than ten-letters:
{/* Username */}
<section>
  <label>Enter username</label>
  <input
    type='text'
    placeholder='username'
    {...register("username", {
      required: true,
      minLength: 4,
      maxLength: 10,
    })}
  />
  {errors.username?.type === "required" && (
    <span>Username is required</span>
  )}
  {errors.username?.type === "minLength" && (
    <span>Username must be at least 4 letters long</span>
  )}
  {errors.username?.type === "maxLength" && (
    <span>Username must not be 10 letters long</span>
  )}
</section>
When a user enters a username with more than ten-letters, our maxLength validation will look something like this:

Pattern Validation
Finally, the pattern validation can be used to set the regex pattern for a form field.
The form field below will only accept lowercase letters:
{/* Username */}
<section>
  <label>Enter username</label>
  <input
    type='text'
    placeholder='username'
    {...register("username", {
      required: true,
      minLength: 4,
      maxLength: 10,
      pattern: /[a-z]/,
    })}
  />
  {errors.username?.type === "required" && (
    <span>Username is required</span>
  )}
  {errors.username?.type === "minLength" && (
    <span>Username must be at least 4 letters long</span>
  )}
  {errors.username?.type === "maxLength" && (
    <span>Username must not be 10 letters long</span>
  )}
  {errors.username?.type === "pattern" && (
    <span>Username must be lowercase</span>
  )}
</section>
When a user enters their username in CAPITAL LETTERS, our pattern validation should look something like this:

More information on the Regex form pattern validation may be found here.
React Hook Form Validation With Yup
React Hook Form also supports Yup validation schema out of the box. Yup is a JavaScript object schema for value parsing and validation where you can pass your schema to the useForm hook as an optional config.
Yup will validate the user’s input data against the schema and return with either errors or a valid result.
Install yup and Hook Form resolver into your app with the command below:
npm install @hookform/resolvers yup
Next, we’ll recreate our native HTML form validation with yup schema. Create a new schema.js file in your src folder with the following content:
import * as yup from "yup";

export const schema = yup
  .object({
    username: yup
      .string()
      .required("Username is required")
      .min(4, "Username must be at least 4 letters long")
      .max(10, "Username must not be 10 letters long"),
    age: yup
      .number()
      .required("Age is required")
      .max(70, "Age is too high")
      .min(18, "Age is too small"),
  })
  .required();
- Create a new FormWithYup.js file in your src folder.
- We can apply the yup schema into our component as shown below:
import "./App.css";
import { useForm } from "react-hook-form";
import { schema } from "./schema";
import { yupResolver } from "@hookform/resolvers/yup";

function FormWithYup() {
  const {
    register,
    handleSubmit,
    formState: { errors },
  } = useForm({
    resolver: yupResolver(schema),
  });
  const onSubmit = (data) => {
    alert(data);
  };
  return (
    <div className='App'>
      <form onSubmit={handleSubmit(onSubmit)}>
        {/* Username */}
        <section>
          <label>Enter username</label>
          <input type='text' placeholder='username' {...register("username")} />
          <span>{errors.username?.message}</span>
        </section>
        {/* Age */}
        <section>
          <label>Enter age</label>
          <input type='number' placeholder='age' {...register("age")} />
          <span>{errors.age?.message}</span>
        </section>
        {/* Submit button */}
        <section>
          <input type='submit' />
        </section>
      </form>
    </div>
  );
}
export default FormWithYup;
The validation schema above will perform the same validation as we have done earlier:

Learn more about Validating Forms with React Hook In React Using YUP from the video below, made by wonderful people:
Using React Hook Form With UI Libraries
React Hook Form library also works with external UI libraries that don’t expose their input ref, such as Material UI, Chakra UI, and React Select.
In this tutorial, we’re going to use the Chakra UI OTP component specifically as an example.
Install Chakra UI with the command below:
npm i @chakra-ui/react @emotion/react@^11 @emotion/styled@^11 framer-motion@^6
Next, import Chakra provider in your index.js file:
import { ChakraProvider } from "@chakra-ui/react";
Wrap the ChakraProvider around the <App /> components in index.js as shown below:
<ChakraProvider>
  <App />
</ChakraProvider>
Next, inside your src folder, create a new OtpForm.jsx file with the following code:
import { HStack, PinInput, PinInputField } from "@chakra-ui/react";
import React from "react";
import { Controller, useForm } from "react-hook-form";
export const OtpForm = () => {
  const { control, handleSubmit } = useForm();
  const onSubmit = (data) => alert(JSON.stringify(data));
  return (
    <div>
      <Controller
        name='otp'
        control={control}
        render={({ field }) => (
          <HStack>
            <PinInput {...field} onComplete={handleSubmit(onSubmit)}>
              <PinInputField />
              <PinInputField />
              <PinInputField />
              <PinInputField />
            </PinInput>
          </HStack>
        )}
      />
    </div>
  );
};
In the code above, we’re wrapping the Controller component around the Chakra UI HStack and PinInput components. The Controller component will take care of registering the form field into the React Hook state management using the provided name.
The handleSubmit function will then handle the submission of the form when the user has provided all the required digits.
When you render the <OtpForm /> component in your App.js file, our otp page should look something like this:

You can learn more about the React Hook Form controller and how it works under the hood from the maintainer’s tutorial video below:
Wrapping Up
React Hook Form is a powerful React form library that allows you to develop and manage the state any kind of form with less code and high performance.
Through this article, you’ve learned about React Hook Form, how you can get started with it and why it’s a good choice for your React and React Native app forms.
Where Do You Go Next?
Do you want to build a better UI? Do you also want more information on React? Check out tips on how to build better UI faster with CopyCat. We are our own kind and lovely sponsors:
- Learn React best practices from here.
- Learn how to use Bootstrap in React from here.
- Learn how to build React Navigation here.
- Learn the difference between React and React Native here.
- Learn How to Make Drag and Drop with React Draggable here.
Try CopyCat yourself to see how much faster you can build using this Figma plugin. It generates production-ready React code, helps makes handoffs smooth, and has a seamless experience. Speed up development and build faster than your competitors.
Related Articles
-
 Uncategorized
Change CSS Font Size and Get Better Web Design
What is CSS Font Size? https://www.istockphoto.com/photo/rising-arrow-on-staircase-on-yellow-background-gm1319849784-406597709?utm_source=unsplash&utm_medium=affiliate&utm_campaign=srp_photos_top&utm_content=https%3A%2F%2Funsplash.com%2Fs%2Fphotos%2Fsteps&utm_term=steps%3A%3A%3A In the world of web design, CSS font size is a critical element that can make or break the user experience. From readability and accessibility to aesthetics and branding, font size plays a vital…
February 28, 2023 -
Uncategorized
React localStorage: set and get items with hooks
Introduction There are two main web storage mechanisms: React localStorage and sessionStorage. These storage types are similar to persistent cookies and session cookies respectively. Local storage and sessionStorage both maintain a separate storage area for each given origin that's available…
April 28, 2022