- Introduction
- A Brief Overview of Figma
- What is a Design Handoff?
- When is a design ready for a Handoff?
- Steps to perform a Design to Developer Handoff
- How to share a Figma design with developers
- Best Practices for a Figma Developer Handoff
- Some Factors that hinder effective developer Handoffs
- Things to do after a Handoff
- Conclusion
- Resources
Introduction
Most Applications we use today go through a User Interface (UI) design stage. This is when the product designers sketch screens and components the users are going to interact with, in the application. The Product Designers also demonstrate the flow of the application, that is, which screens come first and some other details.
The importance of UI Design is to improve the User Experience (UX). An application with a thoughtfully designed interface makes for a smooth experience and increases the chances of a user returning.
There are many applications used to illustrate UIs. Some of them are Figma, Adobe XD, Sketch, InVision, Axure RP, Marvel, Protopie, Balsamiq, and Origami Studio.
After the Product Designers are done designing the pages, the developers come in to write code that brings it to life. This is the process by which designs become actual products.
This process can be easily smoothed out using CopyCat. It is a figma developer handoff tool that converts design to code instantly. CopyCat allows you to concentrate on your app’s business logic and saves you the headache of communicating back and forth. Try it here.
This article goes into detail on how designers who use Figma and developers who write codes come together to convert designs into products. It also explains what a developer handoff is and when a design is ready for a handoff.
Some other things the article presents are steps to perform a design-to-developer handoff, the way to share a Figma developer handoff on Figma, best practices for a Figma developer handoff, factors that hinder effective handoffs, and some things designers do after a handoff.
It promises to be a fun and insightful read. Let’s dive in.
A Brief Overview of Figma
Figma is an Application used to design user interfaces. It is also a collaborative tool. This means that entire teams can use it to inspect the user interfaces made by the designers. Designers also use this tool to create prototypes.
Watch the official overview video of Figma below:
Figma is available on the Web, Windows, Mac OS, and Linux. The Figma Mobile App on Android and iOS allows the viewing of designs and testing of Prototypes. According to the 2022 Design Tools Survey, Figma dominates as the most popular UI Design tool.
Some features that make Figma stand out from other UI Design tools are:
- Multi-platform support: Figma, unlike other tools, can work on multiple platforms like Windows, Mac OS, Linux, and the web.
- Real-time Collaboration: Figma allows team members to work on a design at the same time and see real-time changes. This is extremely helpful not only for remote teams but also makes the design process faster and more transparent to team members.
- Prototyping: Figma allows designers to assemble prototypes easily. This helps in testing designs, getting feedback, and making necessary changes before developers start coding.
These and other features are the reasons why Figma is the most popular tool for UI Design presently.
What is a Design Handoff?
A Design Handoff is a process in which product designers hand over their designs to the developers so that they can bring them to life. This process usually takes place when the designers are satisfied with the interfaces they designed.
Other names for a Design Handoff are Developer Handoff, Design to Developer Handoff, and Handoff. These articles use the terms interchangeably but they mean the same thing.
The Handoff usually takes place in form of a meeting where the designer(s) run down the flow of the user interface, share links and important assets and answer questions if developers have any.
The next stage after a Developer Handoff is the code implementation of the designs. A Handoff is necessary to avoid any confusion that may arise during this stage of development as the design team is usually different from the engineering team. There is a need for all participants to understand the design, so as to implement it efficiently and afford any back and forth.
When is a design ready for a Handoff?
A Design is ready for a Handoff when the designers have tested it and are sure it can safely go to the engineering team. At this stage, developers and designers must have resolved all the issues they had with the designs.
However, even before the proper design handoff, Designers and Developers are supposed to collaboratively influence the design. This is very essential because the engineers could be facing problems like technical constraints with the design ideas. The designers need to be sure the developers can build out whatever they design.
It is for this reason that developers are involved early during the design phase. In fact, one can see the handoff as a “go-ahead” to start writing code.
Steps to perform a Design to Developer Handoff
Effective Design-to-Developer Handoffs are very essential to effective products. There are many ways to structure this process so that developers successfully receive the design, understand the design, and build the solution the designers intended.
This article suggests that teams go through these four steps to achieve an effective handoff.
The steps include:
- Kickoff
- Design
- Mocks
- Handoff
Kickoff
In this stage, the designers and developers discuss the product design. This is a very important part of the whole process. Here, involved participants talk about the technical viability of the designs and possible constraints. All participants need to be on board and discuss the product in detail.
Here, the designers can also make rough sketches of the UI and show the developers. If this happens, everybody has a general idea of where the project is going before it is late.
Design
This stage should come after the kickoff stage. Here, the designers start designing the User Interface components of the screens.
In this stage, the designers can decide to organize their design files by separating them. The designer can create files for wireframes, lo-fi and hi-fi, the final design, and so on. It all boils down to how the designer or design team organizes their files.
But this is the design stage where the User Interface starts getting shape and coming together.
Mocks
This is the stage where the designers request the developers’ input on the design so far. Here developers can show any concerns they have and these concerns are discussed and resolved.
The tool a design team uses really helps at this stage. For example, if the team is using Figma, then it is easy for developers to inspect the design and make comments.
Handoff
After the design looks good for all the participants, it is at this stage that the designer hands over all design assets that are necessary to bring the design to life. This can include images, icons, designs, and perhaps design documentation if the design team has one.
The handoff as mentioned earlier is where the designer(s) go through the design and explains in detail the design so that there is no confusion between the involved teams. It usually takes place during a meeting but can happen through other means of communication.
How to share a Figma design with developers
If the Design team uses Figma, then it is extremely easy to share the design files with developers. This section breaks down this process into steps.
- First, select frame(s) that developers can start working on. These are the frames ready to be implemented into code.
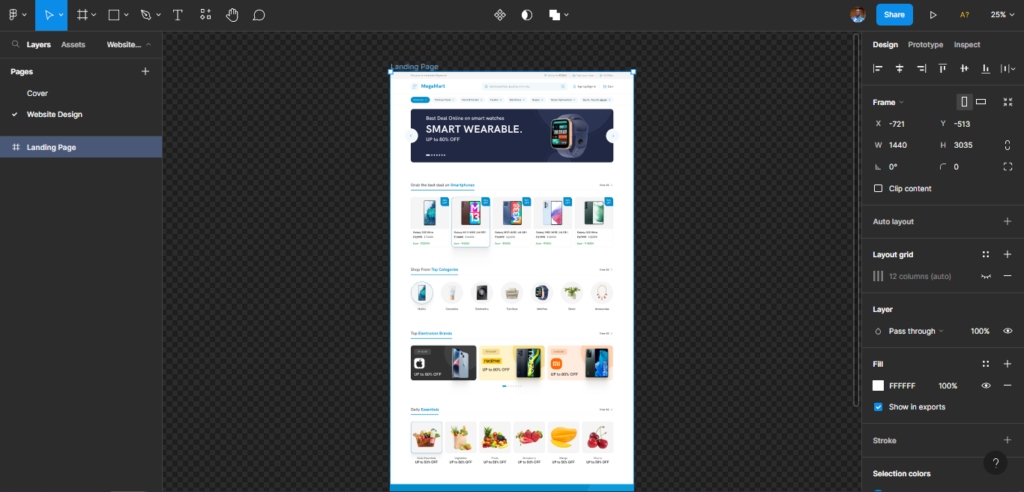
Figma Selected Frame
- Next, click on the share button at the top-right corner of the Figma Application. This triggers a dialogue box as shown below.
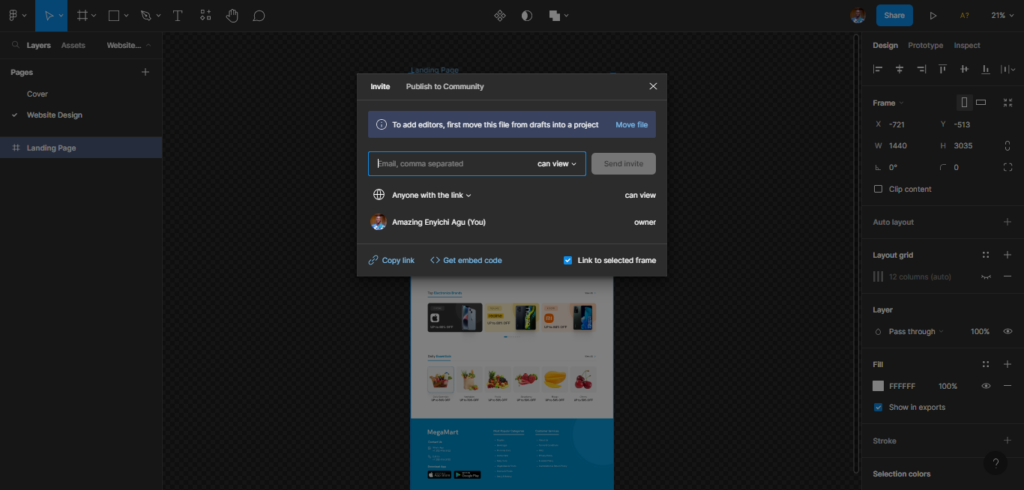
Figma Share Dialogue Box
- Inside the dialogue box, type in the email of whoever you want to give access to. Also, select if the invited participant(s) can view or edit the design. It is possible to share links too instead of invites. Check the “Link to selected Frame” option as demonstrated below.
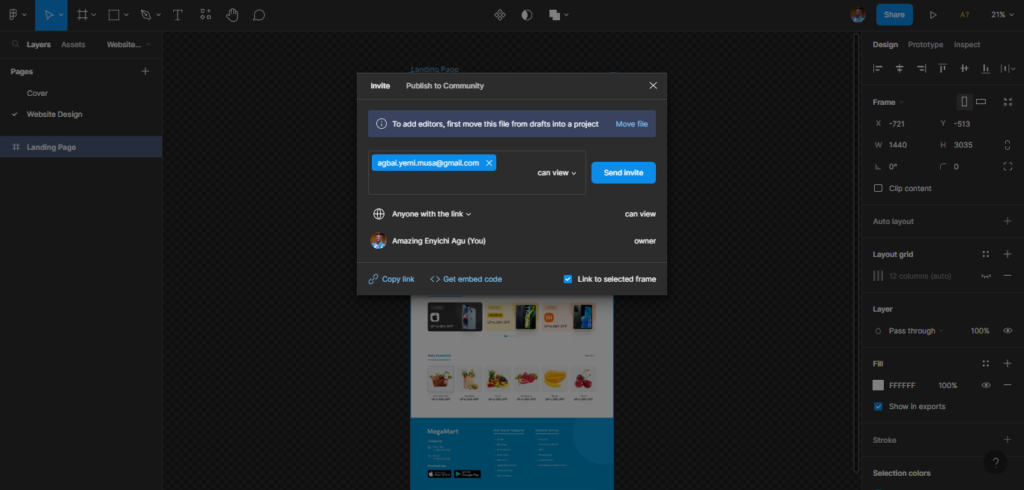
Input Participant(s) email
The invited participant(s) will be notified and can start viewing or editing the Figma frame.
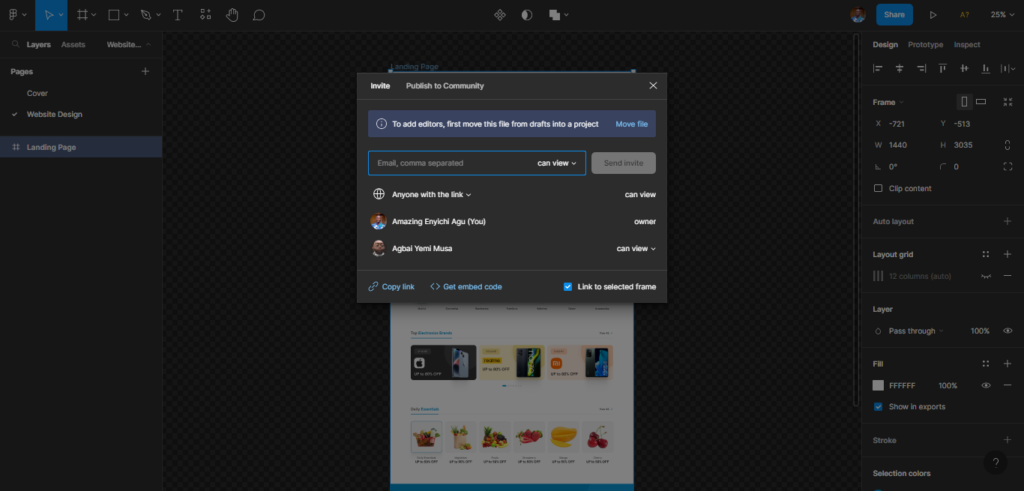
Participant(s) can now view or edit
- With this, the other participants can now have a good look at the designs on their Figma accounts.
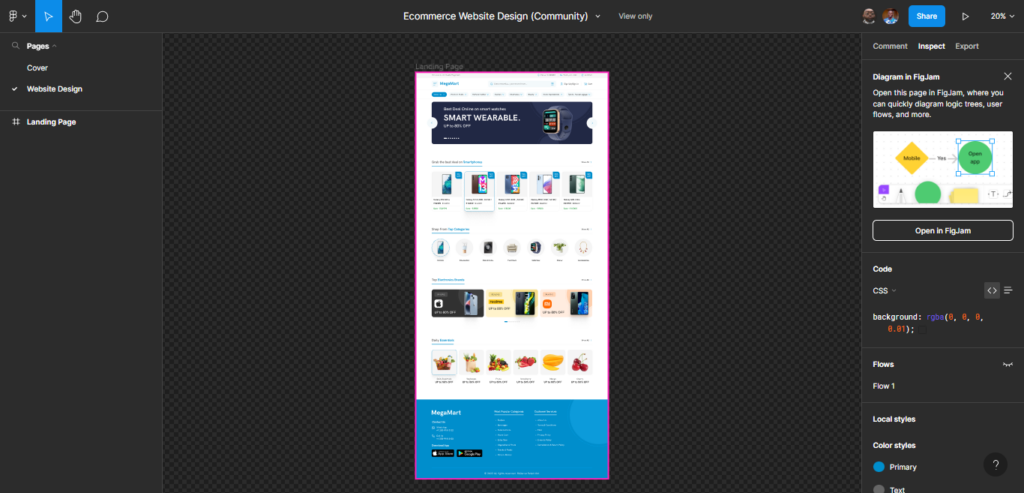
Participant’s View-Only Screen
These are the steps design teams using Figma can follow to share their designs across different departments that need to inspect, edit or comment on them.
Best Practices for a Figma Developer Handoff
There are some practices that make the Handoff process more efficient. This section contains a number of those practices that particularly ensure a successful Figma Developer Handoff.
Create an organized Project Structure
Different teams and designers have different ways of organizing their files. Some methods of organization are more helpful than others. It is important that product designers organize their files in a straightforward way. This way, the stakeholders can go through the files and inspect them easily.
Watch the video below on how to organize your design file on Figma.
Give files thumbnails for additional Context
A thumbnail is a low-quality image that represents the content. It can be seen as a visual summary of the content it represents. Most times, we can access those content by clicking on the thumbnail.
Content thumbnails can represent videos, images, and even documents as in the case of Figma.
Some design projects get large and need more design files. These multiple files can confuse stakeholders who have access to the project.
Giving files thumbnails makes it easier to differentiate the files. It also makes the overall project look more organized. Here is a guide on how to give Figma files thumbnails. Also, here is a preview of File Thumbnails some companies implemented.
Prototype the Design
Prototyping is the process of creating a low-quality but working version of a product. Prototypes are a result of prototyping.
Prototypes do not require too much effort to build and final consumers might not be able to use them. However, prototypes provide enormous insight into a product. The team building the product will spot problems early with a prototype and correct them immediately before it is too late.
It is important for designers to prototype their designs. This keeps all the participants on the same page and everybody gets an idea of how the product should look and work when the company releases it.
Figma offers very excellent prototyping tools. Here is a guide on how to Prototype designs with Figma.
Create a Design System
A Design system is a collection of styles and guides used to create a consistent look and feel of a software product. A design system can contain UI components (buttons. forms, lists, and many more), User Experience (UX) patterns, and guides on the product’s color palette, typography, etc.
When working on a design product, design systems help unite both the design and engineering teams. Both teams now have rules to follow in order to make the product feel consistent and organized.
Figma has a feature that allows designers to build reusable components for UI Designs. But designers can take this a step further to build complete design systems. Here is a guide on how to do that.
Use clear and descriptive naming conventions
One thing that sets a successful design handoff from an unsuccessful one is that in successful handoffs, everybody understands the designs and nobody is confused. One way to avoid confusion is using clear and descriptive naming conventions.
Name files, pages, and frames appropriately. The naming should also be consistent. For example, if a project will go through multiple iterations then the design team should use a naming convention that includes a version number for the files. That way all the stakeholders can identify the different versions without trouble. Here is more information on naming conventions.
Clarify the flow direction of pages or components
Sure, the designs themselves are important, but a person inspecting them should be able to see the user flow of the designs. User flow means the order of the frames as the user interacts with them.
The design team can clarify the flow direction by using the Figma arrow tool. That way the designers can use arrows to connect screens and components to each other.

Figma arrow tool on a list of options
A more effective way of doing this is using the Autoflow Plugin. Here is a guide on how to show user flow with Autoflow. Figma plugins can make work that could’ve taken hours just minutes. Another nice plugin in Figma is CopyCat. It converts UI design to code with just the click of a button. These are some of the wonders Figma plugins can perform.
Ensure easy assets export
When performing the Figma developer handoff, the design team must make sure Stakeholders or participants can export the assets. Figma has an export feature. Here, once a Figma user highlights an asset, they can export the asset in multiple formats.
Even with this feature, however, designers should make sure it is not disabled when sharing the design with others. Here is a guide on how to use the Figma export feature.
All the points listed above are the best practices for a smooth design-to-developer handoff process.
Some Factors that hinder effective developer Handoffs
While the best practices discussed above make the handoff process more clear and productive, there are some common pitfalls design teams fall into which could mar the developer handoff process.
This section of the article examines these factors that hinder effective handoff and how to avoid them.
Lack of Communication
When the designer or design teams begin the design process in isolation, problems tend to develop. This is because the other stakeholders are not aware of what the design team has in mind. It could also lead to a conflict of interest.
There is a need for transparency across multiple teams involved even before the proper handoff takes place. Communication is very important. The design process should be the input of all stakeholders so that the handoff is merely a restatement of agreements between stakeholders.
Lack of clear documentation
Different teams have different ways of documenting their designs. Some may prefer doing it inside the UI design tool like Figma, Adobe XD, and so on. Some may prefer to create separate documents strictly for documentation. For this, they might use collaboration tools like Notion.
Documentation is a written guide on how to utilize a particular tool. UI Designs need documentation so that whoever is introduced to the design understands how it works.
Design teams should strive to document their designs. This increases the chances of the handoff process being effective.
Lack of context and knowledge
When stakeholders lack context and knowledge of the product, this is a big problem during the handoff process. Context means necessary background information used to understand something fully.
All involved parties should obviously know what the project is about and why the designer made most decisions. They should understand the project’s design choices.
One way of solving this problem is when involved teams collaborate frequently during the design process.
Unfamiliarity with shared tools and processes
Every design team has tools they use (For example Figma, Adobe XD, etc). They also have their agreed methods of things like documentation or changing a design. Those are their processes.
When some parties who are supposed to be involved in the handoff process do not know about the shared tools or processes, then this becomes a problem in the handoff process.
To solve this problem, involved parties who are unfamiliar with the shared tools should signify. This way the people familiar with the tools can provide learning resources and walkthroughs.
Things to do after a Handoff
After a Design Handoff, usually, the next step for the developers is to start converting the designs into code and a real product. The design team does the bulk of their work before the handoff, after which the developers take over.
However, apart from developers converting the design to code, it is great if the teams involved in the handoff can also do the following activities after the Handoff. They ensure quality implementation of the designs.
Hold a Design QA
A Design Quality Assurance Process (Design QA) is a meeting where the Developers show the designers their progress so far in implementing the designs. The design and development teams should hold design QAs regularly after the handoff.
This promotes a culture of communication and transparency within teams. This also makes sure that both teams are on track and are working according to the handoff agreements.
Test the design
As the developers keep building the product, the design team should regularly test the designs and make sure they work how they are intended. This is important so that the final product is what all the involved parties already intended.
File reiterations or corrections if any
While testing the product, if the tester notices any mistakes or deviations from the original UI design, the tester should request a reiteration through whichever product management tools the company uses. This could mean for example raising a JIRA ticket if the company uses JIRA.
Conclusion
Whew!. That was a long exposition on how to perform a Figma Developer Handoff.
This article started by giving a brief overview of Figma and what a Design Handoff is. It also explained when a design should be marked ready for a handoff and the steps to perform a Design to Developer Handoff which are Kickoff, Design, Mocks, and Handoff phases.
After that, the article illustrated steps on how to share Figma designs with developers. It also listed and explained some best practices for a Figma developer handoff and some factors that hinder effective Handoffs. After explaining these factors it suggested some ways to solve those problems.
Finally, the article listed and explained some things to do after a Design Handoff.
Figma continues its domination as the most popular UI design tool due to its rich features like easy collaboration, design components, and plugins. Don’t forget to check out the CopyCat Figma plugin to convert designs to Code automatically. It is an awesome plugin.
And that’s all for now.
Resources
Here are further Links on the topic:
- Figma (Wikipedia)
- 2022 Design Tools Survey
- Design Handoff- Creating a better process
- Design to Developer Handoff in Figma
- What exactly is Wireframing? A Complete Guide
Interesting Reads from our Blogs:

