Introduction
Do you want to add a Datepicker to your React application? Most modern web applications require a date and time picker. Whether logging time for employees or choosing a publish date for your blog post, you need a date picker for your web app.
React Datepicker provides a customizable solution to add a date picker to your application easily.
This article will explain what the react date-picker library is and the benefits of using it for your React projects. Afterward, I will walk you through how to use the datepicker by building a simple blog application.
What is React DayPicker?
React Datepicker is a free library that lets you add date and time picker to your react app. It is a popular library with over 1 million weekly installations.

Out of the box, this library comes with;
- Customizable CSS modules
- Time Picker
- Localization
- Settings date range and limits
- Form validation.
Whether you are just starting out with React, or a seasoned developer, this package is ideal for adding a simple datepicker to your web application.
Benefits of React Datepicker
There are many libraries you can use to add a date picker to your react app, such as React Calendar. However, react-date-picker is a preferred option when looking out for a lightweight package.
The component works well out of the box with minimal customizations from your end. With this datepicker, you can validate your forms and set limits for your date components. This can be useful when setting a minimum or maximum date.
What’s more, the datepicker component comes with many customization options to improve your React component.
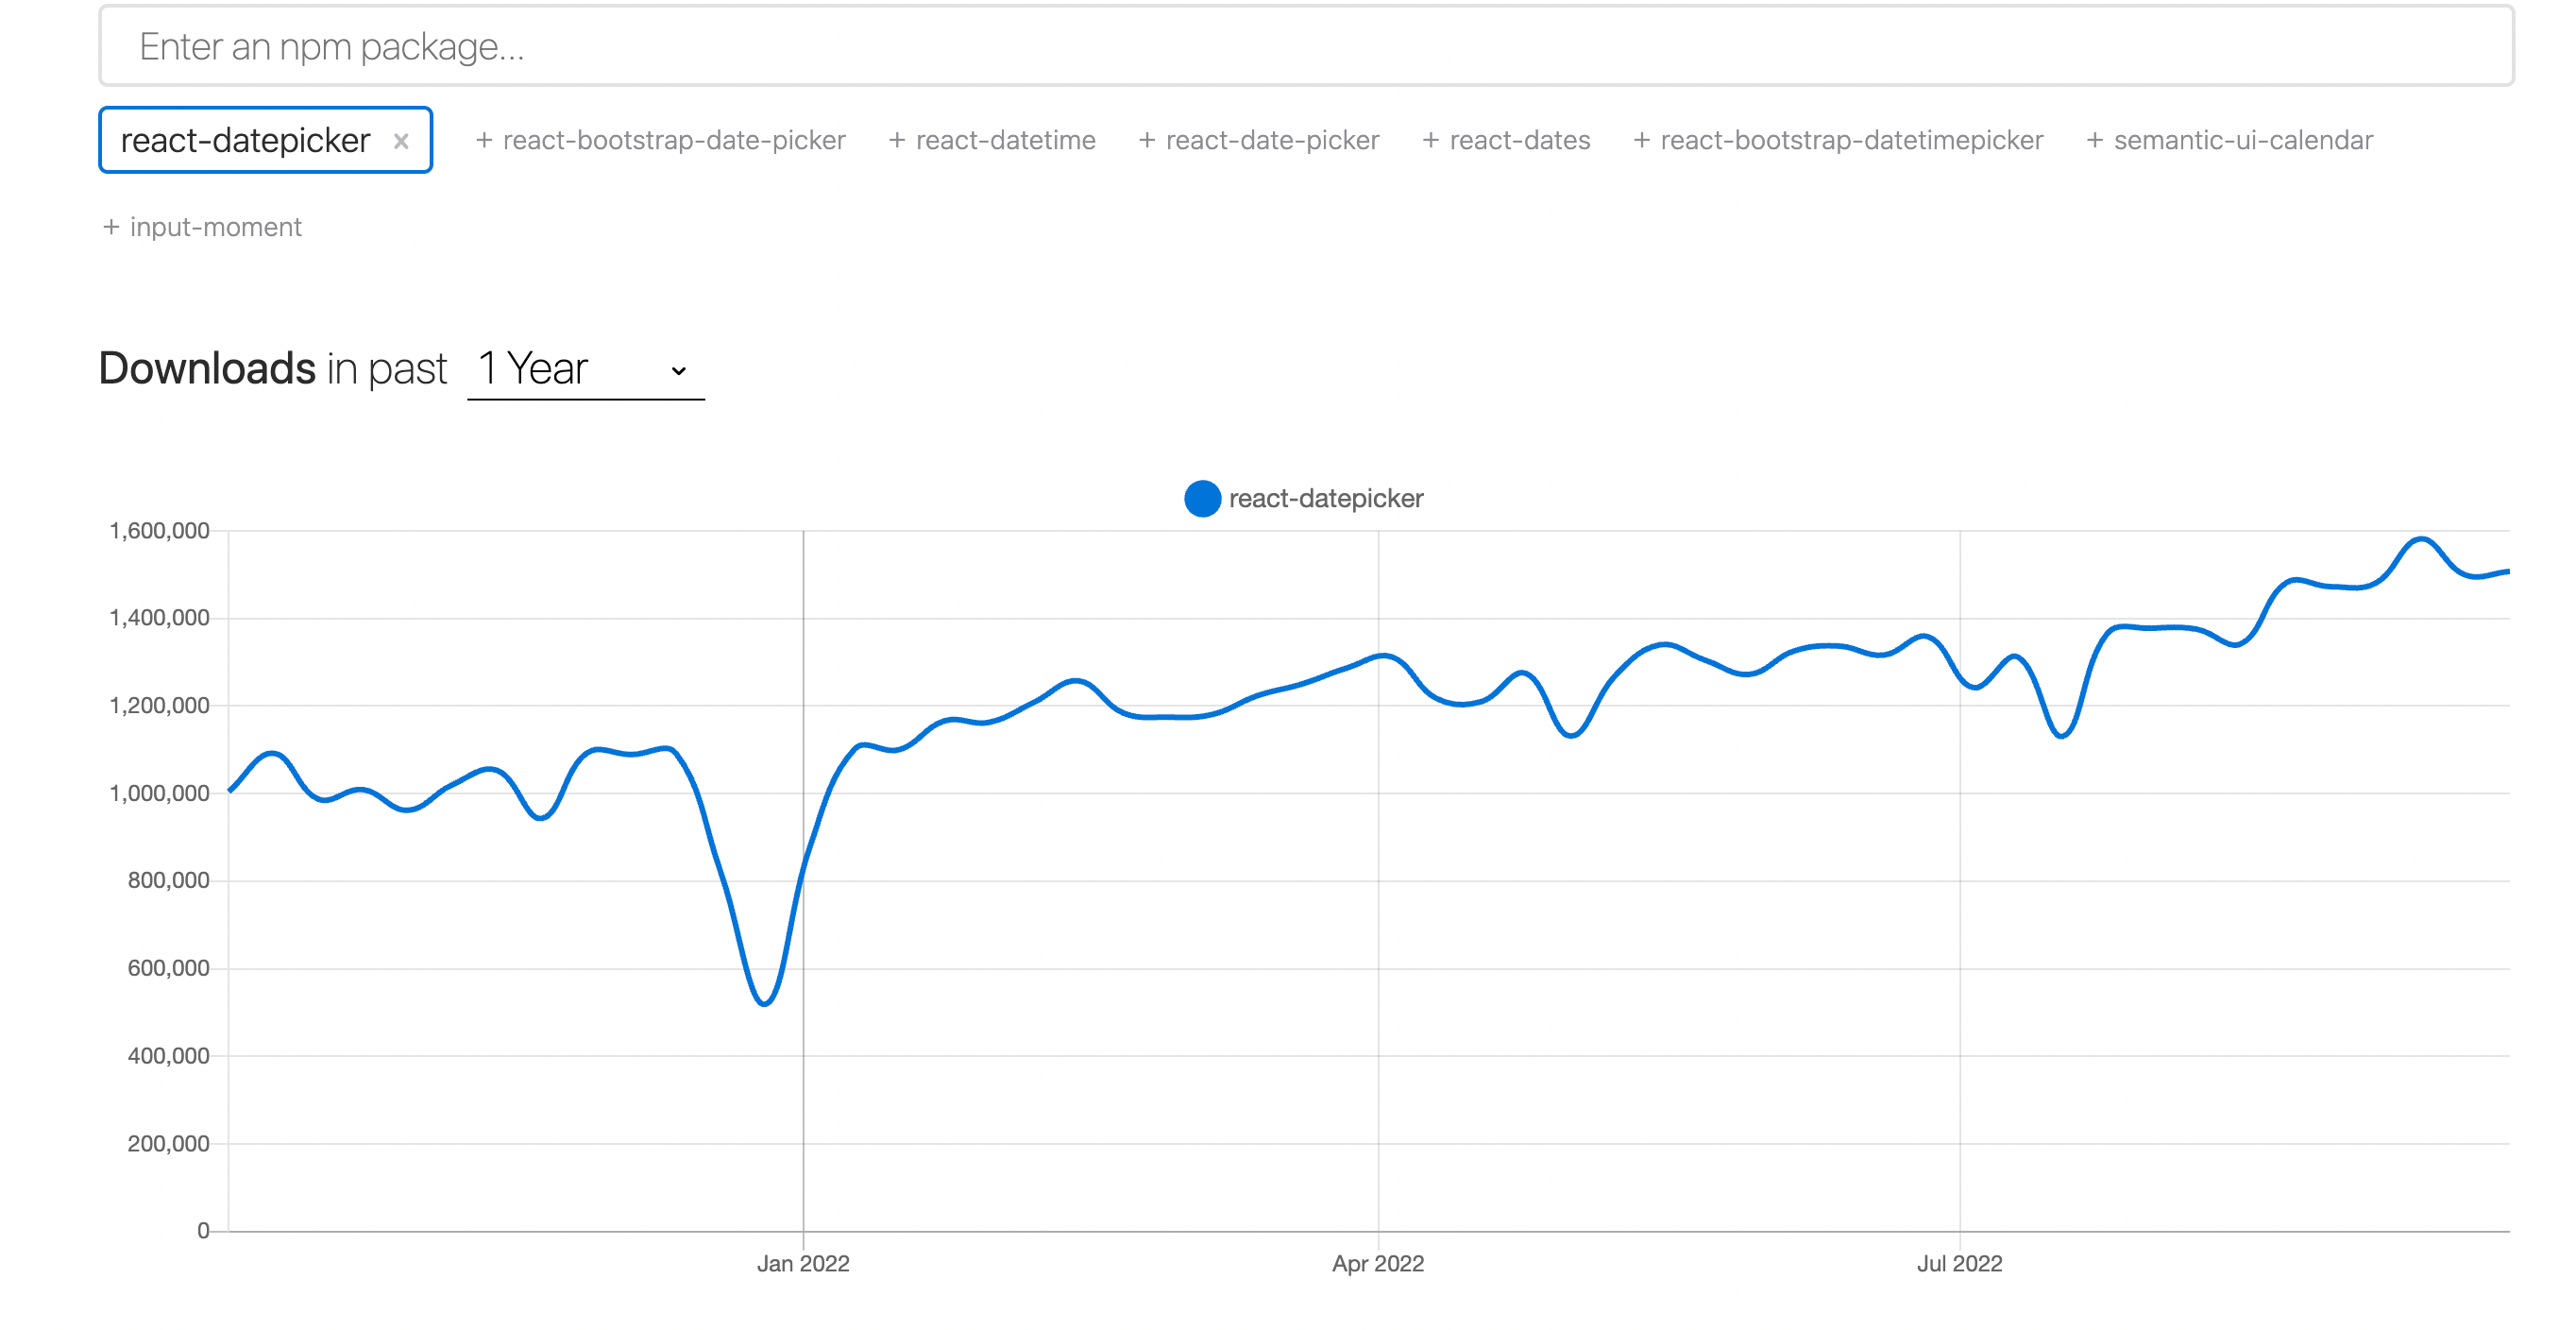
The library is preferred by most developers. This is evident as it has over 6.8k stars on github with over 1 million weekly downloads according to NPM trends.

React date-picker vs React Calendar
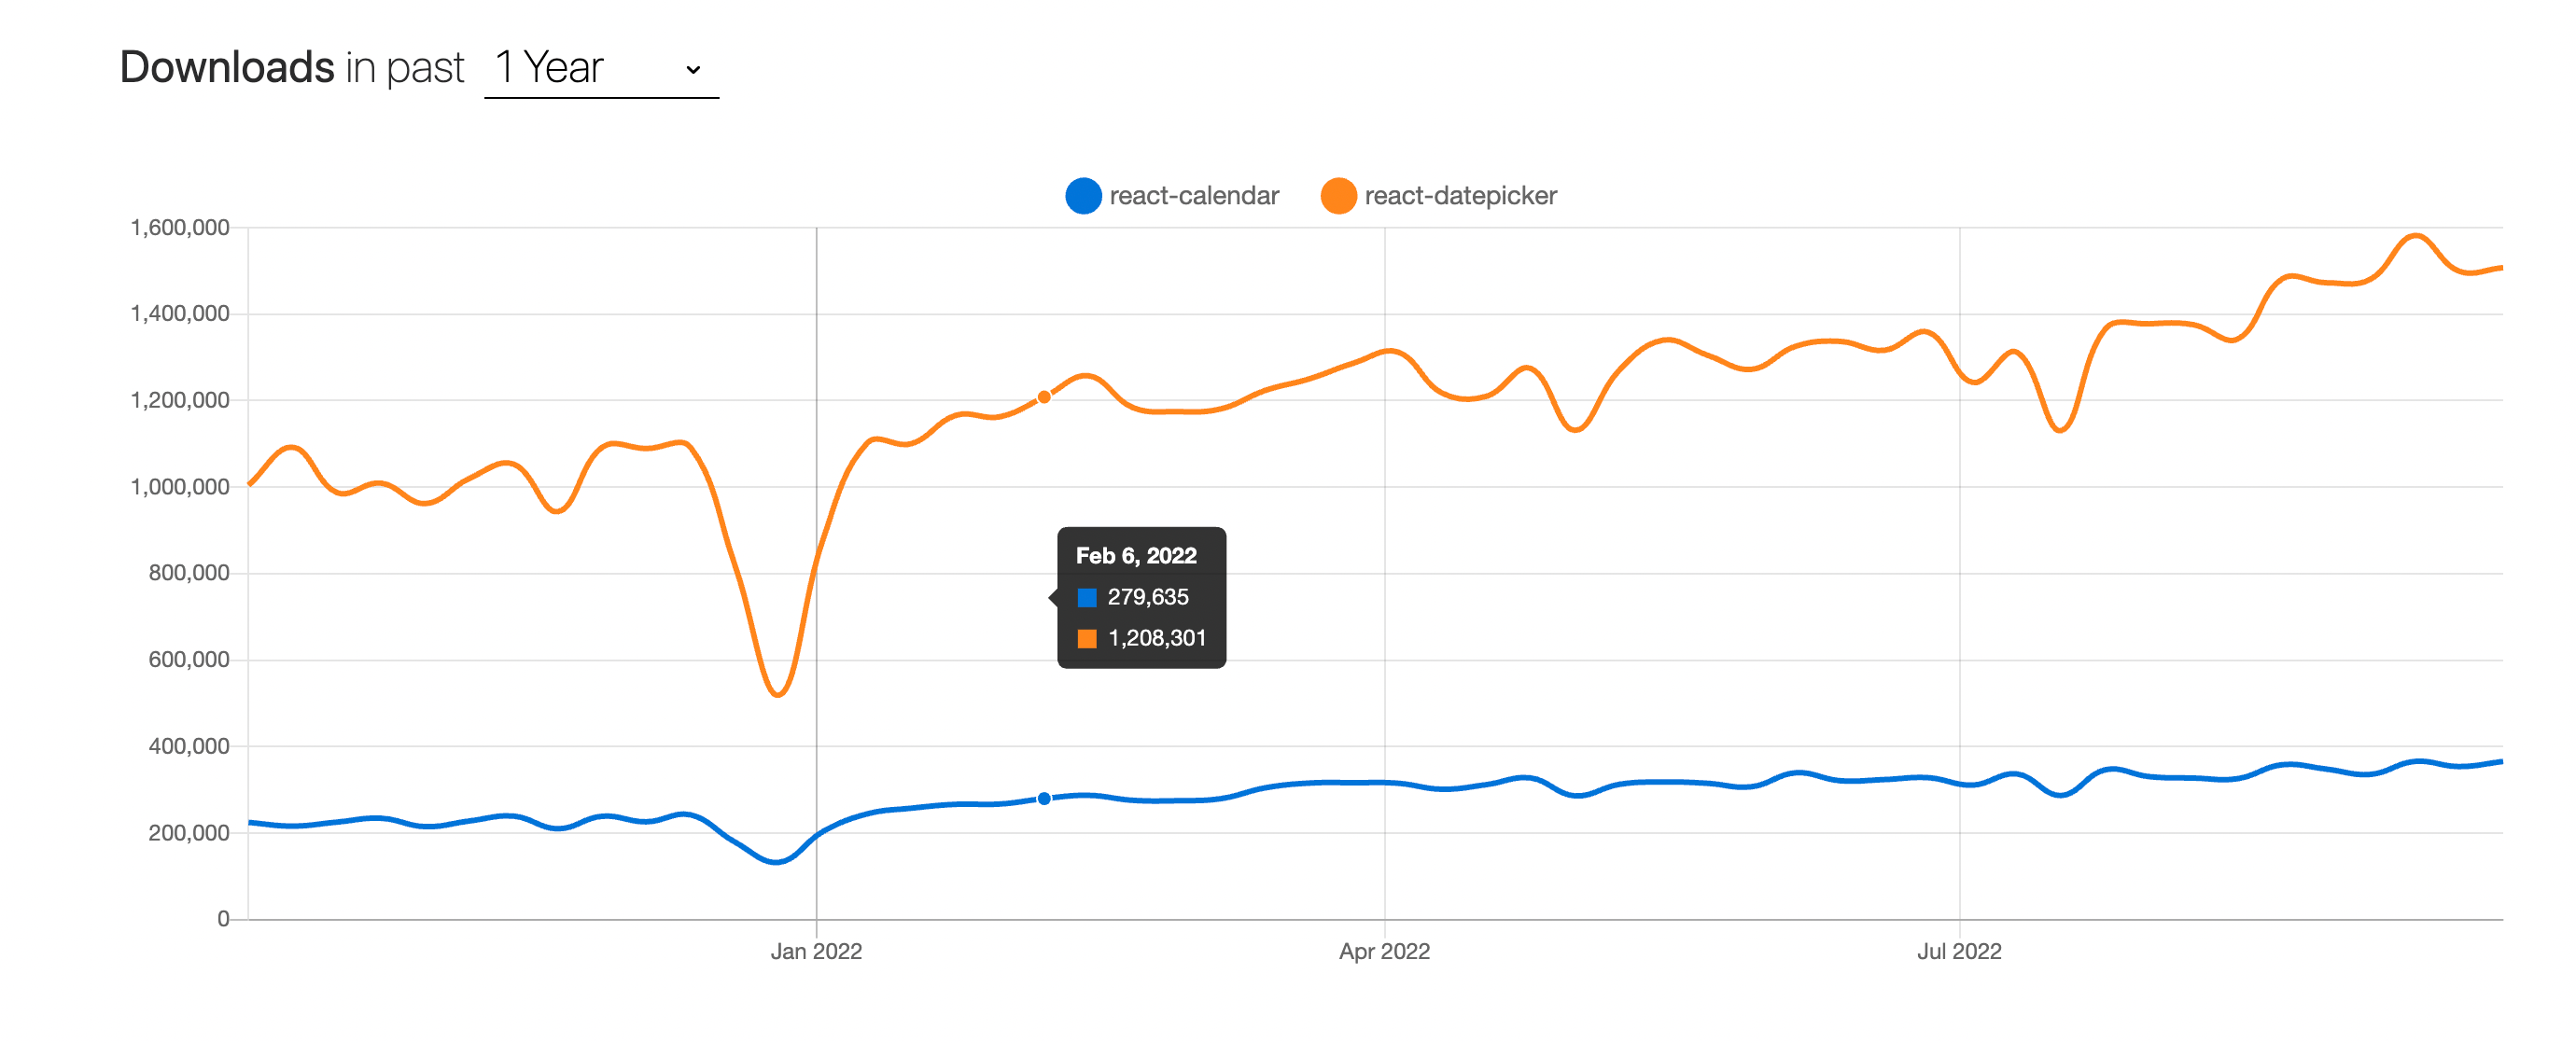
React Calendar is another lightweight solution for adding a calendar date picker to React applications. Both libraries offer similar functionalities, however, react datepicker leads in terms of popularity.

Below you will find a comparison table between both libraries.
Insert table from Google Docs
How to Install Datepicker in React App
In this guide, you would learn how to integrate the date picker into your new or existing react project. Here are a few requirements to meet before using the library.
Prerequisites
You need to have node.js installed on your machine. We will use the npm installer to add the package to our react application.
To follow along with this guide, you need to have:
- Some knowledge of JavaScript and React.
- Experience working with the command line.
- Ideally, you already have a react app and wish to add a date picker to your project.
I will explain the steps so beginners can follow along as well. Below you will find instructions for adding datepicker to your react application.
Install React Datepicker
If you wish to install React datepicker to an existing application, then run the following code snippet on your terminal window.
npm install react-datepicker --save
If you are using yarn, run the command:
yarn add react-datepicker --save
The command above will add React Datepicker to your existing react app. Keep in mind that you need to have React and its PropTypes installed on your system. Otherwise, you won’t be able to use this package.
How to Create a Basic React Datepicker?
Before we can add a date picker to the react application, we need to import the component to our project. For this example, I will add the datepicker in the App.js file. But you can create a different file and import your datepicker if you want to build a reusable DatePicker component.
To use this component, open the App.js file and add the following code snippets.
import React, { useState } from "react";
import DatePicker from "react-datepicker";
import "react-datepicker/dist/react-datepicker.css";

// CSS Modules, react-datepicker-cssmodules.css//
import 'react-datepicker/dist/react-datepicker-cssmodules.css';
In the code above, we are importing the DatePicker component from react-datepicker. Also included in the package are its CSS modules, so you won’t have to worry about styling.
Tip: If you have a global CSS file, you can import the CSS files for the datepicker into it. This will save you the trouble of importing it every time you use it.
Now we are going to update the App component with the following code.
const App = () => {
      const [startDate, setStartDate] = useState(new Date());
      return (
	<DatePicker
	    selected={startDate}
	    onChange={(date) => setStartDate(date)}
	/>
     );
};
The DatePicker component requires two props by default; selected and onChange. We can parse the current date into the selected prop using the Date() object . The onChange prop is the event handler for updating the component’s state with the selected date.
We use the useState hook to update the component and to store the data from the form input. Afterward, set the date entered as the current date.
Save the file and start up your development server using the command below.
npm start
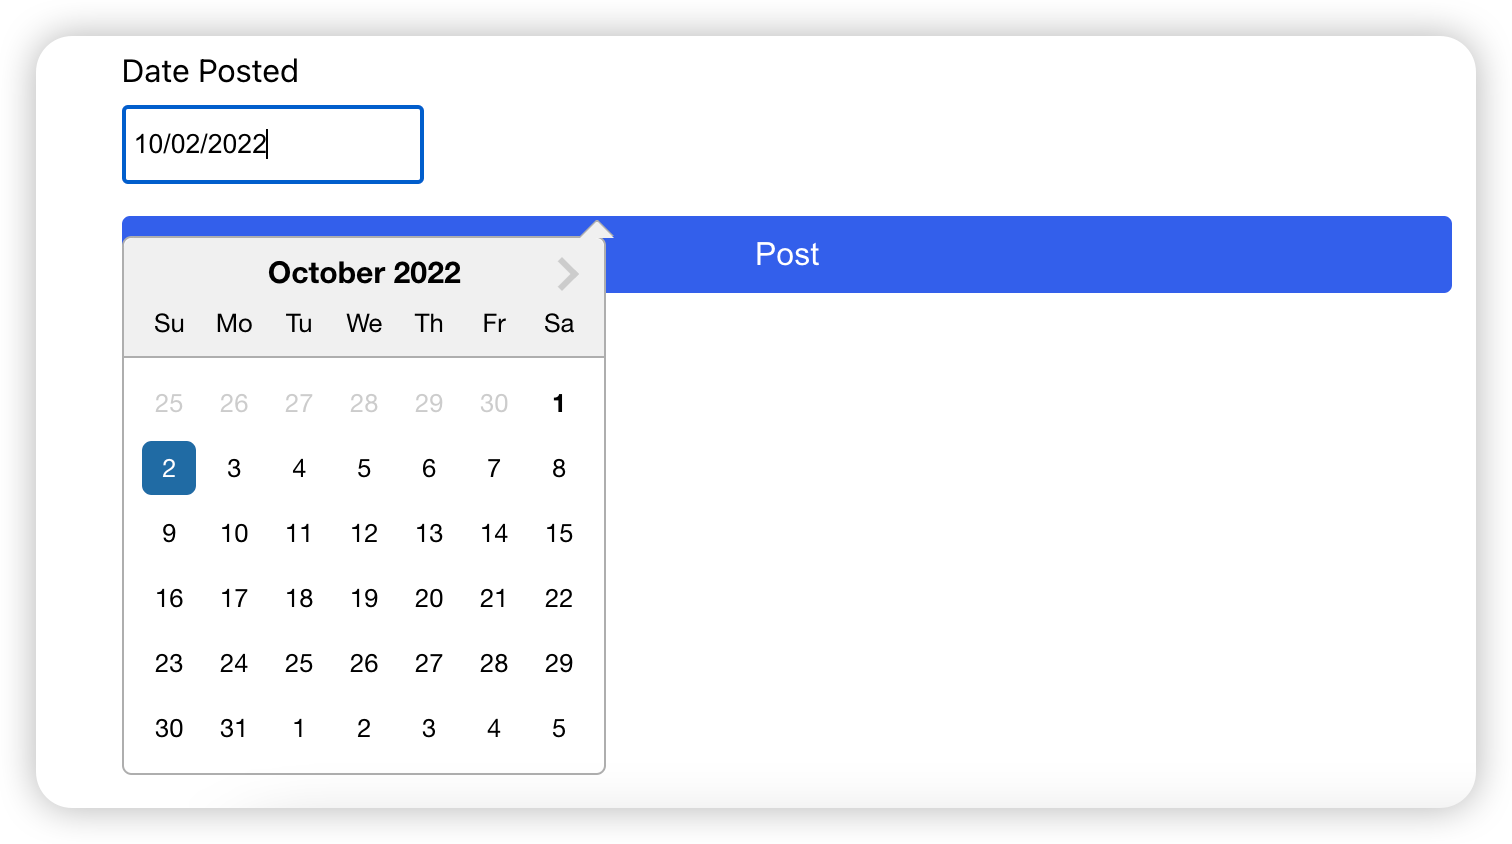
After that, open the development server in the browser. You should see an input field. When you click on it, the datepicker will pop up, and you can choose a date from the calendar.

Congratulations! You have successfully added a basic date picker to your react application.
Time Picker Implementation
The datepicker also allows you to add a time picker to your React component. To use the time picker, add the following props to the DatePicker component.
dateFormat="Pp"
showTimeSelect
timeFormat="p"
The App component should look like this after adding the props above.
const App = () => {
      const [startDate, setStartDate] = useState(new Date());
      return (
	<DatePicker
	    selected={startDate}
	    onChange={(date) => setStartDate(date)}
	    dateFormat="Pp"
	    showTimeSelect
	    timeFormat="p"
	/>
     );
};
Save your changes and preview the site on your browser. You should see a time picker next to your calendar.

Min and Max Date
With this component, you can also add a prop to set the minimum or maximum date allowed on the calendar.
You can use the minDate prop to set a minimum date. To set a min date, add the prop below to the DatePicker component.
//setting minimum date to current date
minDate={new Date()}
Similarly, you can use the maxDate prop to set a maximum date for your component.
//set maximum date to current date
maxDate={new Date()}
If you set a minimum date, any date before the minDate will be disabled. The same holds true when you set a max date.

Show Year Dropdown
By default, the datepicker does not allow you to change the year using a year dropdown. You would have to go back using the month picker, which can be tedious especially if you need to pick an older date.
To solve this issue, we can use the showYearDropdown prop to enable year scrolling. Add the following props to your Datepicker component.
// Add props to DatePicker
showYearDropdown
scrollableMonthYearDropdown
Save your changes and open the dev server.

There are other props you can add to customize the datepicker. You can check Codesandbox for more example codes.
Localize React Datepicker
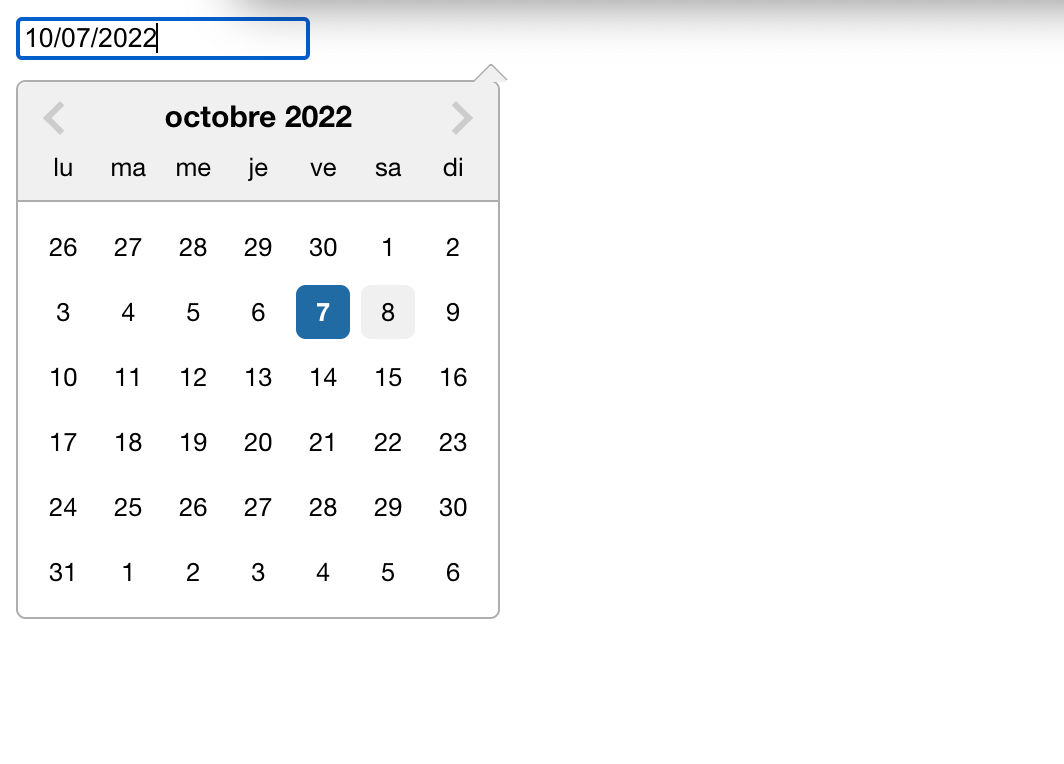
Another benefit to using the react datepicker library is the ability to localize your calendar. React date picker relies on date-fns internalization to localize the calendar date.
The default locale is en-US but can be modified to supported languages. To localize React datepicker, you need to import the locale from date-fns. Then register the locale and finally set the default locale for the component. Below are 3 helper methods to localize your datepicker.
Register Locale – registerLocale(string, object); This method loads the locale object imported from date-fns.
Set Default Locale – setDefaultLocale (string); Used to set a registered locale as the default for all datepicker instances.
Get Default Locale – getDefaultLocale; returns a string showing the currently set default locale.
We can use this feature by importing it to our react app.
import { registerLocale, setDefaultLocale } from "react-datepicker";
import fr from 'date-fns/locale/fr';
Then add the code snippet below to register the locale. For this example, we are using the ‘fr’ locale to import French locale.
registerLocale('fr', fr)
Finally, add the prop below to the datepicker component. Adding this prop will modify the default language for your date picker component.
locale="fr"

You can set a default locale for all your components with the code below.
setDefaultLocale('fr');
How to Create a Blog App Using React Datepicker
In this section, we will create a new React app that uses the datepicker package to add dates to blog posts.
Before we begin, open a terminal window and navigate into the directory you wish to install React. I will use the create-react-app boilerplate to install React.
Installing React
To create a new react application, run the following command;
npx create-react-app blogapp
If you do not have the create-react-app package, then run the following command.
npm install -g create-react-app
After that, run the npm command.
npx create-react-app blogapp
This will install React and its PropTypes in the blogapp folder. You can navigate into this folder using the command.
cd blogapp
Installing React datepicker
We also need to install the date picker package before we begin customizing the application. Run the command below to install datepicker.
npm install react-datepicker --save
Using yarn, run the command.
yarn add react-datepicker --save
After that, open the project folder with your favorite code editor.
Creating Blog Component
I will create a components folder to hold all the components we will use for this project. Inside the src folder, right-click and select New folder. Name the folder as components.

In this folder, we are going to create two files. To create a file, right-click on the components folder and select New file.

Name the first file as Blog.jsx and the second as blog.css.

Tip: you can create a blog folder within the components folder if you want to separate your React components. Since this will be a small project, we can simply create the blog component and its CSS file directly in the components folder.
Building the Blog Component
Now open the Blog component and paste the code snippet below. We are importing React and the datepicker component.
import React, {useState} from "react";
import DatePicker from "react-datepicker";
import "react-datepicker/dist/react-datepicker.css";

// CSS Modules, react-datepicker-cssmodules.css//
import 'react-datepicker/dist/react-datepicker-cssmodules.css';
Also copy and paste the code below to import the blog.css file we created. We will use it later on to style the blog component.
import "./blog.css";
Next, we will create a functional component and export the file as default. For this, copy and paste the code snippet below.
const Blog = () => {
      const [postDate, setPostDate] = useState(new Date());
      const [postTitle, setPostTitle] = useState('');
      const [postContent, setPostContent] = useState('');
      const [postAuthor, setPostAuthor] = useState('');

      const handleSubmit = (event) => {
	    event.preventDefault()

	    // log form content
	    console.log(postTitle)
	    console.log(postContent)
	    console.log(postAuthor)
	    console.log(postDate)
	}

      return (
	   <div className="blog">
		<form onSubmit={handleSubmit}>
		   <h3>Create Blog Post</h3>
		   <div className="form-group">
		   	<label>Title</label>
		   	<input type="text" name="title" value={postTitle} onChange={event => setPostTitle(event.target.value)}/>
	   	   </div>
		   <div className="form-group">
	   		<label>Content</label>
	   		<textarea value={postContent} onChange={event => setPostContent(event.target.value)} rows="10"></textarea>
	   	   </div>
	   	   <div className="form-group">
	   		<label>Author</label>
	   		<input type="text" name="title" value={postAuthor} onChange={event => setPostAuthor(event.target.value)} />
	   	   </div>
	   	   <div className="form-group">
	   		<label>Date Posted</label>
	   		<DatePicker
				selected={postDate}
				onChange={date => setPostDate(date)}        				minDate={new Date()}                                               />
	   	   </div>
	   	   <button type="submit" className="submitBtn">Post" </button>
		</form>
	   </div>
	);
};

export default Blog;
In the code above, we create a Blog component and export the component as default. Within the component, we have created four states using the useState hook to handle the title, content, author, and date input field. We will only log the form values in the console to show it is working.
The handleSubmit event handler logs the form content in the console. We use preventDefault() to stop the default browser behavior upon submitting the form.
Next, we create a form element in the return statement with four input fields for the title, content, author, and date posted field.
We are using the minDate prop to prevent users from selecting an old date. When creating a blog post, the publish date should ideally be the current date or scheduled for a future date. This is why we use the minDate prop to limit the entry to the current date and future dates.
Importing Blog Component to App.js
Now we need to import the Blog component into App.js. For this, copy and paste the code snippet below into App.js.
import Blog from "./components/Blog";
After that, add the Blog component into the return statement of the App.js file. You can simply replace the code in your App.js file with the one below.
import React from "react";
import Blog from "./components/Blog";
const App = () => {
	return (
	    <div>
		<Blog />
	    </div>
	);
};

export default App;
After adding the code, save the changes across all the files and then run the command npm start to start up the development server.
Testing the Application
You can fill in the form with sample details to test our implementation. After that, click on Post to submit the form.

When you open Chrome DevTools, you will see the data from the form logged in the console.

While our focus in this guide is the datepicker component, we will add some CSS styles to beautify the page. Remember, we created a blog.css file at the start of this tutorial. We are going to create some styles for the form.
Don’t want to spend time designing your page? CopyCat can help you build UI faster. You simply need to enter the link to your Figma design, our tool will generate boiler-plate code for your Figma designs.
Copy and paste the CSS code below into the blog.css file to customize your form.
.blog {
   margin: 0;
   padding: 0 20%;
}

.form-group {
   display: flex;
   flex-direction: column;
}

.form-group input {
   padding: 10px 4px;
   margin-top: 8px;
   margin-bottom: 16px;
}

.form-group textarea {
   padding: 10px 4px;
   margin-top: 8px;
   margin-bottom: 16px;
}

.submitBtn {
   padding: 10px 20px;
   background-color: #345feb;
   border: none;
   color: #fff;
   border-radius: 4px;
   font-size: 16px;
   width: 100%;
   cursor: pointer;
}
When you preview the page, you should see a nice-looking layout.
Tip: If you want to use a CSS framework for your application, check our post on the top 10 CSS frameworks for frontend developers.

You can test the functionality by filling out the form and picking a date from the datepicker calendar. When you submit the form, you should get the data logged in the console.

That’s it! We have successfully created a simple React app for adding blog posts. You can build on this application by integrating a database to store the data from the form.
Check out the video below to learn how to connect React with a backend application such as Express.
Tip: If you need the code for this application, I have deployed it to my online. You can download the files from my Github account.
React-datepicker Alternatives
React datepicker is one of the most popular libraries for adding calendar widgets. However, there are other libraries that cut close in terms of functionality. Below are some alternatives to react-datepicker.
Conclusion
In this guide, we have shown you how to add the React datepicker package to an existing React app. We also built a Blog application that uses a simple and reusable datepicker component to store post dates.
There are other props you can add to the datepicker to improve the functionality. You can check the official docs for this package for further examples.
Would you like to fast-track your development and build UI faster? our tool can help you convert your Figma designs into production-level React Components.


