

Introduction
Tables, whether they are used as furniture or in programming, serve the same primary purpose. They provide a place where we can arrange different items. Particularly in programming, they allow web developers to represent data in rows and columns with React Table.
React table libraries help you build powerful tables easily in your React application in no time. One such React table library popularly and widely used by developer’s across is the React Table library. What are the basic features and use cases of React Table, and how can you build a table with the React Table library? You will be learning that and more in this article with react tables examples. So let’s dive right in.
What is React Table Library?
React Table is a headless UI library providing the logic, state, processing, and API for the UI elements and interactions. However, it doesn’t determine how the table is marked up or how it is styled, it gives you full control. React Table is simply a collection of custom hooks.
It is not a react table component, but a react utility, making it easier to integrate into existing themes than other alternatives. All features in React Table are implemented by importing the corresponding hook in your React applications.
React Table package has over 1.3M weekly downloads on the npm package manager and 19.6k Github stars.
Basic Features of React Table Library
- Lightweight
- Easy to set up, use, and full control
- Headless (it is 100% customizable, Bring your own UI)
- It is resizable
- The API is fully controllable, Auto out of the box
- Sorting functionality
- Filtering functionality
- Row expansion
Various use cases of the React Table Library
- When you want to compare individual values to one another
- The table presents you with Data as raw as possible
- The data to be represented are numerical and in a text format.
- If the data cannot easily be represented visually, React table the close substitute.
When Not to use React Table library
- If the information to be displayed is better represented visually, using graphs, charts, or shapes.
- When the data contains too many features and parameters
- When you want to focus more on trends and relationships between the data available.
React Table Example: A Guide on How to use the React Table library
This section will cover the creation of the React table and everything you need to know to get up and running. Below is the codesandbox of various features you will be building in this tutorial.
Creating a React Application
The first thing is to create a new React project, you will be using create-react-app for this.
You can do that by running the command below in your command line. However, if you want to implement the React Table in an existing project, kindly skip this step.
Syntax:
npx create-react-app my-app
After that has been successful, the next thing is to navigate to the my-app project
cd my-app
In your code editor, run the command below to start your React server in your browser on localhost
npm start
OR
yarn start
Installing React Table library
Now that you have your React project up and running, it is time to install the React table library, the table package for React is available through the npm or yarn package manager.
Run the command below to install react-table in your React project:
npm command
npm install react-table
yarn command
yarn add react-table
Implementing a Basic table
Now that you have react-table installed in your project, you can now use it across your project.
What should a basic table component have? A table head for the columns and a table body will contain the data to be displayed under each table head. To implement this, these are the steps you will be following.
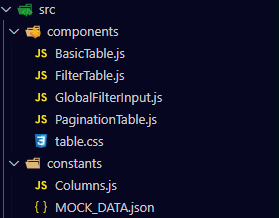
Step 1: Folder setup
You will need to create two folders, one for the table components (BasicTable.js, FilterTable.js, GlobalFilterInput.js and Pagination.js) and the other folder for the table constants ( MOCK_DATA.json, Columns.js). But for this part, you will be working on the BasicTable.js component file
Step 2: Get the data that will be displayed on the table.
The next step is to create some JSON mockup data displayed in the table rows and columns. So in your MOCK_DATA.json, create a valid JSON to serve as your table markup like the one below.
[{"id":1,"first_name":"Dallas","last_name":"Geibel","email":"dgeibel0@twitter.com","gender":"Male","date_of_birth":"2/3/2022","age":25,"country":"Slovenia","phone":"2107768258"},
{"id":2,"first_name":"Toby","last_name":"Mullineux","email":"tmullineux1@sina.com.cn","gender":"Male","date_of_birth":"3/16/2022","age":47,"country":"China","phone":"5981931450"},
{"id":3,"first_name":"Keen","last_name":"Sexten","email":"ksexten2@a8.net","gender":"Male","date_of_birth":"2/2/2022","age":60,"country":"China","phone":"1761395128"},
{"id":4,"first_name":"Shantee","last_name":"Conwell","email":"sconwell3@intel.com","gender":"Female","date_of_birth":"4/18/2022","age":34,"country":"Indonesia","phone":"3372973788"},
{"id":5,"first_name":"Meaghan","last_name":"Agett","email":"magett4@bloglovin.com","gender":"Female","date_of_birth":"11/17/2021","age":22,"country":"United States","phone":"8161423968"}]
From the above mock data, you now have data to display on the table with different fields.
Step 3: Defining columns for the table
You will define the columns that will be displayed as a fixed header for your table in this step. This will be done in the Columns.js file. The export is an array of objects.
export const COLUMNS = [
  {
    Header: 'Id',
    accessor: 'id',
  },
  {
    Header: 'First Name',
    accessor: 'first_name',
  },
  {
    Header: 'Last Name',
    accessor: 'last_name',
  },
  {
    Header: 'Date of Birth',
    accessor: 'date_of_birth',
  },
  {
    Header: 'Country',
    accessor: 'country',
  },
  {
    Header: 'Phone',
    accessor: 'phone',
  },
];
It takes the Header and accessor as columns definition. The Header refers to the name you want to give the columns in the table while the accessor is the key that points to the value of the MOCK_DATA.json data to be mapped in the column. So first_name in the MOCK_DATA.json will be the header First Name when displayed on the table.
Step 4: Use the data and columns to create a table instance
You will be doing this in the BasicTable.js file
import React, { useMemo} from 'react'
import { useTable } from 'react-table'
import MOCK_DATA from './MOCK_DATA.json'
import {COLUMNS} from './Columns'

function BasicTable() {
    const columns = useMemo(() => COLUMNS, [])
    const data = useMemo(() => MOCK_DATA, [])

    const tableInstance = useTable({
        columns,
        data
    })

    const { getTableProps, getTableBodyProps, headerGroups, footerGroups, rows, prepareRow} = tableInstance
  return (
    <table {...getTableProps()}>
        <thead>
            {headerGroups.map((headerGroup) => (
                <tr {...headerGroup.getHeaderGroupProps()}>
                    {headerGroup.headers.map((column) => (
                        <th {...column.getHeaderProps()}>
                          {column.render('Header')}
                       </th>
                    ))}
                </tr>
            ))}
        </thead>
        <tbody {...getTableBodyProps()}>
            {rows.map(row => {
                 prepareRow(row)
                  return (
                    <tr {...row.getRowProps()}>
                       {row.cells.map((cell) => {
                         return <td {...cell.getCellProps()}>
                          {cell.render('Cell')}</td>
                            })}
                    </tr>
                    )
                })
            }
        </tbody>
    </table>
  )
}

export default BasicTable
Step 5: Stying the Basic Table component
Create a table.css file and add some custom styles just like the CSS code below. You are free to write your own styling. You can use material UI or Bootstrap to style the react table component.
table {
    border-collapse: collapse;
    border-spacing: 0;
    width: 100%;
    border: 1px solid #ddd;
}

table th, table td {
    text-align: left;
    padding: 16px;
    border: 1px solid #ddd;
}

table tr:nth-child(even) {
    background-color: #f2f2f2;
}

table tr:hover {
    background-color: #ddd;
}

table th {
    padding-top: 12px;
    padding-bottom: 12px;
    text-align: center;
    background-color: #4CAF50;
    color: white;
}
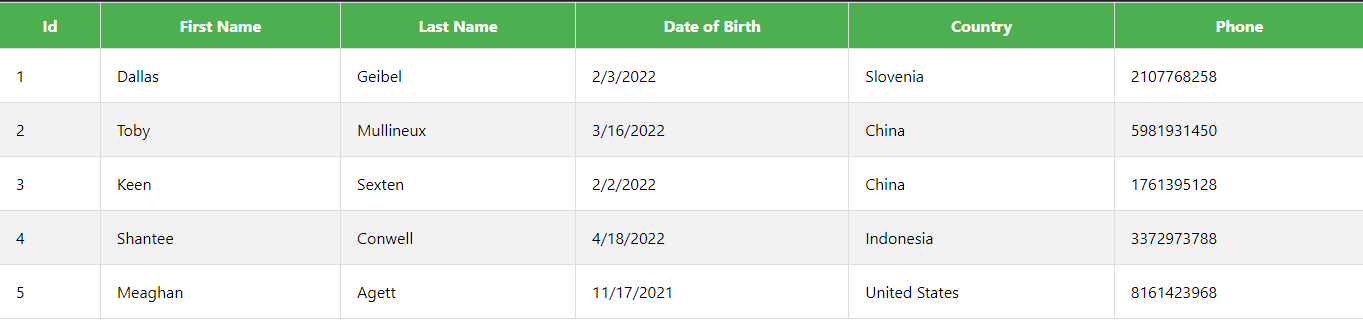
This is what your table should look like on your browser
Additional Features to the Basic table component
React Table: Header Groups
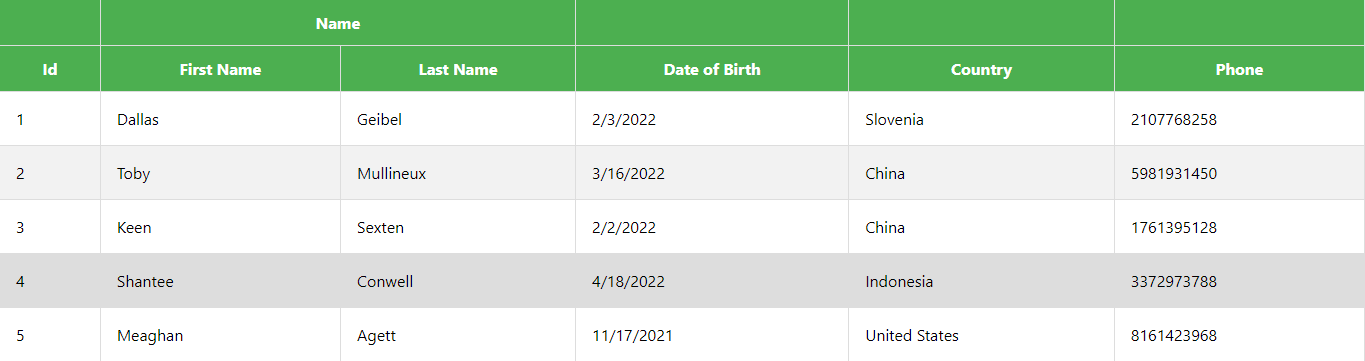
In the following example, you create a basic table with each group having its own header. With React table, you can easily implement fixed headers grouping. For example, you met want to group First Name and Last Name under a parent Header called Name.
How do you achieve this? it is quite simple to do that with React table. The only change you need to make is in your Columns.js file, you have to define your columns property differently.
export const COLUMNS = [
  {
    Header: 'Id',
    accessor: 'id',
  },
  {
    Header: 'Name',
    columns: [
      {
        Header: 'First Name',
        accessor: 'first_name',
      },
      {
        Header: 'Last Name',
        accessor: 'last_name',
      },
    ],
  },
  {
    Header: 'Date of Birth',
    accessor: 'date_of_birth',
  },
  {
    Header: 'Country',
    accessor: 'country',
  },
  {
    Header: 'Phone',
    accessor: 'phone',
  },
];
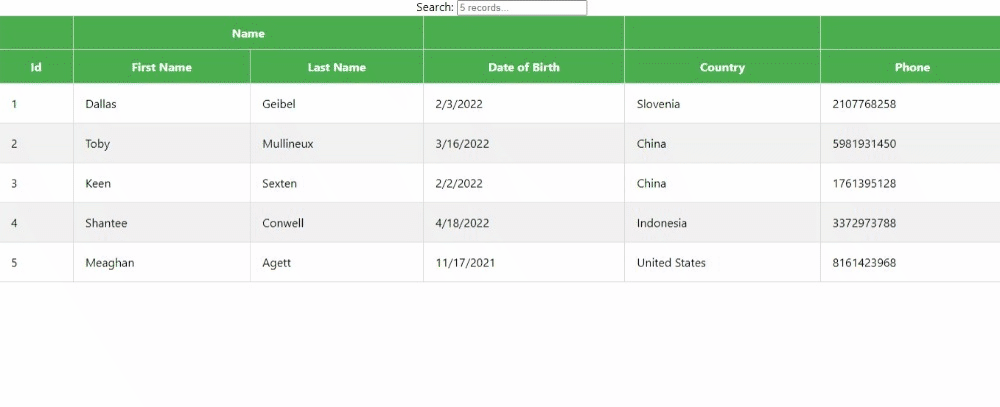
When you do that, this is how it will be displayed on your browser
React Table: Footer
You can also easily add a fixed footer to your table. One use case for this is when you have a certain amount of data displayed and you want your users to keep track of the headers while they scroll down. More advanced would be to support horizontal and vertical scroll.
So to achieve this, you will need to update the Columns.js, BasicTable.js, and table.css file
Step 1: Update the Columns.js file to include a Footer.
export const COLUMNS = [
  {
    Header: 'Id',
    Footer: 'Id',
    accessor: 'id',
  },
  {
    Header: 'First Name',
    Footer: 'First Name',
    accessor: 'first_name',
  },
  {
    Header: 'Last Name',
    Footer: 'Last Name',
    accessor: 'last_name',
  },
  {
    Header: 'Date of Birth',
    Footer: 'Date of Birth',
    accessor: 'date_of_birth',
  },
  {
    Header: 'Country',
    Footer: 'Country',
    accessor: 'country',
  },

  {
    Header: 'Phone',
    Footer: 'Phone',
    accessor: 'phone',
  },
];
Step 2: Pass footerGroups to the table instance. Then, finally pass the appropriate value to the tfoot tag.
const { getTableProps, getTableBodyProps, headerGroups, footerGroups, rows, prepareRow} = tableInstance
<tfoot>
 {footerGroups.map((footerGroup) => (
   <tr {...footerGroup.getFooterGroupProps()}>
    {footerGroup.headers.map((column) => (
      td {...column.getFooterProps()}>{column.render('Footer')}</td>
    ))}
   </tr>
 ))}
</tfoot>
Step 3: Style the footer.
You can now proceed to style your table footer.
 tfoot td  {
    padding-top: 12px;
    padding-bottom: 12px;
    text-align: center;
    background-color: #4CAF50;
    color: white;
}
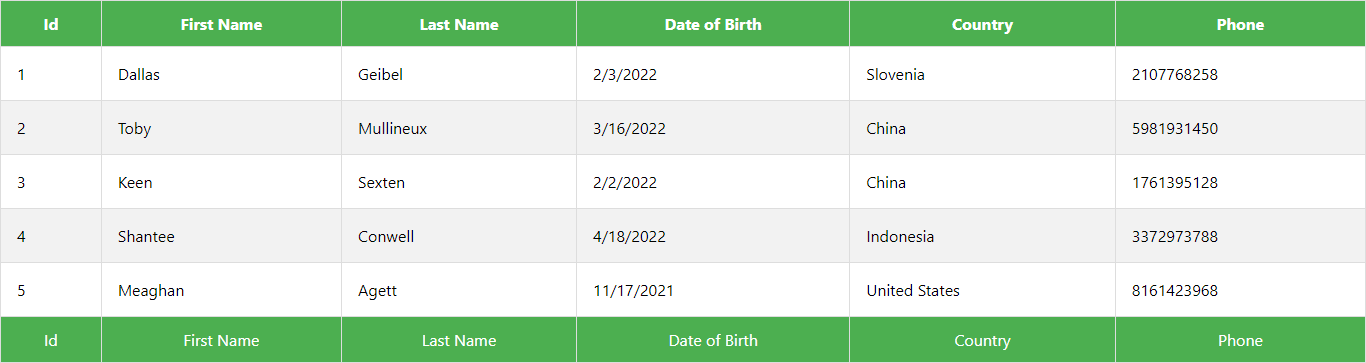
This is how your footer will look on the browser.
React Table: Sorting (useSortby)
It’s time to include the sorting feature in the React table.
Step 1: useSortby
This is the hook required to implement the sorting feature. You can get it up and running with just a few lines of code. To get it going, you must first import the useSortby hook after that, pass useSortby to the useTable hook.
Step 2: getSortByToggleProps()
This prop, helps you sort a UI in the React Table, you can sort from thead, by just attaching it to the props generated from each column, You can also choose to add an icon for everything time the UI is sorted, either in ascending or descending order.
import React, { useMemo} from 'react'
import { useTable, useSortBy } from 'react-table'
import MOCK_DATA from './MOCK_DATA.json'
import {COLUMNS} from './Columns'
import './table.css'

function BasicTable() {
    const columns = useMemo(() => COLUMNS, [])
    const data = useMemo(() => MOCK_DATA, [])

    const tableInstance = useTable({
        columns,
        data
    }, useSortBy)

    const { getTableProps, getTableBodyProps, headerGroups, footerGroups, rows, prepareRow} = tableInstance
  return (
    <table {...getTableProps()}>
        <thead>
            {headerGroups.map((headerGroup) => (
                <tr {...headerGroup.getHeaderGroupProps()}>
                    {headerGroup.headers.map((column) => (
                        <th {...column.getHeaderProps(column.getSortByToggleProps())}>{column.render('Header')}
                        <span>
                            {column.isSorted ? (column.isSortedDesc ? ' 🔽' : ' 🔼') : ''}
                        </span>
                        </th>
                    ))}
                </tr>
            ))}
        </thead>
        <tbody {...getTableBodyProps()}>
            {
                rows.map(row => {
                    prepareRow(row)
                    return (
                        <tr {...row.getRowProps()}>
                            {row.cells.map((cell) => {
                                return <td {...cell.getCellProps()}>{cell.render('Cell')}</td>
                            })}
                        </tr>
                    )
                })
            }
        </tbody>
    </table>
  )
}

export default BasicTable
React Table: Filter (Global Filtering)
When it comes to filtering, you can either implement a global filter for your React table or a Column filtering. In this tutorial, you will cover global filtering. Global filtering applies to all table columns. Here are the steps you will take:
Step 1: Create a filter input component for global filtering. call it GlobalFilterInput.js, and create it in the component folder. Implement the code below
import React, {useState} from 'react'
import {useAsyncDebounce} from 'react-table'

export function GlobalFilterInput({
    preGlobalFilteredRows,
    globalFilter,
    setGlobalFilter
}) {

    const count = preGlobalFilteredRows.length;
    const [ value, setValue ] = useState(globalFilter)
    const onChange = useAsyncDebounce((value) => {
        setGlobalFilter(value || undefined);
    }, 300);

    return (
      <span>
        Search: {''}
        <input
          value={value || ''}
          onChange={(e) => {
            setValue(e.target.value);
            onChange(e.target.value);
          }}
          placeholder={`${count} records...`}
        />
      </span>
    );
}
Step 2: Create a FilterTable.js file. Also, copy the template in BasicTable.js into it.
Step 3: Import GlobalFilterInput.js into FilteTable.js.
Step 4: Wrap the JSX in a React fragment and render GlobalFilterInput passing in the necessary props
import React, { useMemo} from 'react'
import { useTable, useGlobalFilter } from 'react-table'
import MOCK_DATA from './MOCK_DATA.json'
import {COLUMNS} from './Columns'
import './table.css'
import {GlobalFilterInput} from './GlobalFilterInput'

function FilterTable() {
    const columns = useMemo(() => COLUMNS, [])
    const data = useMemo(() => MOCK_DATA, [])

    const tableInstance = useTable({
        columns,
        data
    }, useGlobalFilter)

    const { getTableProps, getTableBodyProps, headerGroups, footerGroups, rows, prepareRow, preGlobalFilteredRows, setGlobalFilter, state} = tableInstance
  return (
    <>
      <GlobalFilterInput
        preGlobalFilteredRows={preGlobalFilteredRows}
        setGlobalFilter={setGlobalFilter} globalFilter={state.globalFilter}
      />
      <table {...getTableProps()}>
        <thead>
          {headerGroups.map((headerGroup) => (
            <tr {...headerGroup.getHeaderGroupProps()}>
              {headerGroup.headers.map((column) => (
                <th {...column.getHeaderProps()}>{column.render('Header')}</th>
              ))}
            </tr>
          ))}
        </thead>
        <tbody {...getTableBodyProps()}>
          {rows.map((row) => {
            prepareRow(row);
            return (
              <tr {...row.getRowProps()}>
                {row.cells.map((cell) => {
                  return (
                    <td {...cell.getCellProps()}>{cell.render('Cell')}</td>
                  );
                })}
              </tr>
            );
          })}
        </tbody>
      </table>
    </>
  );
}

export default FilterTable
React Table: Pagination (usePagination)
When you have a lot of data to be displayed on a table, you might want to implement pagination for a better user experience. With React Table, you can easily implement the next/previous pagination. But before you proceed, make sure to your MOCK_DATA.json and increase the data you have to 50 or more.
Step 1: Create a new component file called PaginationTable.js in your components folder. Import PaginationTable.js in App.js and render it.
Step 2: usePagination. You will be using this hook to implement the pagination feature. you will need to import it and pass it into the useTable hook.
Step 3: Instead of restructuring rows, restructure page from the table instance and replace it with rows in the JSX.
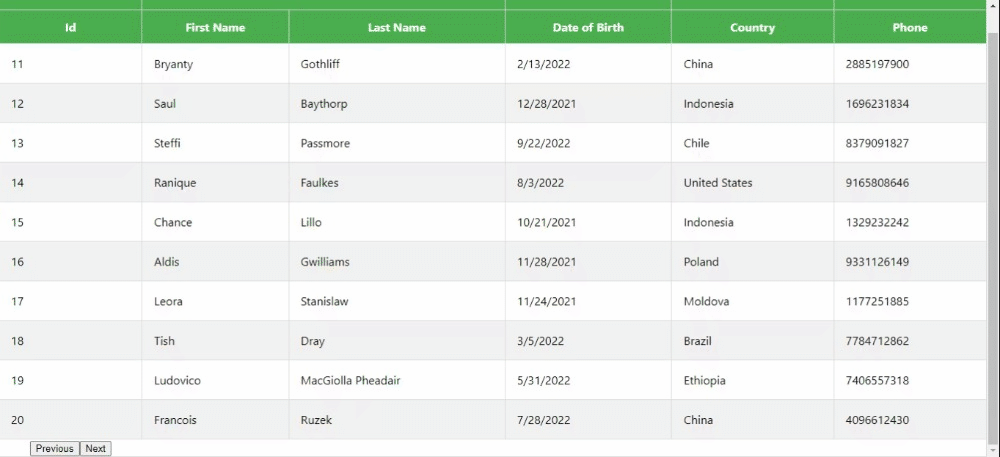
Step 4: When you save these changes, check your browser. You will notice that only 10 data will be displayed on the table. So you can proceed to add the next and previous button features.
Step 5: Destructure nextPage and previousPage from the table instance. They are both helper function that is available in React table to help you navigate across different pages.
Step 6: Add two buttons in the JSX for next and previous and handle their click event.
import React, { useMemo} from 'react'
import { useTable, usePagination } from 'react-table'
import MOCK_DATA from './MOCK_DATA.json'
import {COLUMNS} from './Columns'
import './table.css'

function PaginationTable() {
    const columns = useMemo(() => COLUMNS, [])
    const data = useMemo(() => MOCK_DATA, [])

    const tableInstance = useTable({
        columns,
        data
    }, usePagination)

    const { getTableProps, getTableBodyProps, headerGroups, page, nextPage, previousPage, prepareRow} = tableInstance
  return (
    <>
    <table {...getTableProps()}>
        <thead>
            {headerGroups.map((headerGroup) => (
                <tr {...headerGroup.getHeaderGroupProps()}>
                    {headerGroup.headers.map((column) => (
                        <th {...column.getHeaderProps()}>{column.render('Header')}
                        </th>
                    ))}
                </tr>
            ))}
        </thead>
        <tbody {...getTableBodyProps()}>
            {
                page.map(row => {
                    prepareRow(row)
                    return (
                        <tr {...row.getRowProps()}>
                            {row.cells.map((cell) => {
                                return <td {...cell.getCellProps()}>{cell.render('Cell')}</td>
                            })}
                        </tr>
                    )
                })
            }
        </tbody>
        <div>
            <button onClick={() => previousPage()}>Previous</button>
            <button onClick={() => nextPage()}>Next</button>
        </div>
    </table>
    </>
  )
}

export default PaginationTable
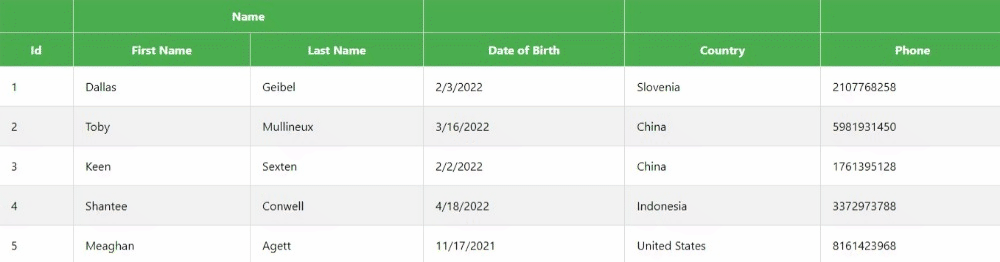
This is how it will work in your browser
Advanced features of the React Table library
There are additional table features that are available to you when you use the React table library, some of them include:
- Header Grouping
- Columns Hiding
- Columns Ordering and Filtering
- Selecting Rows
- Sticky columns
Alternatives to React Table Library
You can also use other Table libraries in your React project to manage and represent data.
Recommend Resources
React table is a powerful utility library with more to offer than what you covered in this article. Asides from the hooks and properties you used, there are others you should explore in building powerful tables. I have listed some resources you will find useful as you create more powerful tables.
- React Table Docs
- React Tables From Zero to Hero
- https://youtube.com/playlist?list=PLC3y8-rFHvwgWTSrDiwmUsl4ZvipOw9Cz
Conclusion
In this tutorial, you have seen how React tables can be used to build powerful tables. You have covered creating a basic table and adding table features like sorting, filtering, and pagination. I hope you found this article helpful in understanding the React table.
Last but not least, have you considered reducing the time it takes you to implement Figma designs? particularly when a deadline is looming. Thanks to the CopyCat plugin, I can do just that. Using CopyCat, you can quickly convert Figma designs into React components. Check it out now and also tell your team about it.
Related Articles
-
 React.js
Using Material UI Autocomplete to Implement an Autocomplete Feature in React
Do you want to be more efficient? Consider CopyCat, an AI-powered plugin that will convert your Figma design to UI code, allowing you to concentrate on the app's business logic. Convert Design to Code with CopyCat Introduction According to Wikipedia:…
December 15, 2022 -
React.js
Guide to building your ReactJS custom hooks
Introducing the concept of React custom hooks ReactJS has introduced powerful improvements to web development since its introduction in 2013 as part of the family of UI libraries. This improvement is not only thanks to the introduction of custom hooks, but also…
August 13, 2022