

- Introduction
- Understanding Task Automation in React Development
- Task Automation Tools for React Development
- Webpack:
- Babel:
- ESLint:
- Code example:
- Jest:
- Wrapping Up Tools
- Best Practices for Task Automation in React Development
- Common mistakes that junior developers make when doing task automation
- Best practices
- Conclusion
Introduction

As software development becomes increasingly complex, developers constantly look for ways to streamline their workflow and improve productivity. One of the most effective ways to achieve this is through task automation. By automating repetitive and time-consuming tasks, developers can free up their time to focus on more critical and complex tasks. In this article, we will be focusing on task automation in the context of React development. React is a popular JavaScript library for building user interfaces and is widely used in web development. We will explore various task automation tools that can be used in React development. We will also explore best practices for setting up and implementing task automation.
Understanding Task Automation in React Development
Developers may find themselves needing help with the many tasks they need to perform daily. From building and deploying code to running tests and generating documentation, it can be easy to get bogged down by the sheer volume of work. However, task automation can help you to solve this problem by automating repetitive and time-consuming tasks.
Project Pain Points
React developers face one of the biggest challenges managing the many tasks required to keep a project running smoothly. This includes building and deploying code, running tests, and generating documentation. These tasks can consume a significant amount of time and energy, making it difficult for developers to be productive. It is vital to identify the tasks that take up the most time and energy. Then, find ways to automate or streamline them to automate tasks effectively. This can include using task automation tools, scripts, and other solutions to automate repetitive tasks and improve the overall workflow.
In React development, some examples of tasks that can be automated include:
- Building and deploying code
- Running tests
- Generating documentation
- Formatting code
- Optimizing images
- Managing dependencies
- and more.
Why Automate Tasks
By automating repetitive and time-consuming tasks, you can free up time to focus on more important and complex tasks. Additionally, automation can minimize human error and increase the consistency and reliability of the software development process.
One of the best ways to automate a project is using a design-to-code tool like CopyCat. It’s a development tool that automatically generates code from any Figma design. It takes care of the repetitive layout and styling code that would otherwise take forever and automates this so you can focus on the rewarding challenges.
Now that you understand the challenges that React developers face, it’s time to explore tools to help automate your tasks. In the next section, we will look at some of the most popular task automation tools for React development and how you can use them to improve your workflow.
Task Automation Tools for React Development
As a developer, it’s important to understand the different task automation tools available for React development and how they can be used to improve your workflow. Here are some popular task automation tools that you can consider using:
Webpack:
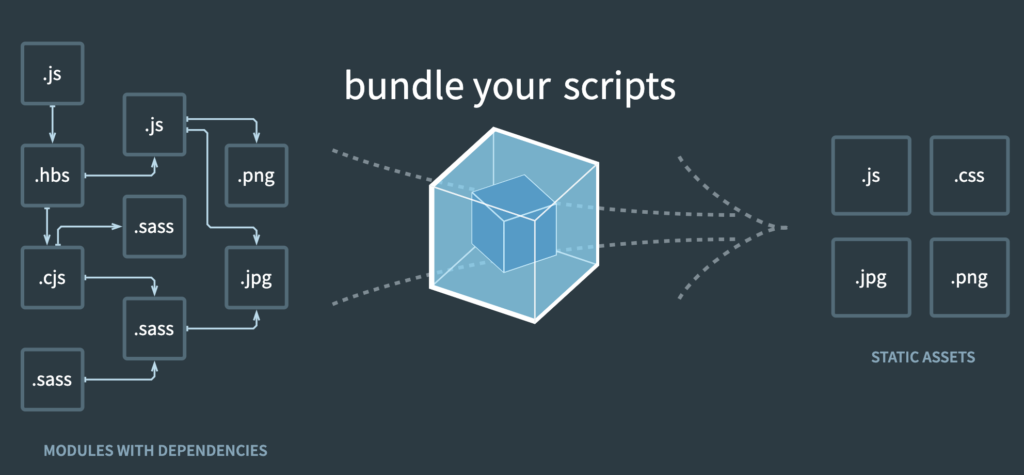
Webpack is a powerful module bundler that can automate tasks such as transpiling code, minifying assets, and generating source maps. It can also be used to optimize images and manage dependencies.
Webpack allows you to bundle all your assets and dependencies into one or multiple chunks that can then be loaded on demand by the browser, it also allows you to use pre-processors like sass, less and post-processors like uglify, optimize-css and more. Here are a few examples of when a developer might use Webpack to automate tasks:
- Bundling: Webpack can be used to bundle all of the JavaScript files in a React application into a single file that can be loaded by the browser. This can improve the performance of the application by reducing the number of HTTP requests needed to load all of the code.
- Transpiling: Webpack can be used in conjunction with tools like Babel to transpile modern JavaScript code into an older version that is compatible with older browsers. This allows developers to use the latest JavaScript features in their React applications, even if some users are still using older browsers.
- Minifying: Webpack can also be used to minify the bundled JavaScript code. This can further improve the performance of the application by reducing the size of the code that needs to be loaded by the browser.
- Hot Reloading: Webpack can be configured to enable hot reloading. This allows developers to see changes made to their code without having to manually refresh the browser. This can save a lot of time and improve the developer experience.
Code example:
Here’s an example of how to use Webpack to bundle and transpile a React application:
javascriptCopy code
// webpack.config.js
const path = require('path');
const webpack = require('webpack');

module.exports = {
  entry: './src/index.js',
  output: {
    path: path.resolve(__dirname, 'dist'),
    filename: 'bundle.js'
  },
  module: {
    rules: [
      {
        test: /\\.js$/,
        exclude: /node_modules/,
        use: {
          loader: 'babel-loader'
        }
      }
    ]
  },
  plugins: [
    new webpack.optimize.UglifyJsPlugin()
  ]
};
In this example, Webpack is used to bundle all of the JavaScript files in the src directory into a single file called bundle.js in the dist directory. It also uses the babel-loader to transpile the code and UglifyJsPlugin to minify it. A good video resource to learn more about webpack in React development is this tutorial by freeCodeCamp:
When to use it: Use Webpack when you want to bundle your React application and optimize its performance.
Babel:
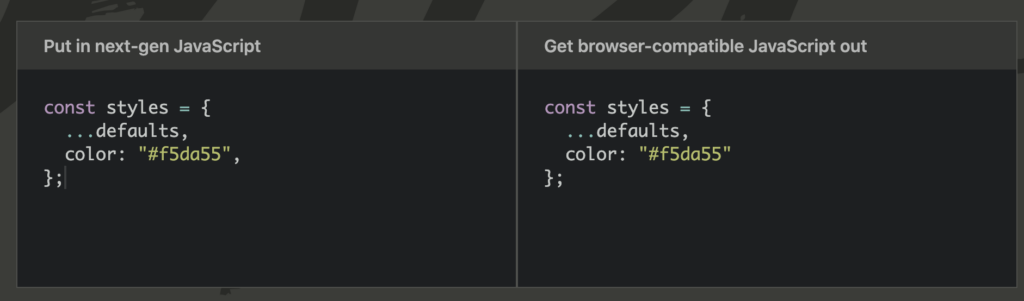
Babel is a JavaScript transpiler that can be used to convert modern JavaScript code into a format that is compatible with older browsers. This can be especially useful when working with React, as it allows you to use the latest features of the JavaScript language like JSX, async/await, and more. Here are a few examples of when a developer might use Babel to automate tasks:
- Supporting older browsers: Babel can be used to transpile modern JavaScript code into an older version compatible with older browsers. This allows developers to use the latest JavaScript features in their React applications, even if some users are still using older browsers.
- Using experimental features: Babel can also be used to transpile code that uses experimental JavaScript features that may not be widely supported yet. This allows developers to try out new features without having to wait for them to be fully supported by all browsers.
- Improving performance: Babel can also be used to optimize the code to improve the performance of the application.
Code example:
Here’s an example of how to use Babel to transpile a React application:
perlCopy code
// .babelrc
{
  "presets": [
    "@babel/preset-env",
    "@babel/preset-react"
  ],
  "plugins": [
    "@babel/plugin-proposal-class-properties",
    "@babel/plugin-transform-runtime"
  ]
}
In this example, Babel is used to transpile the code with the @babel/preset-env and @babel/preset-react presets. The @babel/plugin-proposal-class-properties is used to enable the use of class properties and @babel/plugin-transform-runtime is used to improve the performance.
When to use it: Use Babel when you want to use the latest JS features in your React application not yet supported by some browsers.
ESLint:
ESLint is a tool that can be used to lint and format your code. The tool ensures that it adheres to a consistent style and that there are no potential errors. It also helps in catching potential bugs and code smells. It can also be integrated with your text editor to show real-time errors and warnings. Here are a few examples of when a developer might use ESLint to automate tasks:
- Enforcing a consistent code style: ESLint can be configured to enforce a specific code style across a codebase. This can be helpful for teams that want to ensure that code is written in a consistent manner, making it easier to read and understand.
- Identifying potential errors: ESLint can be configured to identify potential errors in code, such as using undefined variables or calling a function with the wrong number of arguments. This can help developers catch bugs early on, before they cause issues in production.
- Preventing security vulnerabilities: ESLint can be configured to identify potential security vulnerabilities in code, such as using user input without properly sanitizing it.
Code example:
Here’s an example of how to use ESLint to lint a React application:
jsonCopy code
{
  "extends": ["react-app", "prettier"],
  "rules": {
    "react/prop-types": 0,
    "no-unused-vars": 1,
    "no-console": 1
  }
}
In this example, ESLint is extending the react-app and prettier configs, then it’s disabling the prop-types rule, enabling the no-unused-vars rule and enabling the no-console rule.
A developer should use ESLint when they want to ensure that the codebase is consistent and free of potential errors, or when they want to catch security vulnerabilities early on.
When to use it: Use ESLint when you want to ensure the quality and consistency of your codebase.
Jest:
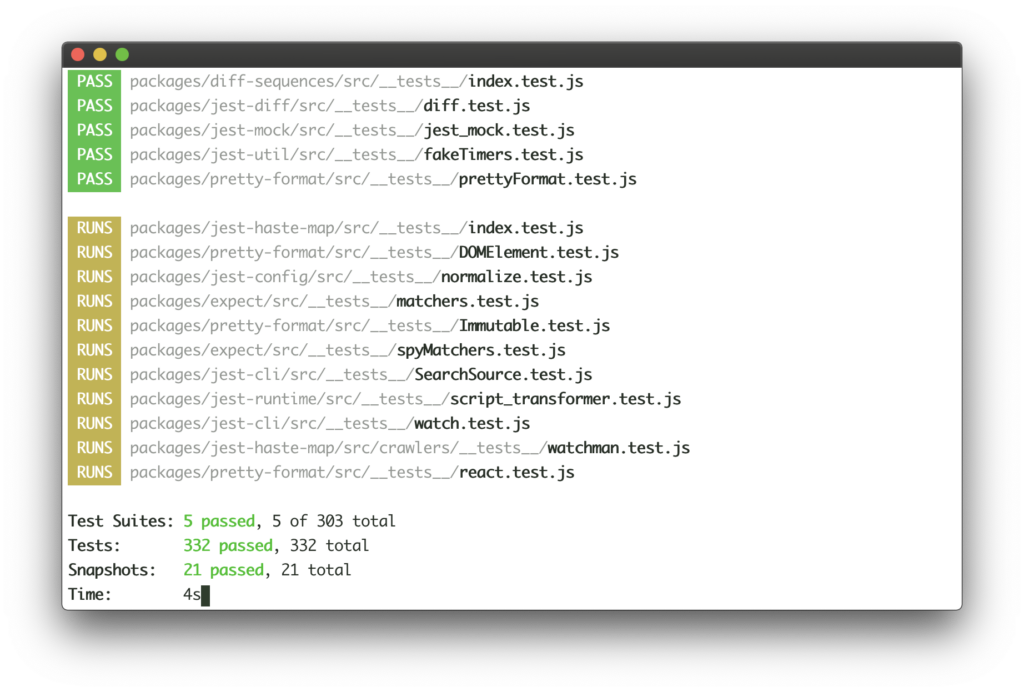
Jest is a popular JavaScript testing framework that can be used to run unit tests and perform other types of testing. It’s often used in conjunction with React, allowing you to test your React components in isolation. Jest will enable you to write tests with a simple and intuitive API, and it also includes a powerful assertion library and a built-in test runner.
When to use it: Developers should use Jest when they want to ensure the quality and reliability of their code.
Code example:
For example, to test a simple component in React, a developer could write the following code using Jest:
javascriptCopy code
import React from 'react';
import { shallow } from 'enzyme';
import MyComponent from './MyComponent';

describe('MyComponent', () => {
  it('renders correctly', () => {
    const wrapper = shallow(<MyComponent />);
    expect(wrapper).toMatchSnapshot();
  });
});
In this example, Jest is used to test the MyComponent component using the shallow function from enzyme to create a shallow rendering of the component, and the expect function from Jest to compare the result to a snapshot of the expected output. This ensures the component behaves as expected and any changes to the component do not cause unexpected behavior.
Prettier
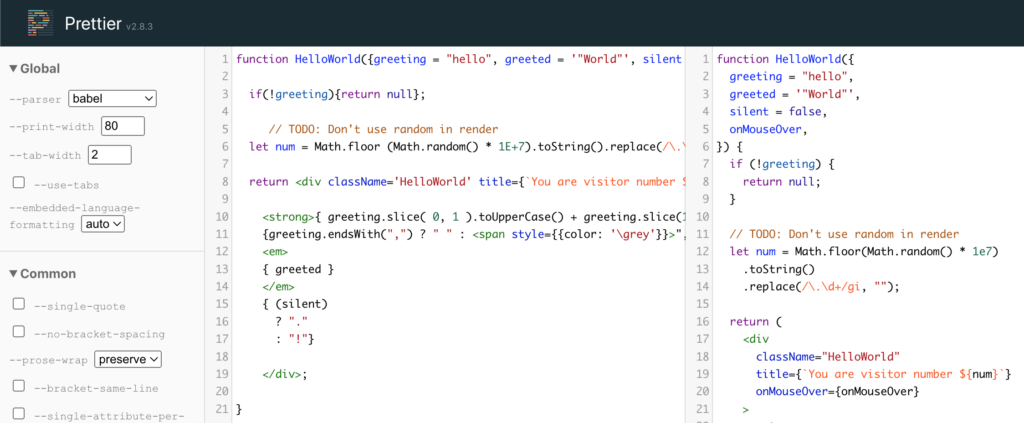
Prettier is a code formatter that can automatically format your code according to a set of rules. Use Prettier when you want to ensure consistent code formatting across your project. Here are a few examples of when a developer might use Prettier to automate tasks:
- Enforcing a consistent code style: Prettier can be used to ensure that code is written in a consistent manner, making it easier to read and understand.
- Automating code formatting: Prettier can automatically format code according to a set of rules, such as indentation and spacing, without the need for manual intervention.
- Integrating with other tools: Prettier can be integrated with other tools, such as ESLint, to automatically format code as part of a build or lint process.
Code example:
Here’s an example of how to use Prettier to format a React application:
jsonCopy code
{
  "singleQuote": true,
  "trailingComma": "es5"
}
Above, Prettier is configured to use single quotes for strings and to include trailing commas in the generated code. You can try it for yourself on the Prettier Playground.
When to use it: A developer should use Prettier when they want to ensure that the codebase is consistent and easy to read, or when they want to automate the formatting of code to reduce manual effort.
Create React App:
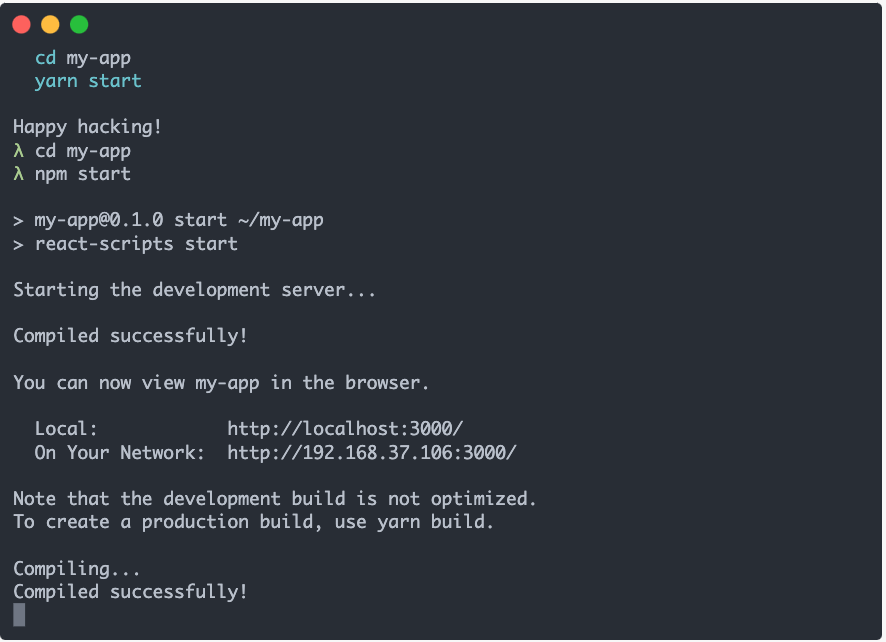
Create React App is a tool that can be used to set up a new React project quickly. It includes various features such as a development server, automatic transpiling, and hot module reloading. Create React App is a command-line tool that helps you to bootstrap a new React project with minimal configuration. It also includes a development server, a test runner, and a build script. Here are a few examples of when a developer might use Create React App to automate tasks:
- Setting up a new React project: CRA can be used to quickly set up a new React project with a development server, a production build pipeline, and a basic file structure.
- Automating build and deployment: CRA includes scripts for building and deploying a React application, making it easy to automate these tasks as part of a continuous integration and deployment pipeline.
- Providing a consistent development environment: CRA provides a consistent development environment across different projects and developers, reducing the need for manual configuration.
Code example:
Here’s an example of how to use Create React App to set up a new React project:
perlCopy code
npx create-react-app my-app
cd my-app
npm start
In this example, npx create-react-app command is used to create a new React project called “my-app”, and then cd my-app command is used to navigate into the project directory. Finally npm start command is used to start the development server, allowing the developer to start writing code for the new React application.
A developer should use Create React App when they want to quickly set up a new React project with a consistent development environment, or when they want to automate the build and deployment of a React application.
When to use it: Use CRA when you want to start a new React project quickly and easily, without having to configure Webpack and Babel.
Wrapping Up Tools
Using these tools, you can automate tasks such as building and deploying code, running tests and generating documentation. You can also automate tasks such as formatting code, optimizing images, and managing dependencies. Note that while these tools can be extremely helpful in automating tasks, it’s essential to use them correctly. It’s important to understand the capabilities of each tool and how they can be used to automate tasks in your project. Additionally, be aware of each tool’s limitations and make sure that you’re using the right tool for the job.
Best Practices for Task Automation in React Development

Task automation is a powerful tool for streamlining the development workflow and increasing productivity, but it’s important to use it effectively to get the most out of it. Junior developers often make a few common mistakes when doing task automation, making the process inefficient and ineffective. We’ll share the common mistakes and how to avoid them next. Then, we’ll share a few best practices to keep in mind when automating tasks in React development.
Common mistakes that junior developers make when doing task automation
Here are a few common mistakes that junior developers make when doing task automation, and some ways to avoid them:
Failing to plan ahead:
One of the biggest mistakes junior developers make is failing to plan ahead when setting up task automation. Without a clear plan and set of goals, it’s easy to get bogged down in the details and end up with a complex and difficult-to-maintain automation setup.
How to avoid: take the time to plan out your automation goals and the steps you’ll need to take to achieve them before you start setting up your automation scripts.
Using too many tools:
Another common mistake is using too many tools or libraries for task automation. This can lead to a cluttered and confusing setup that is difficult to maintain.
How to avoid: Be selective about the tools you use. Only choose the ones that are absolutely necessary for your project.
Not testing and debugging:
Junior developers often forget to test and debug their automation scripts, which can lead to problems down the line.
How to avoid: Make sure to test and debug your scripts as you go to catch any issues early on.
Not paying attention to performance and security:
Task automation can have an impact on the performance and security of an application if not done correctly. Junior developers often overlook this and may cause performance issues or security vulnerabilities.
How to avoid: Pay attention to the performance and security implications of your automation scripts and make sure that they are not causing any issues.
Not using version control:
Version control systems like Git help to track changes to your automation scripts over time. Junior developers often forget to use version control, which can make it difficult to collaborate with other developers or roll back to a previous version of a script if something goes wrong.
How to avoid: Use version control to keep track of your automation scripts.
Best practices
Here are a few best practices to strive for when automating tasks in React development:
Keep it simple:
The more complex a task automation setup is, the more difficult it will be to maintain and troubleshoot. Try to keep things as simple as possible and avoid adding unnecessary steps or dependencies.
How: For example, if you find yourself manually copying and pasting files every time you want to build your React app, automate that task first.
Use established tools:
There are many task automation tools available, but not all of them are created equal. Stick with established tools that have a large user base and a strong community. These tools are more likely to be well-maintained and have good documentation.
How: For example, using a tool like webpack, which has been around for several years and has a large community of contributors, is a better choice than using a new and untested tool.
Automate repetitive tasks:
Task automation is most effective when used to automate repetitive or time-consuming tasks. Identify the tasks that you find yourself doing over and over again, and look for ways to automate them.
How: For example, you can use a tool like babel to automatically transpile your code from ES6 to ES5, which will save you time and reduce the chance of errors.
Test and debug as you go:
Task automation can be tricky to set up, so it’s important to test and debug your automation scripts as you go. This will help you catch any issues early on and make it easier to fix them.
How: For example, you can use a tool like eslint to automatically check your code for errors and issues.
Watch this quick video for tips and tricks on debugging:
Use version control:
Version control systems like Git can be used to track changes to your automation scripts over time. This makes it easier to roll back to a previous version of a script if something goes wrong. It also makes it easier to collaborate with other developers on the same project.
How: By using a version control system like Git, you can keep track of the different versions of your code and easily revert to a previous version if necessary.
Be mindful of performance and security:
Task automation can have an impact on the performance and security of your application. Be mindful of this when setting up and running your automation scripts, and make sure that your scripts are not causing any performance issues or security vulnerabilities.
How: For example, using a tool like Prettier to automatically format your code can help improve readability and maintainability. However, it’s important to use it in combination with other tools to ensure that your code is also secure and performant.
Here’s another way to ID and fix performance issues in React using React Profiler:
By following these best practices, developers ensure they are using task automation effectively and efficiently in their React development workflow.
Conclusion
Task automation is a powerful tool for streamlining your React development and is a must-have skill for any React developer. By understanding the common challenges and tasks and using the right task automation tools, you can save time and focus on what matters – creating great apps. By following these steps and examples, you can avoid common mistakes junior developers make and take your development skills to the next level. You can make your development process faster, more efficient, and more enjoyable. Happy coding!
Interesting Reads From Our Blog:
- Unlock the Power of Javascript Async Operations
- Why Mastering Coding Fundamentals Are More Valuable than Expertise in One Language
- A Beginner’s Guide to Maintaining React Applications
- Optimize Your React App: A Practical Guide to Better React Performance
- How to Present Designs to Developers: Figma Developer Handoff Guide
Related Articles
-
 React Best Practices
How to Convert Figma to React
Introduction The front-end development ecosystem is continuously evolving and new trends come and go daily. From UX prototyping tools to Web development frameworks, there is a lot of innovation happening. New tools are dropped more frequently than ever, especially in…
June 9, 2022 -
React Best Practices
Reactjs Build Production: Optimize Performance with a Deployment Build
Introduction to Reactjs Build Production For running your React.js project, there are two modes are available - development and Reactjs build production. During the development phase, we will be running our code locally using the development mode where React provides…
February 25, 2022