


- Introduction
- Prerequisites
- Importance of Typescript Interface
- How Interfaces are Compiled in Typescript
- How is an Interface Implemented in Typescript?
- How to specify optional properties in interfaces?
- How to specify Read-only properties in Typescript Interfaces?
- Indexable properties in Typescript Interface
- Using Typescript Interface in functions
- Using Typescript Interfaces in Classes
- What are the different types of variables in a class?
- How to use generics in Typescript Interfaces
- Understanding the Extends keyword and Typescript extend type
- How to make Callable Typescript Interfaces
- Conclusion
- Interesting Reads From Our Blogs
Introduction
A superset of JavaScript called TypeScript adds new functionality and useful enhancements to the language. This includes a potent static type system. By including types in your code, you can find or prevent mistakes early on and eliminate errors during compilation.
An interface is an abstract type in TypeScript that instructs the compiler on which property names a given object can have. When you define an object with properties, TypeScript automatically generates implicit interfaces. It begins by using TypeScript’s type inference capabilities to look at the object’s property name and data type.
In this article, we discuss how to create and work with Typescript interfaces to improve the functionality of your projects.
Let me introduce you to our CopyCat tool, which will help speed up your work time before we go on. Your Figma files are transformed into fully functional web and mobile apps to achieve this. Additionally, it supports your preferred technologies, such as Bootstrap, Typescript, and TailwindCSS, to mention a few. You would thank me later after clicking here.
Prerequisites
- Basic knowledge of Javascript
- Basic knowledge of Typescript
Importance of Typescript Interface
Interfaces offer a fantastic way to impose object consistency in codebases. This includes extending objects like types etc, which is helpful in various scenarios. Interfaces ensure that the right data is passed to properties, constructors, and functions in addition to ensuring consistency.
Last but not least, interfaces give an application more flexibility and looser coupling. Although they are never visible in the JavaScript that is generated, they are helpful for identifying problems as you build an application and will undoubtedly be useful for future modifications.
How Interfaces are Compiled in Typescript

Interface, as previously discussed in this article, is a structure that defines the contract in your application. Interface defines the syntax that classes must use. Classes descended from an interface must adhere to the structure specified by the interface.
The interface is not converted to JavaScript by the TypeScript compiler. The interface is used for type checking. Duck typing and structural subtyping are other terms for this process.
However, a function or an arrow function can be used to declare methods and properties in an interface, which is defined by the keyword interface.
How is an Interface Implemented in Typescript?

Using various TypeScript features, we will create interfaces in this section. We’ll also get some guidance on using the interfaces we made.
The interface keyword, the interface’s name, and a block containing the interface’s body are used to create interfaces in TypeScript. For illustration below is a Person interface:
interface Person {
    firstName: string;
    lastName: string;
}
The interface Person is a name we can now use to describe the requirement in the previous example. It still represents having a first and last name, but it’s also a type now. However we can use it in the same way we would have previously. Now TypeScript will check to see if our object meets the requirements of the interface.
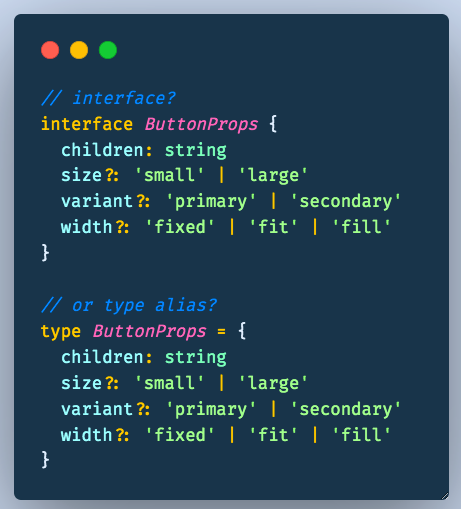
How to specify optional properties in interfaces?

Interfaces which describe function types or objects in typescript are able to have optional property type. This means that an optional property would not require typescript checking to see if the object type meets the requirements of the interface. Nonoptional properties are required in the defined object to meet the requirements of the interface.
However, to specify optional properties in interfaces, typescript has a way of understanding the difference between optional and required properties. In order to make a property optional it is required to add a `? ` at the end of the property name in the declaration.
Let us take a look at what the code illustration looks like in the following lines of code below;
interface Person {
    firstName: string; //required property
    lastName?: string; //optional property (denoted by a ?)
}
The above code block shows an interface Person, which has two properties, `firstName` and `lastName`. We can see that the property `lastName` has a ? after the declaration, this way typescript is able to understand the subtle differences that whenever the person interface is in use and the property `lastName` iseither not present or passed typescript is able to understand not to flag it as an error has it is has made optional.
How to specify Read-only properties in Typescript Interfaces?
The read-only typescript keyword makes a property in a class, interface, or type alias read-only. Prefixing a property with read-only makes it read-only. The only times we can set a value for the read-only property are during object initialization or a class constructor. A compiler fault will ensue from any additional assignments.
Let us look at the example below, in order to understand specifying read-only properties in typescript;
To proceed we would be creating a car interface and setting one of its properties to read-only, see below;
interface Car {
 fuelTank : string,
 readonly gearBox: string
}
In the example above, we have a car interface with two properties, and one of them is set to read-only (gearBox), this way a read-only property has been specified and this means that since gearBox is read-only, it is important to note the property, gearBox can only be initialized at the time of declaration or in the constructor.
However if in cases where the read-only property is initialized ahead of declaration or outside the constructor, typescripts automatically flag it as an error that would state that the property is unassignable.
Indexable properties in Typescript Interface
An interface property that may be accessed using the bracket notation (e.g., myInterface[key]) rather than the dot notation is known as an indexable property in TypeScript (e.g. myInterface.key). When defining an interface that can be used to access a collection of items using a key or index, indexable attributes are helpful.
An illustration of an indexable property in a TypeScript interface is shown here:
interface MyIndexableInterface {
  // Define the index signature, which specifies the type of the keys
  // and the type of the values that can be accessed using the bracket notation
  [key: string]: number;
}

// Create an object that implements the interface
const myIndexableObject: MyIndexableInterface = {
  key1: 1,
  key2: 2,
  key3: 3
};

// Access values using the bracket notation
const value1 = myIndexableObject["key1"];
const value2 = myIndexableObject["key2"];

console.log(value1, value2);  // Output: 1 2
The MyIndexableInterface interface in this illustration contains an index signature that specifies the kinds of keys and values that may be accessed using the bracket notation. The values are integers, while the keys are strings.
The next step is to build an interface-implementing object and assign it to the myIndexableObject constant. The bracket notation may be used to access this object’s three properties, which have the keys key1, key2, and key3, with values of 1, 2, and 3, respectively.
Finally, we use the bracket notation to retrieve the data and report them to the console.
When working with data sets that must be accessible via a key or index, such as arrays or maps, indexable attributes might be helpful. You can, however, use them to create flexible and reusable interfaces in your TypeScript code.
Using Typescript Interface in functions
Functions can utilize TypeScript interfaces to declare the types of function parameters they expect as well as the types of values they return. By doing this function delcaration, you can make that the function is called with the right kinds of inputs and that it operates as you would expect it to.
Consider a straightforward function that accepts a name and age as parameters and outputs a string with information about the user’s name and age:
function greet(person: { name: string, age: number }): string {
  return `Hello, ${person.name}! You are ${person.age} years old.`;
}
In this instance, the function anticipates an object with a number-typed age field and a string-typed name field. The type annotation on the person argument on argument specifies this. The type annotation following the ): string symbol indicates that the function’s return type is a string.
By utilizing an interface to specify the geometry of the person object, we can make this code better. As a result, the code is simpler to read and comprehend, and we can reuse the interface in other sections of our code:
interface Person {
  name: string;
  age: number;
}

function greet(person: Person): string {
  return `Hello, ${person.name}! You are ${person.age} years old.`;
}
Now, anytime we use the greet function, we know that it will anticipate an object with a string-type field for the person’s name and a number-type field for the person’s age, and it will return a string with the message about the person’s name and age.
Using Typescript Interfaces in Classes
An interface in TypeScript is a contract that specifies an object’s structure. It outlines the kinds of each of these members as well as the attributes, methods, and events that an object must possess.
You can use a certain interface as a class type if you wish to construct a class that complies with that interface. The class then has to have every member listed in the interface with the appropriate types.
A class that implements an interface might look like this:
interface Shape {
  name: string;
  width: number;
  height: number;
  area(): number;
}

class Rectangle implements Shape {
  name: string;
  width: number;
  height: number;

  constructor(name: string, width: number, height: number) {
    this.name = name;
    this.width = width;
    this.height = height;
  }

  area(): number {
    return this.width * this.height;
  }
}
In this instance, the Shape interface is implemented by the Rectangle class. This means that all of the members specified in the Shape interface, with the appropriate types, must be present in the Rectangle class. In this instance, the Rectangle class has a name property with a text data type, a width property with a number data type, a height property with a number data type, and an area() function with a number return value.
The Rectangle class is ensured to have the right structure and behavior by adhering to the Shape interface. Because of this, you may use instances of the Rectangle class wherever a Shape is expected, without having to worry about the object’s members.
Several Interfaces Example
A class in TypeScript can implement several interfaces. When you want a class to behave like several related interfaces, this is helpful. Here’s an illustration:
interface Shape {
  name: string;
  width: number;
  height: number;
  area(): number;
}

interface Solid {
  volume(): number;
}

class Cube implements Shape, Solid {
  name: string;
  width: number;
  height: number;

  constructor(name: string, width: number) {
    this.name = name;
    this.width = this.height = width;
  }

  area(): number {
    return this.width * this.height;
  }

  volume(): number {
    return this.width * this.height * this.width;
  }
}
In this illustration, the Shape and Solid interfaces are both implemented by the Cube class. It must thus contain all of the elements specified in both interfaces, together with the appropriate types. The Cube class in this instance has a number-type width and height property, a number-type area() method, and a number-type volume() function in addition to a string-type name property.
The Cube class is more versatile and reusable since it implements several interfaces, allowing it to be used in any situation where a Shape or a Solid is anticipated.
What are the different types of variables in a class?
Three types of variables may be specified in a class in TypeScript:
- Instance variables
- Static variables
- Local variables
Instance Variables
A variable that is defined directly within a class, outside of any method or constructor, is known as an instance variable. These variables are associated with a class instance, and every instance of a class will have a different collection of instance variables. The “this” keyword, which designates the active instance of the class, is used to access instance variables.
Static Variables
The static keyword is used to declare variables that are static. These variables are part of the class as a whole, not a specific class instance. This indicates that a static variable is only used once and is shared by all instances of the class. The class name is used to access static variables, followed by the dot (.) operator.
Local Variables
Variables that are defined inside a function or constructor are referred to as local variables. These variables are solely accessible within the method or constructor in which they are defined, and they cannot be accessed from elsewhere. The keyword “this” is not prefixed to local variables.
The declaration and usage of each of these kinds of variables in a class are demonstrated by the following example:
class Counter {
  // instance variable
  count: number;

  // static variable
  static instances: number = 0;

  constructor() {
    // local variable
    let message: string = "Creating instance";

    // increment static variable
    Counter.instances++;

    // initialize instance variable
    this.count = 0;

    // access local variable
    console.log(message);
  }

  increment(): void {
    // increment instance variable
    this.count++;

    // access static variable
    console.log(`Count: ${this.count} of ${Counter.instances} instances.`);
  }
}
In this illustration, the Counter class includes three variables: a static variable named instances, a local variable called message, and an instance variable called count. In the class constructor, the instances variable and the count variable are both initialized and increased. The count variable is increased by one using the increment() method, which also prints the instances and count variables.
Every instance of the Counter class that is created has a distinct count variable of its own, but they all share an instances variable. This enables you to keep track of both the number of instances of the class that have been generated and their current states.
How to use generics in Typescript Interfaces
In this illustration, the Shape interface is extended by the Solid interface, which the Cube class implements. Therefore, the Cube class Generics is a technique to build reusable TypeScript components that can interact with various kinds. This makes it possible to develop adaptable, type-safe code that can deal with a variety of inputs without repeatedly using the same logic.
In TypeScript, interfaces are a potent tool that may be used to constrain objects to a certain structure. You may make interfaces even more adaptable and reusable by including generics in them.
Here is an illustration of a generic interface:
interface Collection<T> {
  items: T[];

  add(item: T): void;
  remove(item: T): void;
  get(index: number): T;
}
In this illustration, the Collection interface specifies a generic type T that designates the nature of the collection’s contents. The add(), remove(), and get() methods all accept and return values of type T, and the items property is an array of type T.
The Collection interface may be used with any type since it makes use of a generic type. You may use it to make a collection of items of any kind, a collection of strings, a collection of integers, etc. Here’s how you may make a collection of strings using the Collection interface:
class StringCollection implements Collection<string> {
  items: string[];

  constructor() {
    this.items = [];
  }

  add(item: string): void {
    this.items.push(item);
  }

  remove(item: string): void {
    this.items = this.items.filter((i) => i !== item);
  }

  get(index: number): string {
    return this.items[index];
  }
}
The StringCollection class in this illustration implements the Collection interface by substituting a string type for the generic type T. Accordingly, the add(), delete(), and get() methods all take and return strings, and the items field is an array of strings.
You may use the Collection interface to construct collections of any kind since it is general. As a result, you may create reusable, adaptable code that can work with a variety of input formats without repeatedly using the same logic.
Understanding the Extends keyword and Typescript extend type
You may extend one interface from another with TypeScript. By doing so, you may design a new interface that has all the components of the old interface in addition to new ones.
Here is an illustration of an interface extension:
interface Shape {
name: string;
width: number;
height: number;
area(): number;
}
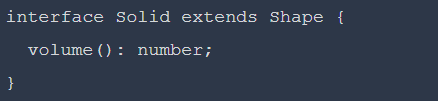
interface Solid extends Shape {
volume(): number;
}
In this illustration, the Shape interface is extended by the Solid interface. As a result, the Solid interface has a volume() function in addition to all of the Shape interface’s elements.
A class must contain each of the Shape and Solid interface components in order to implement the Solid interface. Accordingly, the class must contain a name property that can take a string value, a width property, a height property, a method called area() that returns a number, and a method called volume() that likewise produces a number.
Using the Solid interface as an example, consider the following class:
class Cube implements Solid {
  name: string;
  width: number;
  height: number;

  constructor(name: string, width: number) {
    this.name = name;
    this.width = this.height = width;
  }

  area(): number {
    return this.width * this.height;
  }

  volume(): number {
    return this.width * this.height * this.width;
  }
}
In this illustration, the Shape interface is extended by the Solid interface, which the Cube class implements. As a result, the Cube class has to have all of the appropriate types for each member of the Shape and Solid interfaces. The Cube class has a name property with a text data type, a width property, a height property with a number data type, an area() function with a number return value, and a volume() method with a number return value.
You may make new interfaces that are more specialized and cater to your needs by expanding an existing interface. As a result, you can develop more adaptable and versatile code without having to reuse the same logic over. You can also extend multiple interfaces when they are separated by commas.
How to make Callable Typescript Interfaces
You may combine the function and interface type in TypeScript to produce a callable interface. Here’s an illustration:
interface MyCallableInterface {
  // Define the signature of the function
  (arg1: string, arg2: number): boolean;
}

// Implement the interface using a function type
const myCallableFn: MyCallableInterface = (arg1, arg2) => {
  // Perform some operations with the arguments
  // and return a boolean value
  return arg1.length > arg2;
}

// Use the callable function
const result = myCallableFn("hello", 3);
console.log(result);  // Output: true
In this example, we design an interface with a single function signature named MyCallableInterface. The arguments and return type of the function that will implement the interface are defined by this signature.
The interface is then put into use by declaring a constant with the name myCallableFn and the type MyCallableInterface. The implementation of the function, which accepts two parameters and returns a boolean value, is defined using a fat arrow function.
The function is then called, and the output is printed to the console.
It should be noted that callable interfaces are a convention that is frequently used to build callable types rather than a feature that is built into TypeScript. This approach may be used to generate callable types in your TypeScript code for your own needs.
Conclusion
In the course of this article, we have gone through how to work with typescript interfaces, their importance, how interfaces are compiled, how interfaces are implemented, specifying optional and read-only properties, using interfaces in typescript, and many more.
With this guide and knowledge, you would able to work with interfaces in typescript smoothly and professionally in order to build more stable and smooth working applications.
Want to create React UI more quickly? Your Figma creations may be quickly turned into useful React components using our service at CopyCat. Your time would be saved, allowing you to concentrate on developing capabilities like using the forEach loop to display data from an API.
Interesting Reads From Our Blogs
- All You Need to Know About TypeScript Types
- What to Read When Using Typescript In Your React App
- 10 CSS Frameworks for Frontend Developers in 2022
- Your Introductory Guide to React Intl
- The Top 16 Design System Examples
Check out these youtube videos;
Interface in Typescript
TypeScript Tutorial #15 – Interfaces
Related Articles
-
 React.js
Complete Guide to Bootstrap Tabs in ReactJS
Introduction Bootstrap tabs are a popular component of the popular open-source front-end development toolkit, Bootstrap. It provides a way to create navigation elements on a web page quickly. This article will discuss how to use Bootstrap tabs to create navigation…
December 20, 2022 -
React.js
How to Create React 3D Animation with three.js and react-three-fiber Library
3D animation is one of many ways that frontend development has evolved over time. They boost user interaction with your website and make it appear as if you're engaging with real-world objects. This article will go through how to utilize…
August 13, 2022


