- Introduction
- What is Bootstrap?
- Bootstrap Forms
- Rules for Using BootStrap Forms
- Bootstrap Form Layouts
- Bootstrap: Responsive Form Layout
- Bootstrap: Static Form Control
- Bootstrap: Adding Help Text to Form Controls
- Bootstrap: Disabling Form Controls
- Bootstrap: Making Inputs Read-only
- Bootstrap: Sizing Form Controls
- Conclusion
Introduction
Bootstrap is not foreign regarding better and easier styling alternatives to CSS.
The tool, initially named Twitter Blueprint, was created at Twitter by Mark Otto and Jacob Thornton as a framework to promote uniformity across internal products. Officially made open-source in 2011, it soon became the favorite amongst many other styling solutions for front-end developers. With its latest version, Bootstrap 5, released on June 16, 2020, Bootstrap has remained the first-choice styling framework amongst its competitors.
This article discusses forms in Bootstrap and how to integrate them into our frontend applications especially React.
However, before we continue, I’d like to introduce you to a cool plugin for your React projects. Copycat cuts down your development time by almost 35% by converting your Figma files to up-and-running React projects! Not only that, but it also has support for your favorite tools like Typescript, Bootstrap, and TailwindCSS, amongst others! Check it out here!
Moving on, we can start by defining Bootstrap.
What is Bootstrap?
Bootstrap is an open-source, template-based, front-end styling framework that can be used to create websites as well as single-page and dynamic web applications. It includes JavaScript extensions, custom components, and design templates built on HTML and CSS for everything from typography to forms, buttons, navigation, and other interface elements.
It is a quicker and simpler method of developing cross-compatible and mobile-friendly sites and features pre-defined classes that simplify a developer’s task.
Bootstrap Forms
HTML forms are an essential component of web pages and apps, but manually building form layouts or customizing form controls one by one with CSS is sometimes monotonous and time-consuming.
However, through a preset collection of classes, Bootstrap significantly streamlines the process of styling and aligning form components like labels, select boxes, input fields, text areas, buttons, etc.
When added to regular form elements, these classes remove the need for CSS alignment by automatically applying predefined styles to them while still leaving the form fully customizable.
Bootstrap can be used to build all imaginable forms, from very simple contact forms to more complex ones.
For a video introduction to Bootstrap forms, check out this video: https://www.youtube.com/watch?v=dKVX22GR7zQ
Rules for Using BootStrap Forms
When Bootstrap Forms, it’s important to take note of the usage guidelines. A few of them are as follows;
- Always use <form role=”form”> (This improves accessibility for people using screen readers)
- Always wrap labels and form controls in <div class=”form-group”> (ensures optimum spacing as well as accessibility)
- Add class .form-control to all textual <input>, <textarea> elements, and .form-select to <select> elements
- When associating text with form controls, apply the .form-text class to the element( i.e. a div for block text or a span for inline text)
Bootstrap Form Layouts
Bootstrap provides three basic form layout options, namely;
- Vertical Form (Bootstrap’s default form layout)
- Horizontal Form
- Inline Form
Bootstrap: Vertical/Stacked Forms
Boostrap form elements, by default, stack vertically.
To construct vertical form layouts, all you need is the margin utility classes, the .form-control class to apply form control styles to your input fields, and the form-group classes to group elements together.
Here is an illustration of a vertical form;
export default function App() {
  return (
    <div className="App">
  <form role="form">
    <div class="form-group">
      <label for="email">Email:</label>
      <input type="email" class="form-control" id="email" placeholder="Enter email" name="email" />
    </div>
    <div class="form-group">
      <label for="pwd">Password:</label>
      <input type="password" class="form-control" id="pwd" placeholder="Enter password" name="pwd" />
    </div>
    <div class="checkbox">
      <label><input type="checkbox" name="remember" /> Remember me</label>
    </div>
    <button type="submit" class="btn btn-default btn-primary">Submit</button>
  </form>
    </div>
  );
}
The output of the above should look something like this;

Now that we’ve created our first vertical form, it’s important to note a few things;
- The .form-control class applies a width of 100% to each input element, making them take up the entire width of the screen or parent element.
- The .form-group class groups a text input or form-control and its label.
- The checkbox is not a form control. Hence, its div is assigned a regular class name.
Here’s a video that discusses this in detail: https://www.youtube.com/watch?v=K-ccGZYRWzs
Bootstrap: Horizontal Forms
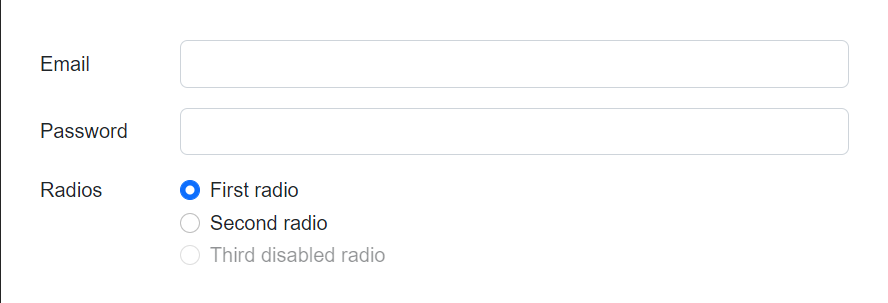
Using the Bootstrap grid classes, you can easily assign specific column classes to design horizontal form layouts with labels and form controls placed side by side rather than on top of each other like in the vertical form. Add the class .row to form groups to create a horizontal form layout, and use the grid classes .col-*-* to set the width of your labels and controls.
Additionally, make sure the <label> elements have the class .col-form-label applied so that they are vertically centred with the related form controls.
To add more or less space to your horizontal forms, the Bootstrap docs recommend sticking to margin-bottom utilities, i.e., space your elements by adding margin bottoms rather than margin-top, padding-top, etc.
Let’s look at an illustration of a horizontal form:
export default function App() {
  return (
    <div className="App">
    <form>
  <div class="row mb-3">
    <label for="inputEmail3" class="col-sm-2 col-form-label">Email</label>
    <div class="col-sm-10">
      <input type="email" class="form-control" id="inputEmail3" />
    </div>
  </div>
  <div class="row mb-3">
    <label for="inputPassword3" class="col-sm-2 col-form-label">Password</label>
    <div class="col-sm-10">
      <input type="password" class="form-control" id="inputPassword3" />
    </div>
  </div>
  <fieldset class="row mb-3">
    <legend class="col-form-label col-sm-2 pt-0">Radios</legend>
    <div class="col-sm-10">
      <div class="form-check">
        <input class="form-check-input" type="radio" name="gridRadios" id="gridRadios1" value="option1" checked />
        <label class="form-check-label" for="gridRadios1">
          First radio
        </label>
      </div>
      <div class="form-check">
        <input class="form-check-input" type="radio" name="gridRadios" id="gridRadios2" value="option2" />
        <label class="form-check-label" for="gridRadios2">
          Second radio
        </label>
      </div>
      <div class="form-check disabled">
        <input class="form-check-input" type="radio" name="gridRadios" id="gridRadios3" value="option3" disabled />
        <label class="form-check-label" for="gridRadios3">
          Third disabled radio
        </label>
      </div>
    </div>
  </fieldset>
  </ form>
    </div>
  );
}
And now, our form should look like this;

Note: Labels are very important when building forms using Bootstrap for accessibility reasons. Without a label, screen readers can’t make sense of your form. But in cases where you do not want a label, you can hide them using the .visually-hidden-focusable class (for Bootstrap 5) or the .sr-only class for older versions. Also, take note that each label element has the .form-label class added to it to guarantee proper padding.
It’s important to take note of the column sizes assigned to each element of a row via column sizing utilities like col-sm-2 and col-sm-10, the disabled attribute which allows us to disable a form and can be used in form validation, as well as the spacing provided by the mb-# helper classes.
Checkboxes also have different markups. The form-check-input and form-check-label applied to the radio and its label allow us to style a checkbox or radio based on its checked element or state.
You can read more on this here.
Bootstrap: Inline Forms
All elements in Bootstrap Inline forms are inline, positioned to the left, and have their labels next to them. In Bootstrap 5, inline layouts are achieved by using a grid system using Bootstrap grid classes, .row and .col, to structure the form in rows and columns like in a grid system or when using the flexbox utility.
The classes allow each input to take up the available width equally.
Consider the following inline form example:
export default function App() {
  return (
    <div className="App">
    <h2>Inline form Example</h2>
    <form>
  <div class="row">
    <div class="col">
      <input type="text" class="form-control" placeholder="Enter email" name="email" />
    </div>
    <div class="col">
      <input type="password" class="form-control" placeholder="Enter password" name="pwd" />
    </div>
  </div>
</form>
    </div>
  );
}
When we run the code above, our form should look like this;

Bootstrap: Responsive Form Layout
Additionally, you can make your forms responsive by utilizing grid classes with certain breakpoints.
The form created by the following example will display inline on medium-sized screens and above (viewport width equal to or greater than 768 pixels), but it will stack vertically on smaller viewports.
<form>
    <div class="row align-items-center g-3">
        <div class="col-md-auto col-12">
            <label class="form-label d-md-none" for="inputEmail">Email</label>
            <input type="email" class="form-control" id="inputEmail" placeholder="Email">
        </div>
        <div class="col-md-auto col-12">
            <label class="form-label d-md-none" for="inputPassword">Password</label>
            <input type="password" class="form-control" id="inputPassword" placeholder="Password">
        </div>
        <div class="col-md-auto col-12">
            <div class="form-check">
                <input class="form-check-input" type="checkbox" id="checkRemember">
                <label class="form-check-label" for="checkRemember">Remember me</label>
            </div>
        </div>
        <div class="col-md-auto col-12">
            <button type="submit" class="btn btn-primary">Sign in</button>
        </div>
    </div>
</form>
Below is a video representation of the output of the above code;
You can also find a live representation here:
Bootstrap: Static Form Control
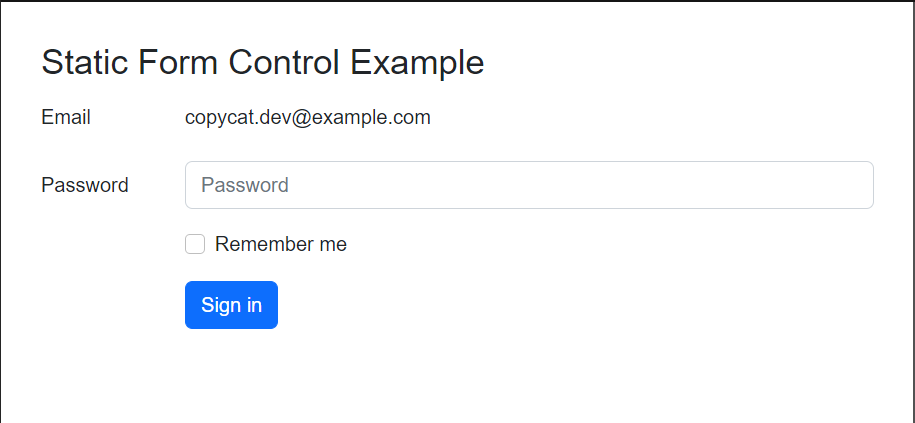
In certain cases, you might choose to show a value in plain text next to a form label rather than a functioning form control. Simply add the attribute read-only and swap out the class .form-control for .form-control-plaintext to do this.
The .form-control-plaintext class keeps the proper margin and padding while removing the form field’s default style.
Let’s look at an illustration:
export default function App() {
  return (
    <div className="App">
      <h2>Static Form Control Example</h2>
      <form>
    <div class="row mb-3">
        <label for="inputEmail" class="col-sm-2 col-form-label">Email</label>
        <div class="col-sm-10">
            <input type="email" readonly class="form-control-plaintext" id="inputEmail" value="copycat.dev@example.com" />
        </div>
    </div>
    <div class="row mb-3">
        <label for="inputPassword" class="col-sm-2 col-form-label">Password</label>
        <div class="col-sm-10">
            <input type="password" class="form-control" id="inputPassword" placeholder="Password" />
        </div>
    </div>
    <div class="row mb-3">
        <div class="col-sm-10 offset-sm-2">
            <div class="form-check">
                    <input class="form-check-input" type="checkbox" id="checkRemember" />
                    <label class="form-check-label" for="checkRemember">Remember me</label>
            </div>
        </div>
    </div>
    <div class="row">
        <div class="col-sm-10 offset-sm-2">
            <button type="submit" class="btn btn-primary">Sign in</button>
        </div>
    </div>
</form>
    </div>
  );
}
The output of the above code is as below;

Bootstrap: Adding Help Text to Form Controls
Placing help text for form controls in an effective manner to aid users in entering the proper data in a form. Using the class .form-text, you may add block-level help text for a form control. The block help text is normally placed at the bottom of the control.
Here’s an illustration:
export default function App() {
  return (
    <div className="App">
      <h2>Help Text Example</h2>
      <label class="form-label" for="inputPassword">Password</label>
      <input type="password" class="form-control" id="inputPassword" />
      <div class="form-text">
          Must be 8-20 characters long, contain letters, numbers and special characters, but must not contain spaces.
      </div>
    </div>
  );
}
The following is the outcome of the code above:

The <small> element can also be used to insert inline help text. In this situation, however, .form-text is not necessary.
The following example demonstrates how to do this:
<div class="row align-items-center g-3">
    <div class="col-auto">
        <label class="col-form-label" for="inputPassword">Password</label>
    </div>
    <div class="col-auto">
        <input type="password" class="form-control" id="inputPassword">
    </div>
    <div class="col-auto">
        <span class="form-text">Must be 8-20 characters long.</span>
    </div>
</div>
The outcome of the code above looks like this;

Bootstrap: Disabling Form Controls
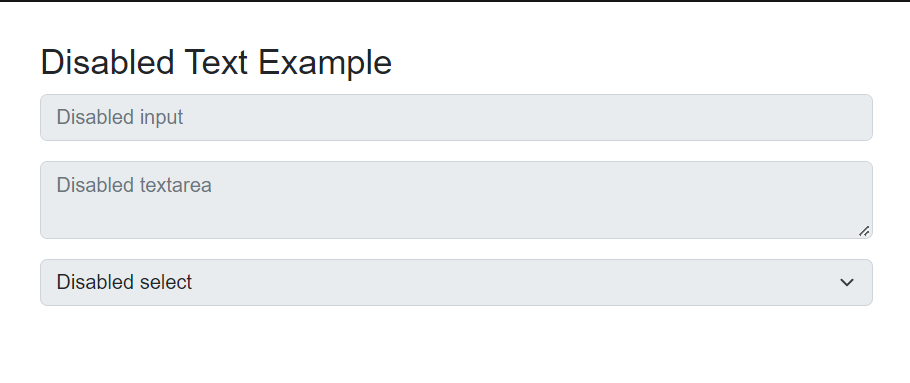
To deactivate specific form controls, simply add the disabled property to them, and Bootstrap will take care of the rest.
Here’s an illustration:
export default function App() {
  return (
    <div className="App">
      <h2>Help Text Example</h2>
      <input type="text" class="form-control mb-3" placeholder="Disabled input" disabled />
      <textarea class="form-control mb-3" placeholder="Disabled textarea" disabled></textarea>
      <select class="form-select" disabled>
          <option>Disabled select</option>
      </select>
    </div>
  );
}
The output of the above should look like this;

Bootstrap: Making Inputs Read-only
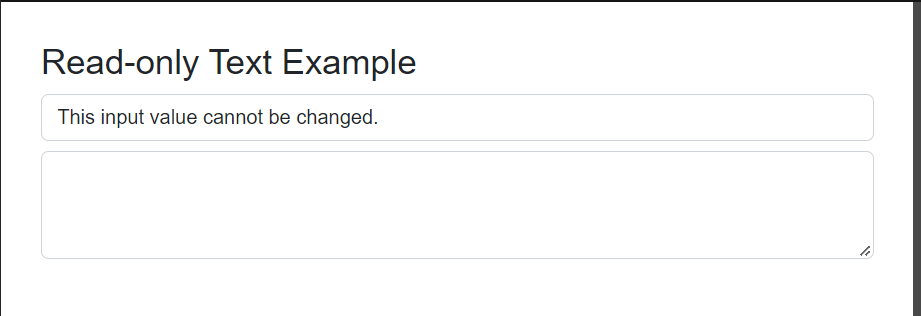
To make input or text-area’s value uneditable or read-only, Bootstrap provides the read-only boolean property. Like disabled inputs, read-only inputs have a lighter background but still use the regular text cursor.
Check out the example below to see how it works:
export default function App() {
  return (
    <div className="App">
      <h2>Read-only Text Example</h2>
      <input type="text" class="form-control mb-2" value="This input value cannot be changed." readonly />
      <textarea rows="3" class="form-control" readonly>This textarea value cannot be changed.</textarea>
    </div>
  );
}
The above code outputs two form controls whose values are uneditable.

Bootstrap: Sizing Form Controls
The Bootstrap 5 version employs a form control class of the appropriate size to size a form control. Because of this, we can style input items in large, regular, and small sizes. The form control size is used based on the user interface and design. The element’s default size or medium size is used by the “.form-control” class. The classes “form-control-lg” and “form-control-sm,” respectively, are used for large and small components.
So a large input form control syntax would be;
<input type="text" class="form-control form-control-lg" placeholder="Large input">
A normal input form control;
<input type="text" class="form-control" placeholder="Regular input">
…..and finally, a small input.
<input type="text" class="form-control form-control-sm" placeholder="Small input">
Below is an image representation of all form control sizes;

Bootstrap: Column Sizing of Form Controls
Additionally, you may adjust the size of your text fields, checkboxes, and input fields to match the Bootstrap grid column widths. To do this, simply put your form controls in grid columns.
To see how it essentially operates, let’s use the example below:
export default function App() {
  return (
    <div className="App">
      <h2>Column Sizing Example</h2>
      <div class=" form-group row g-3">
    <div class="col-6">
        <input type="text" class="form-control" placeholder="City" />
    </div>
    <div class="col-4">
        <select class="form-select">
            <option>State</option>
        </select>
    </div>
    <div class="col-2">
        <input type="text" class="form-control" placeholder="Zip" />
    </div>
</div>
    </div>
  );
}
From the code above, we have assigned column sizes of six, four, and two to the city, state, and ZIP form controls, respectively, as well as a .gap-3 class to their parent div. That way, all form controls occupy the corresponding columns while maintaining the assigned gap spacing between them.
Below is an image representation of this;

Conclusion
Bootstrap offers solid solutions to numerous styling and markup problems, and Bootstrap Forms are one of these solutions. These form classes allow us to style, validate and optimize our applications for accessibility in one go. The large community backing also makes it possible to find ready-made templates for use as well as resources to support beginners.
We at CopyCat have a robust collection of easy-to-grasp React and Bootstrap articles to aid your development.
A few of them are;
- Most Accessible Guide To Using React Bootstrap Button
- A Beginner’s Guide to React’s useEffect Hook
- Reactjs Bootstrap: How To Use Bootstrap In React.js?
Check them all out here.


